This guide is for those who want to update their device manually by flashing the OTA ZIP using ADB sideload or Stock Recovery. Manual installation helps to upgrade any Android device instantly, provided you have the OTA ZIP file on hand.

Generally, every OEM releases their software updates via OTA (Over-the-air). But in some cases, OTA may be unable to reach in every region on the same day of roll out. It may be due to different carriers, and that’s why you may get the OTA notification a bit late. But for the Android enthusiast, who can’t wait for an update can use this guide and manually install OTA using the tutorials given below!
Regular software updates are an integral part of the Android irrespective of the device manufacturer. Every OEM pushes their full or incremental updates via OTA which is commonly called “OTA updates.” An OTA update may be a complete software package, major system upgrade or just the latest security patches. The whole system for upgrading Android phones and tablets are entirely automated. You need the least effort to update any device using OTA. Even an OTA can be downloaded in the background and install later on while rebooting.
However, as mentioned earlier, an OTA may not be available for all the devices at once. Factors like mobile carrier and geographical region may restrict the roll out on time, and hence, a delay can be expected. In such cases, you can manually upgrade your Android device using ADB Sideload and stock recovery. But keep in mind that, you need to have update.zip file on hand to proceed to the manual update.
Luckily, we have several developer forums like XDA, Android Central, OnePlus and other device based forums. Some expert users who already receive the update, tend to capture the OTA zip and share in those forums. Even sometimes, the company themselves use to share the OTA link in their device specific discussion forums.
So, if you have the OTA package, you can take this community benefit and update your device instantly using the guide given below!
Requirements
The primary requirement for manually updating the Android phone is the OTA package. Make sure to download it correctly. You may find the update.zip file in the XDA Developer forum (mostly) or may be in device specific forums such as ASUS ZenTalk, Meizu Forum, etc.
Once you are sure that you had the correct firmware file on hand, you can proceed to the tutorial and update your Android device manually using any of the suitable methods given underneath.
Notice: Sideloading OTA updates do not require an unlocked bootloader. Also, this process won’t wipe out your device. Therefore, you don’t need to worry about your important files and data. Everything will be intact even in a significant system upgrade.
Moreover, if your device is rooted using Magisk or SuperSU, or if you did any system modification on your phone, this tutorial may fail. So, before proceeding to the tutorial, make sure that your device is in the stock position.
If you are sure that your device fulfills all the requirements mentioned above, read ahead to start the tutorial.
To remember
- Make sure your phone has at least 80 – 85% charge. If not, please do charge it before starting the experiment.
- You need to enable USB Debugging mode to connect your Android phone to computer. (Settings > About Phone > Build number > Tap it 7 times to become developer; Settings > Developer Options > USB Debugging).
- You must install Android SDK tool on your computer.
- Install Android USB driver on your computer.
Method #1: Apply update from ADB (Install OTA update using ADB Sideload)
This method uses ADB Sideload command to install OTA ZIP on any Android device manually. But you need to have a computer on hand along with a USB cable (preferably the one provided by the OEM along with your phone box).
But in order to install OTA using Apply update from ADB option, you must have ADB and fastboot tool installed on your PC. If not, please do that first and get back to this tutorial.
Tutorial: Apply update from ADB
- Download the OTA ZIP package for your Android device.
- Install ADB and Fastboot driver (Ignore if already done).
- Copy/Paste the downloaded OTA package to your ADB directory [C:\adb].
- Use the button combination of your device to enter the recovery mode. If you are not sure about your phone’s button combination, you can use fastboot command to enter recovery mode. How? Check the next steps.
- Connect your phone to the computer using compatible USB cable (preferably, the official one, provided by OEM with the phone box).
- Check your phone’s screen. If it asks you to allow USB debugging, just accept it by selecting the OK/Yes option.
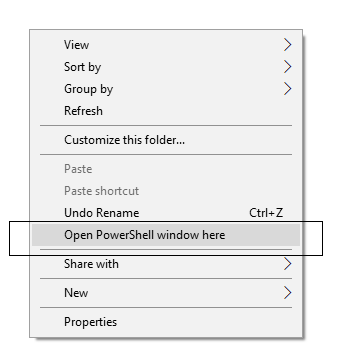
- Open Command Prompt on the same directory as the folder with ADB files. (Press the SHIFT key and right-click on an empty space. Select “Open PowerShell window here” or “Open command window here” from the pop-up menu.)

- Now, boot your device into the recovery mode using the following command:
adb reboot recovery
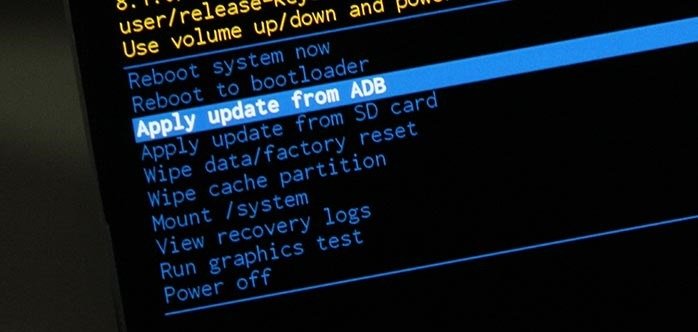
- On your device, select ‘Apply update from ADB.’

- Type the following code on your Command Window and HIT enter:
adb sideload ota-update<file-name>.zip - Your OTA installation should start now!
- Once the installation is completed, select “reboot system now” option from the recovery menu.
Wait a while, and your phone may take up to 10 minutes to boot for the first time.
This is the best method and works almost on every Android smartphone, provided you have the correct update.zip firmware file.
Method #2: Apply update from SD card (Install OTA update using Stock Recovery)
In this method, you can install the OTA ZIP file without using the computer / ADB commands. So, all you need to do is with the button combinations on your stock recovery. Check out the tutorial below:
Tutorial: Apply update from SD card
- Download the OTA ZIP packages from any valid source on your computer.
- Next, connect your phone to the computer using a compatible USB cable (preferably, the official one, provided by OEM with the phone box).
- Transfer the OTA package to your phone’s internal storage (root, not inside any folder).
- Switch OFF your phone.
- Enter the recovery mode using the particular button combination of your phone. If you don’t know about physical button combination, you can alternately use the following command to enter recovery mode:
adb reboot recovery
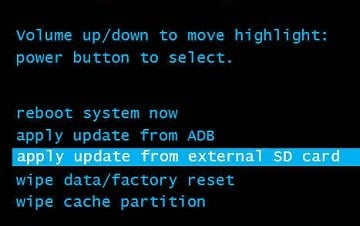
- Using the Volume rockers, choose Apply update from SD card and select it by hitting the Power button.

- Navigate to the OTA ZIP file that you had pasted in your internal storage in step #3.
- Finally hit the Power button to confirm the installation of OTA update.
- Once the installation process is finished, select Reboot system now.
And you are done!!
So you are done with this tutorial! You had successfully installed Android OTA on your phone using our guide. If you faced any problem with performing this tutorial, please let us know by dropping a comment below. Our team will reply you back as soon as possible.


