If you are a Google Pixel fan, you might be interested in unlocking the bootloader of your Pixel 8 or Pixel 8A device. Unlocking the bootloader allows you to flash custom ROMs, root your device, install mods, and customize your software. However, unlocking the bootloader also comes with some risks, such as voiding your warranty, losing your data, and exposing your device to security threats. Therefore, you should only proceed if you know what you are doing and are willing to accept the consequences.
Like all other Google phones, the Pixel 8/8A/ 8 Pro also comes with a locked bootloader. However, the Original Equipment Manufacturer (OEM) has provided a straightforward mechanism to unlock the device. This process involves using fastboot commands, which are a series of instructions that interact directly with the device’s bootloader. This allows users to make modifications while maintaining the security of their device.
The tutorial below will walk you through the comprehensive steps necessary to safely unlock the bootloader on the Google Pixel 8/8A. However, before we delve into the tutorial, let’s explore the advantages of unlocking a bootloader on any Android phone. Understanding these benefits will provide a clearer picture of why this process is often undertaken by Android users. Let’s get started!
The bootloader of your Pixel 8/8A is an integral part of the core Android system. It initiates the kernel and is responsible for booting up your device. In addition to this, it also safeguards the device by ensuring integrity through the verification of the boot and recovery partitions.
Benefits of Unlocking Bootloader
Unlocking the bootloader of an Android device opens up a world of possibilities for Android enthusiasts or super users. It’s indeed the first step to perform for those who love to use root apps from the Play Store. Here are some key benefits of unlocking the bootloader:
- Custom ROMs: Unlocking the bootloader allows you to install custom ROMs on your device. These ROMs can offer features not found in the stock version of Android and can even improve device performance.
- Root Access: With an unlocked bootloader, you can gain root access to your device. This gives you full control over your device, allowing you to make changes to the system files, overclock your CPU, and more.
- Latest Updates: Sometimes, manufacturers stop providing updates for older devices. With an unlocked bootloader, you can install the latest Android updates by flashing them manually.
- Install Recovery: An unlocked bootloader allows you to install a custom recovery like TWRP. This can be used to flash custom ROMs, root packages, and perform full backups of your device.
- Remove Bloatware: With root access, you can remove pre-installed apps and bloatware from your device, freeing up storage space and potentially improving device performance.
Remember, while unlocking the bootloader has many benefits, it also comes with risks such as voiding your warranty or bricking your device if not done correctly. Always proceed with caution and make sure you understand the process and the risks involved.
Google has indeed provided a straightforward mechanism to unlock the bootloader using fastboot commands. However, before we proceed to the tutorial, it’s crucial to ensure that all pre-requisites are met. This preparation is key to a successful and smooth process. Please review the pre-requisites below carefully and ensure they are fulfilled before moving on to the tutorial.
Warning: All custom ROMs, Official Firmware, How-to guides, tutorials, roots, hacks, and tricks featured on our site are the intellectual property of their respective developers. We hold no responsibility for any issues that may arise with your device as a result of following these guides. Please proceed with these actions at your own discretion and risk.
Backup your device first
Unlocking the bootloader on Pixel 8/8A will indeed erase all data from your phone. This includes SMS, photos, apps, videos, games, contacts, and everything else stored in your internal storage. Therefore, it’s essential to back up all your data before proceeding with the tutorial.
There are numerous backup applications available that can assist you in this process. Once you’ve ensured that all your data is safely backed up, you can proceed to the tutorial below to unlock the bootloader on your Pixel 8/8A using fastboot commands. Remember, this process is irreversible, so it’s important to be certain before you proceed.
Tips: Before proceeding with the bootloader unlocking process, ensure that you’ve copied all backup files from your phone to your computer. This is because the internal memory of your device will be wiped clean during the unlocking process. By backing up your files, you ensure that no data is lost. Once you’ve securely backed up all your data, you can proceed with the unlocking process. Remember, data loss is irreversible.
If you’re a developer and wish to unlock the bootloader, it’s recommended to do so before setting up the Google Play Store, installing apps, or performing any other actions on your device. This is because the security feature in Android wipes out all data from your phone when the bootloader is unlocked. By unlocking the bootloader first, you can avoid losing any data or settings that were added after the initial setup.
Pre-requisites
Before you begin the process of unlocking the bootloader on your Pixel 8/8A, please ensure the following:
- Charge Your Phone: Ensure your phone has at least 80 – 85% charge. If not, please charge it before starting the procedure.
- Enable USB Debugging: To connect your Android phone to your computer, you need to enable USB Debugging mode. Here’s how you can do it:
- Go to
Settings > About Phone > Build number - Tap on
Build number7 times to activate Developer mode - Then go to
Settings > Developer Options - Enable
USB Debugging
- Go to
- Enable OEM Unlock: This can be done by going to
Settings > Developer optionsand enablingOEM unlock. - Install Android SDK Tool: You must have the Android SDK tool installed on your computer. This tool provides the necessary utilities for communicating with your Android device.
Please ensure all these pre-requisites are met before proceeding with the tutorial. This will help ensure a smooth and successful process.
Google Pixel USB Drivers
To connect your Android phone with your computer, it’s essential to have the appropriate USB drivers installed. For the Google Pixel 8/8A, please ensure that you have the correct USB drivers installed. If not, you can download the latest official drivers from our Android USB Drivers section using the link provided below:
Now that you’re all set and ready, let’s proceed with the tutorial to unlock the bootloader of your Google Pixel 8/8A using fastboot commands. Remember, each step is crucial for the successful unlocking of your bootloader. Proceed with caution and ensure you follow each step accurately. Let’s get started!
How to Unlock Bootloader on Pixel 8/8A using Fastboot
We’ve compiled a comprehensive, step-by-step guide on how to unlock the bootloader on the Pixel 8/8A. If you’re familiar with unlocking bootloaders on any previous Pixel devices, this process should be similar.
Please read each line carefully and ensure that you understand the entire tutorial before actually performing it on your Android device.
Important points to remember
- This bootloader unlocking tutorial is specifically designed for the Pixel 8/8A. Please refrain from trying this on any other variants of the phone.
- While this tutorial has been performed on Windows, those familiar with Fastboot on Mac or Linux can also follow these steps.
- It’s crucial to back up all your data on your phone before proceeding, as the unlocking process will erase all data.
- Please be aware that unlocking the bootloader may void your warranty.
Remember, each step is crucial for the successful unlocking of your bootloader. Proceed with caution and ensure you follow each step accurately.
Requirements
- Google Pixel 8 or Pixel 8A
- USB cable
- Android SDK with drivers
Tutorial (step-by-step)
- You need to download the Android SDK Platform Tools package, which includes ADB and Fastboot. Once downloaded, proceed with the installation on your computer. This will equip your system with the necessary tools for Android development and modification.
- Navigate to the
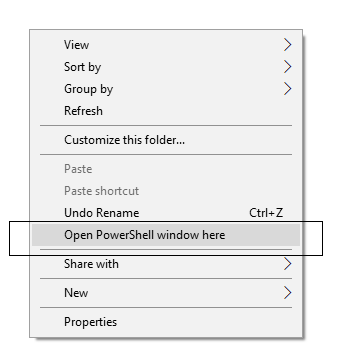
C:\adbdirectory on your computer where the ADB and Fastboot binaries are located. This is the folder where you’ll be executing your commands. - While inside the folder, press and hold the SHIFT key. Then, right-click on an empty space. This action usually opens up additional options.
- You should choose the option that says ‘Open PowerShell window here’. This will launch the PowerShell interface in the context of the current folder, allowing you to execute commands directly.
- Proceed by connecting your phone to your PC using a USB cable. This will establish a link between your device and the computer, enabling data transfer and command execution.
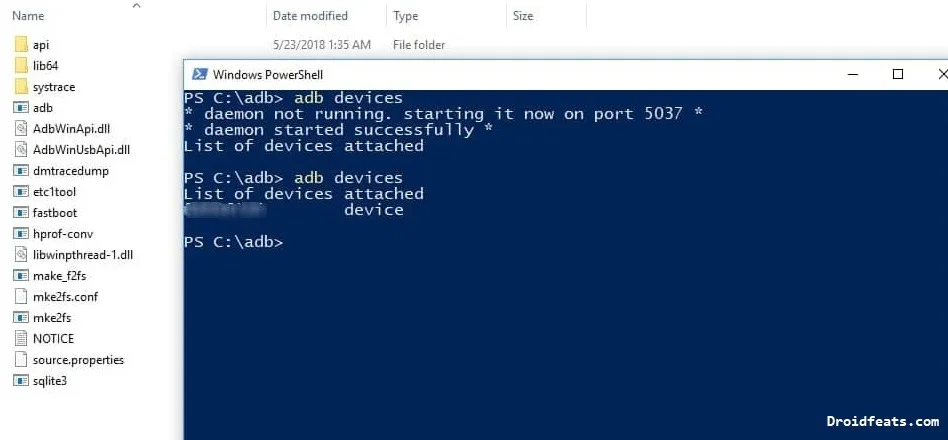
- Next, initiate the Bootloader/Fastboot mode on your device. You can do this by entering the following command in the PowerShell window:
adb reboot bootloader. This command instructs your device to restart in bootloader mode. - To ensure that your device is properly connected and detected, use the following command:
adb devices. This command will list the devices connected to your PC, allowing you to confirm that your phone is recognized. - Upon executing the command, you should see a unique device ID displayed, accompanied by a ‘fastboot’ message. This indicates that your device is correctly identified and in fastboot mode.
- To unlock the bootloader on your Pixel 8/8A, use the following command:
fastboot oem unlock. This command instructs the device to unlock its bootloader, a necessary step for installing custom ROMs or performing other system-level modifications. - Upon executing the command, a warning message will appear on your device’s screen. This is a standard security measure to ensure that you are aware of the implications of unlocking the bootloader. Please read the warning carefully before proceeding.
- Use the volume key on your phone to navigate and select the “Unlock The Bootloader” option. Confirm your selection by pressing the power key. Upon confirmation, the phone will reboot. Please note that all user data on the phone will be erased during this process.
- The phone is expected to reboot automatically now, with the bootloader unlocked. However, if it doesn’t, you can manually initiate the reboot by entering the following command on your computer:
fastboot reboot
Congratulations! The bootloader on your Google Pixel 8/8A is now unlocked. This allows you to install custom recovery, custom ROMs, or any system tweaks of your preference. However, please proceed with caution while making these modifications.
We offer a wealth of guides, articles, and tips for Android on our blog. We believe the following posts might be of particular interest to you:
- Post link #1: Best VPN Service Providers (Buyers Guide and Review)
- Post link #2: MX Player Custom Codec [AC3, DTS, MLP, TrueHD, and more]
So, you’ve successfully completed this tutorial and unlocked the bootloader on your Google Pixel 8/8A using our guide. If you encounter any issues while following this tutorial, please don’t hesitate to leave a comment below. Our team will respond as soon as possible.
Did you find this post helpful? If so, we’d appreciate it if you could share it on social media as a token of your gratitude.


![Download Realme 7 GCam Port [Most Compatible Version] Download Realme 7 GCam Port [Most Compatible Version]](https://static.droidfeats.com/wp-content/uploads/2025/03/Realme-7-450x253.webp)
![Download Redmi 9 GCam Port [Most Compatible Version] Download Redmi 9 GCam Port [Most Compatible Version]](https://static.droidfeats.com/wp-content/uploads/2025/02/Redmi-9-GCam-Port-450x245.webp)
![Download OnePlus 11 GCam Port [Most Compatible Version] Download OnePlus 11 GCam Port [Most Compatible Version]](https://static.droidfeats.com/wp-content/uploads/2025/02/OnePlus-11-GCam-Port-450x245.webp)