Most of the Android phone users are much interested in customizing their devices with the advanced third-party custom ROMs, root, or even mods. Such interested users must install a custom recovery prior to further customization. This tutorial will serve as a guide to learn how to download and install TWRP recovery on Android devices where the latest TWRP recovery version is available for the officially supported devices.

Tutorial on how to install TWRP recovery on Android devices?
Android is actually a much vibrant operating system mainly because if it’s open source nature. In Android, you will not be limited at all on what you can tweak or adjust up which is certainly not possible on any stock OEM device.
Most manufacturers ponder on delivering certain exclusive features to their flagship devices, and that’s all that a common user would glean from it. In order to reckon some additional features, or to change and customize your OS, or even if you want to switch to yet another software, you will definitely need to have quite a few things like unlocking the phone’s bootloader only with which you can install a custom recovery.
Those people who are already into the Android development scenario or those who were already interested to know about might be having good knowledge about TWRP, and it benefits.
But for those who are new to this term, it’s always better that you have basic knowledge about it before you go to download and install the TWRP recovery on your Android.
What is TWRP?
TWRP (TeamWin Recovery Project) is actually a third-party and the first touch-enabled custom recovery for the Android devices which allows the users to install the third-party software including the custom ROMs, kernels, and mods. Also, it enables a user to wipe/flash the device partitions as well as to backup/restore the software.
Dee’s Troy is now leading the project along with other developers responsible for maintaining the individual device support. Presently, TeamWin officially supports over 100 Android devices from various manufacturers. Individual developers are handling the unofficial ports/development for the specific Android devices.
Pre-requisites
You must be having the following requirements to be fulfilled before you head down to install the TWRP recovery on Android.
- It’s highly recommended that you must have a full backup of your device before flashing TWRP. You can do the backup on Android phones following our guide.
- Be sure that your phone is charged at least 50-60% so that you can avoid sudden shutdowns during the process.
- Initially, you must enable OEM unlocking and then unblock the bootloader of your device and only then you can flash the TWRP recovery.
- You may need to download and install USB drivers on your PC.
- For method 1, you may also need to install ADB/Fastboot tools on your PC.
Download TWRP Recovery Image
In order to make your effort easy, we have attached the links to all the supported Android manufacturers. You may just need to click on your device’s manufacturer name and then download the TWRP recovery for your device.
- Alcatel
- Allview
- Amazon
- Amlogic
- Archos
- Asus
- Barnes & Noble
- BQ
- Cat
- Dell
- Elephone
- Essential
- Fairphone
- HP
- HTC
- Huami
- Huawei
- Hyundai
- Infinix
- IUNI
- Kazam
- LeEco
- Lenovo
- Letv
- LG
- Lyf
- Marshall
- Mattel
- Meizu
- Micromax
- Minix
- Mobvoi
- Motorola
- Nextbit
- Nokia
- Nubia
- Nvidia
- Omate
- OnePlus
- Oppo
- Oukitel
- Pantech
- Planet
- Quanta
- Razer
- Realme
- Samsung
- Silentcircle
- Sony
- TWRP
- Ulefone
- Umidigi
- Unihertz
- Vanzo
- Vestel
- Wileyfox
- Wingtech
- Xiaomi
- Yu
- ZTE
- ZUK
Once you are done with the downloading of the TWRP recovery for your respective Android device, you need to follow the instructions to install the recovery.
How to Install TWRP Recovery?
We will give you two ways to install TWRP recovery on your Android devices. In the first method, you will have to use the Fastboot to flash the recovery IMG file. The second method has to be followed by the Samsung Galaxy users where they will flash the recovery using the Odin tool.
Method #1: Flash TWRP Recovery using Fastboot
- Download TWRP recovery image (*.img) for your Android device.
- Now copy this image file to C:\adb folder where the ADB/Fastboot binaries will be present.
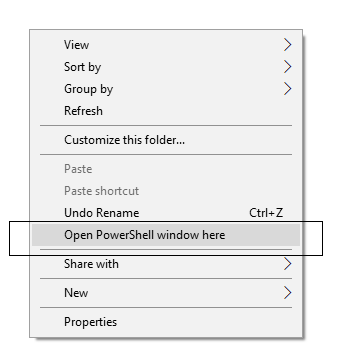
- Press and hold the SHIFT key and do a right-click on an empty space inside the folder.
- You should Select ‘Open PowerShell window here’.
- Now Boot your Android phone into the Bootloader/Fastboot mode.
- Connect it to the PC with the help of the USB cable.
- Make sure that your device is being detected properly using the following command:
fastboot devices
- The command will return a unique device ID right with the ‘fastboot’ message.
- Lastly, install TWRP recovery on the device using the following command:
fastboot flash recovery <recovery-image.img>
- Replace “<recovery-image.img>” with the real filename of the recovery image. Example:
fastboot flash recovery twrp-3.2.1-0-angler.img
- Android Devices with A/B partition system, such as the Google Pixel/Pixel 2, Moto Z2 Force, Mi A1, and Mi 9T Pro, will not be supporting direct flashing. So you will need to boot TWRP for such devices using the following command:
fastboot boot <twrp-recovery.img>
- Replace “<twrp-recovery.img>” with the exact filename. Example:
fastboot boot twrp-3.2.1-2-taimen.img
So this is how you can install TWRP recovery using Fastboot which will be working for the majority of OEM Android devices.
Method #2: Flash TWRP Recovery using Odin Tool
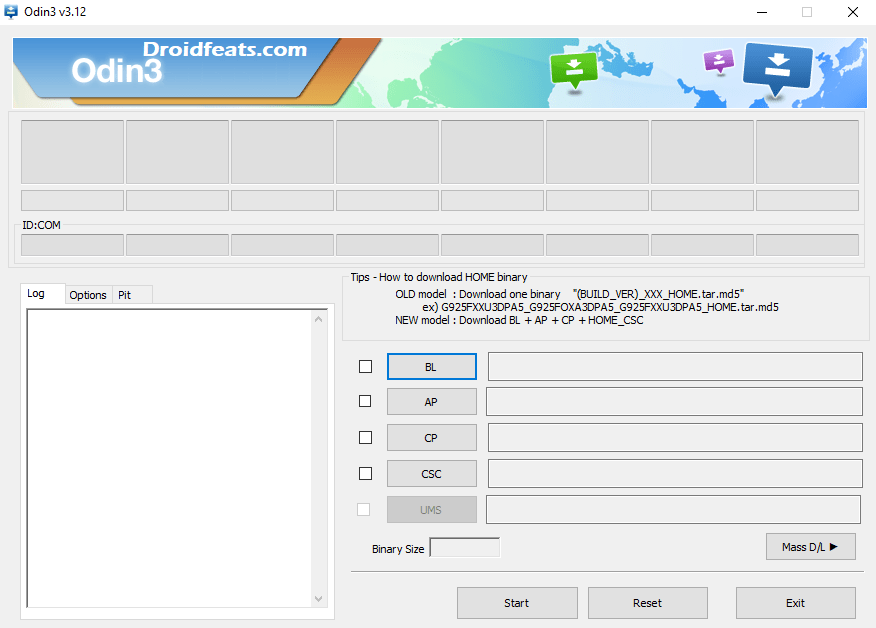
- Initially, download the TWRP recovery Odin flashable (*.img.tar) file for your Samsung device along with Odin tool and extract the ZIP on your PC.
- Head on to the extracted folder and then run the ‘Odin3.exe’ by doing a double-click on it.
- Now Boot your Samsung device into Download mode and then connect your device to the PC.
- You can see the COM port in the Odin window should lighten up.
- Now click on the ‘AP’ button.
- Select the TWRP recovery tar file for your Samsung Galaxy device.
- Be sure that you don’t modify any other settings.
- Lastly, click on the ‘Start’ button to install TWRP recovery using Odin tool.
Once the flashing process is finished, you will see a ‘PASS!’ message on the device screen, and the phone will automatically reboot.
How to do an Update of TWRP Recovery?
- Initially, you need to download the latest TWRP version (.img) for your device.
- Now connect your phone to the computer using the USB cable.
- Copy the downloaded IMG file and move to the phone’s storage or SD card.
- Disconnect the device from the PC and power it off.
- Now Boot your Android device into TWRP recovery mode.
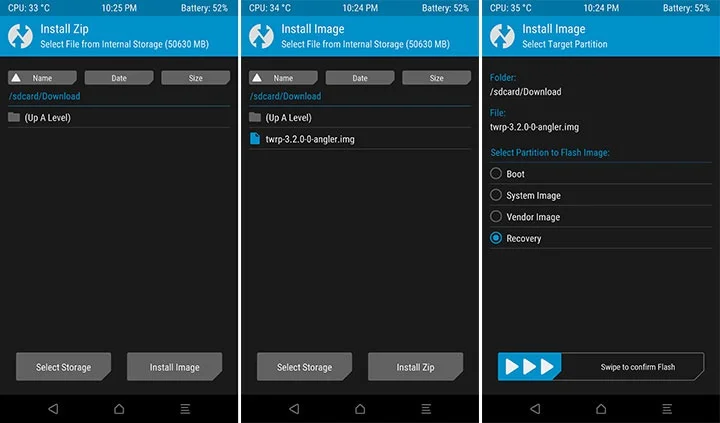
- Head to the ‘Install’ menu and tap on the ‘Install image’ button seen at the bottom.
- Select the TWRP IMG file there.
- Select the ‘Recovery’ from the list of partitions shown on the device screen.
- Lastly, swipe the button on the device screen to update the TWRP recovery to the latest available version.
- Once done with it, click on the ‘Reboot System’ icon.
It’s done with the installing of the TWRP recovery on your Android devices, and now you can go ahead as well as flash the custom ROMs such as LineageOS and Resurrection Remix 6.0. You are now able to use it to root your Android phone by flashing Magisk or SuperSU.
We hope you have now a clear knowledge about how to download and install TWRP recovery on Android devices. If you have any further queries, kindly leave them down in the comment box.


3 Comments
Thanks for clickbait. Not for any android phone, just for those who are currently officially supported by TWRP list. It doesn’t explain how to compile TWRP to make it work on ANY Android Device. Still many devices are unsupported by TWRP currently.
Definitely this tutorial is not for the OPPO / VIVO or low budget smartphone users. But works on all the developer friendly phones, either official or unofficial, all builds are available in the repository.
I hate so much people who think that they are great teachers !!!! Stupid explanation!!! You think that your logic must be adopted by people brains…Real hate!!!!