From this post, you will be able to install Android 11 / Android R on your PC using Android Studio. This guide is especially for the developers who want to test their apps on Android 11 API.
The tutorial below is performed on a MacBook, but steps are exactly the same for Windows PC as well. Read ahead!
Google announced Android 11 in the last month. While being in its developer preview phase, Google is making Android 11 available for the developers earlier than the public so that they would optimize their apps accordingly for the latest Android API.

Right now, the developer previews of Android 11 are available for Pixel devices only. But if you are a developer not having a Pixel phone, or even you don’t want to install them directly on your device, you can get them on your PC. We will be using the Android Studio tool and Google Pixel 3 virtual device in order to install Android 11 on your computer. The download links for the required tools are given below; make sure to read every line carefully.
Android emulators are nothing new for tech-savvy people. In fact, they are quite famous for gaming purposes. There are so many such emulators available for the users. However, Google has its own package that comes with the Android Studio tool. It can create a Virtual Pixel device on your computer and install any latest Android.
Android Studio is dedicated to developers, but common users and enthusiasts can also use it to try out the latest Android versions like Android 11 and its new features before Google releases it for the public. Read ahead; we have a complete tutorial on how to install Android 11 on Mac, Windows, and Linux using the Android Studio emulator.
Prerequisite
- Download Android Studio for your PC (Mac, Windows, Chrome OS).
- Make sure to download the proper package based on the platform on your computer.
See also: How to Setup ADB on Mac and install TWRP on Android device (Apple user’s guide)
Windows system requirements
- Microsoft® Windows® 7/8/10 (64-bit)
- 4 GB RAM minimum, 8 GB RAM recommended
- 2 GB of available disk space minimum,
- 4 GB Recommended (500 MB for IDE + 1.5 GB for Android SDK and emulator system image)
- 1280 x 800 minimum screen resolution
Mac system requirements
- Mac® OS X® 10.10 (Yosemite) or higher, up to 10.15 (macOS Catalina)
- 4 GB RAM minimum, 8 GB RAM recommended
- 2 GB of available disk space minimum,
- 4 GB Recommended (500 MB for IDE + 1.5 GB for Android SDK and emulator system image)
- 1280 x 800 minimum screen resolution
Linux system requirement
- GNOME or KDE desktop
- Tested on gLinux based on Debian (4.19.67-2rodete2).
- 64-bit distribution capable of running 32-bit applications
- GNU C Library (glibc) 2.19 or later
- 4 GB RAM minimum, 8 GB RAM recommended
- 2 GB of available disk space minimum,
- 4 GB Recommended (500 MB for IDE + 1.5 GB for Android SDK and emulator system image)
- 1280 x 800 minimum screen resolution
Chrome OS system requirement
- 8 GB RAM or more recommended
- 4 GB of available disk space minimum
- 1280 x 800 minimum screen resolution
- Intel i5 or higher (U series or higher) recommended
Recommended devices:
- Acer: Chromebook 13/Spin 13, Chromebox CXI3
- Lenovo: Yoga C630 Chromebook
- HP: Chromebook x360 14, Chromebox G2
- Dell: Inspiron Chromebook 14
- ASUS: Chromebox 3
- ViewSonic: NMP660 Chromebox
- CTL: Chromebox CBx1
How to Install Android 11 on PC using emulator
The following steps are on installing Android 11 on your PC using the Android Studio emulator. Make sure to perform each action carefully. We will create Google Pixel 3 virtual device on your computer and install Android R / Android 11 on it.
(Our guide ahead has screenshots taken from a macOS machine. You can use the same steps for Windows and Linux.)
- Download the Android Studio tool and install it on your computer (based on the platform you are using).
- Once the installation is complete, open the Android Studio application.
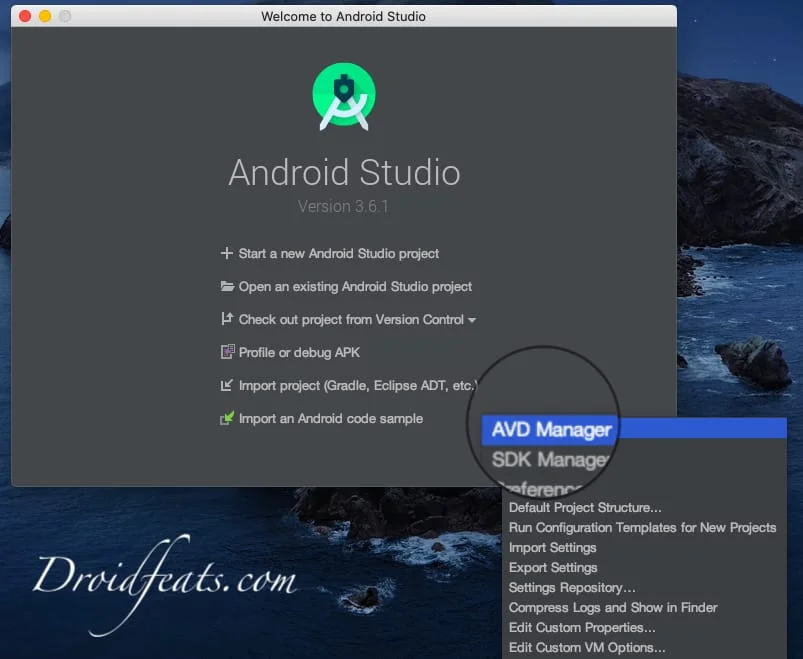
- Next, from the home screen, click on the Configure button placed on the bottom right > select AVD Manager. (Check the screenshot below)
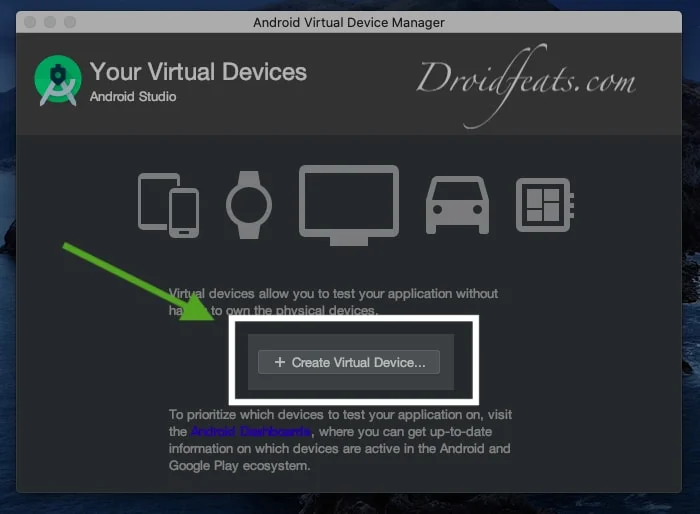
- The next part is to create a virtual device for Android R installation. In AVD manager, click the “Create Virtual Device” button as shown below:
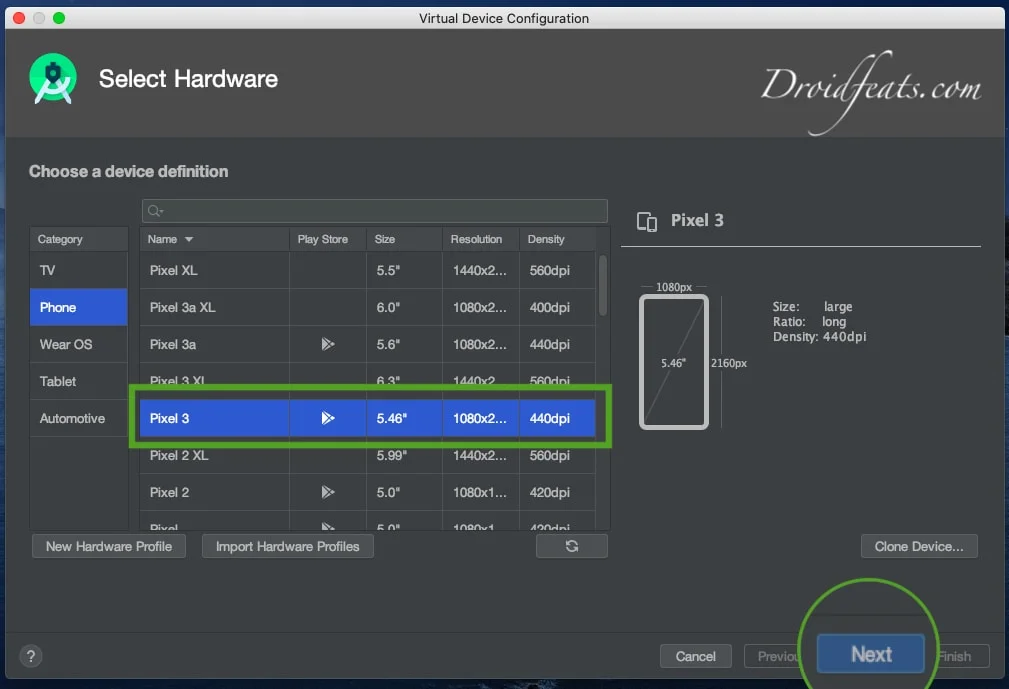
- Next, you need to select which phone you want to emulate. We are using Pixel 3 here, but you can choose any other supported device — Pixel XL, Pixel, Pixel 3a XL, Pixel 2, Pixel 2 XL, Pixel 3 XL, Pixel 3, and Pixel 3a. Select and click on Next.
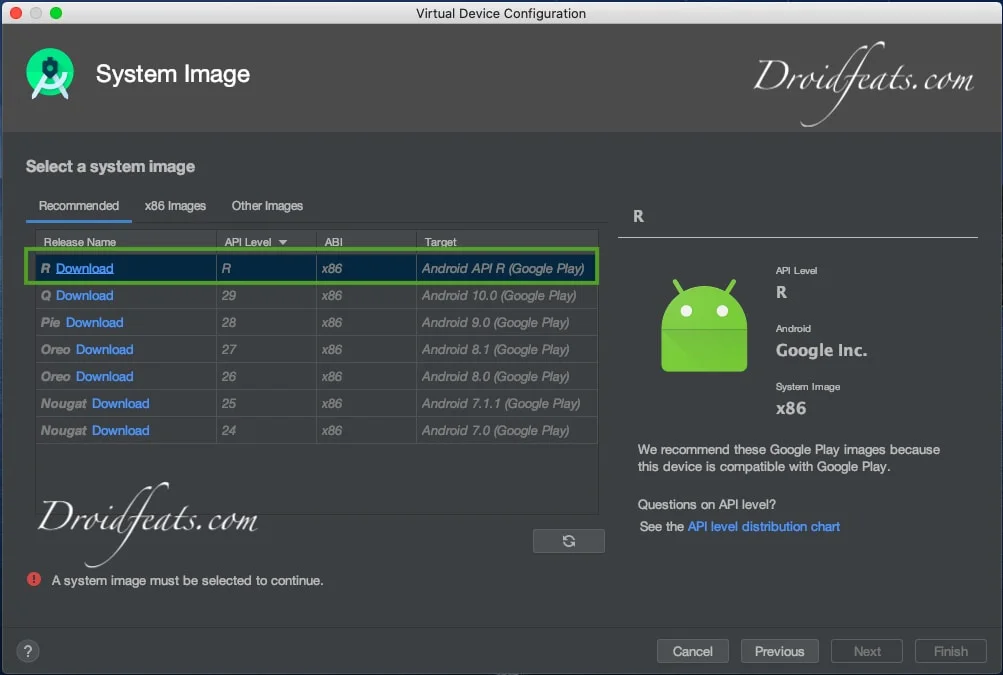
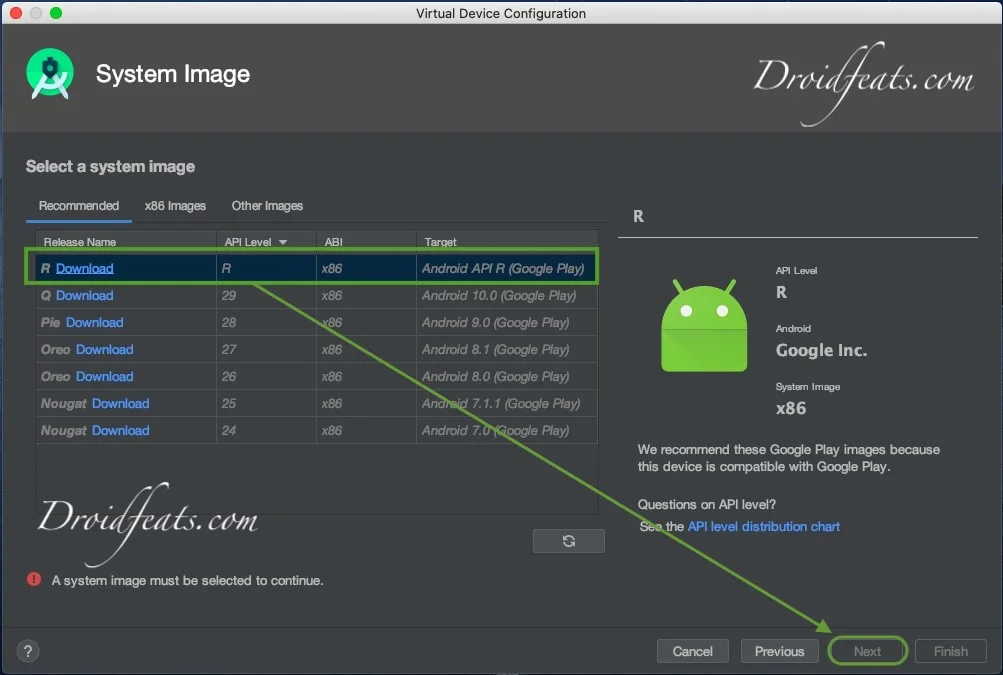
- The next screen will allow you to choose the Android version. Make sure to select Android R and choose API Level category R, then click on Download right against the name.
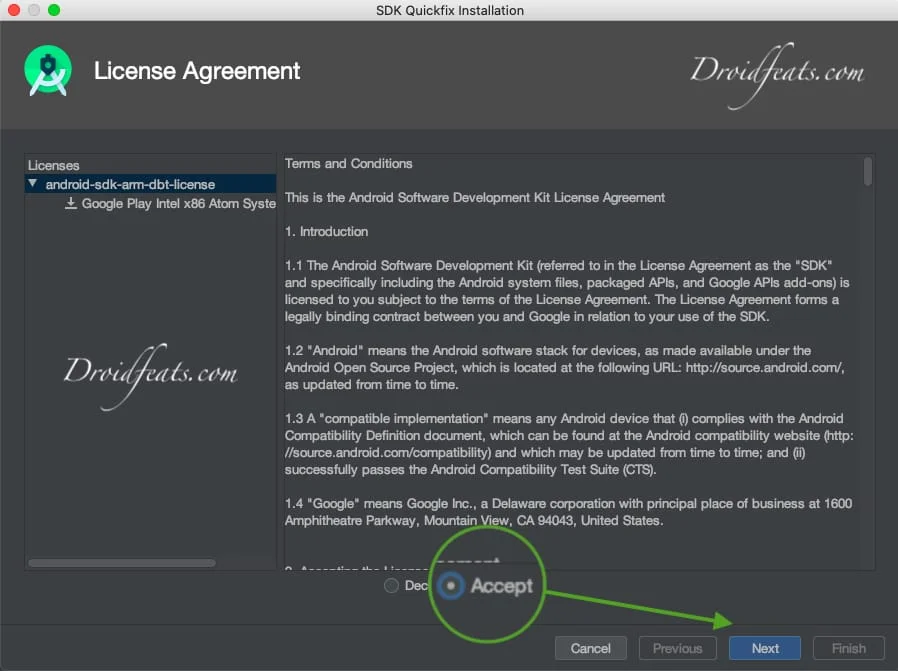
- Now, on the next page, you need to accept the license agreement and then begin downloading as well as extracting the selected image.
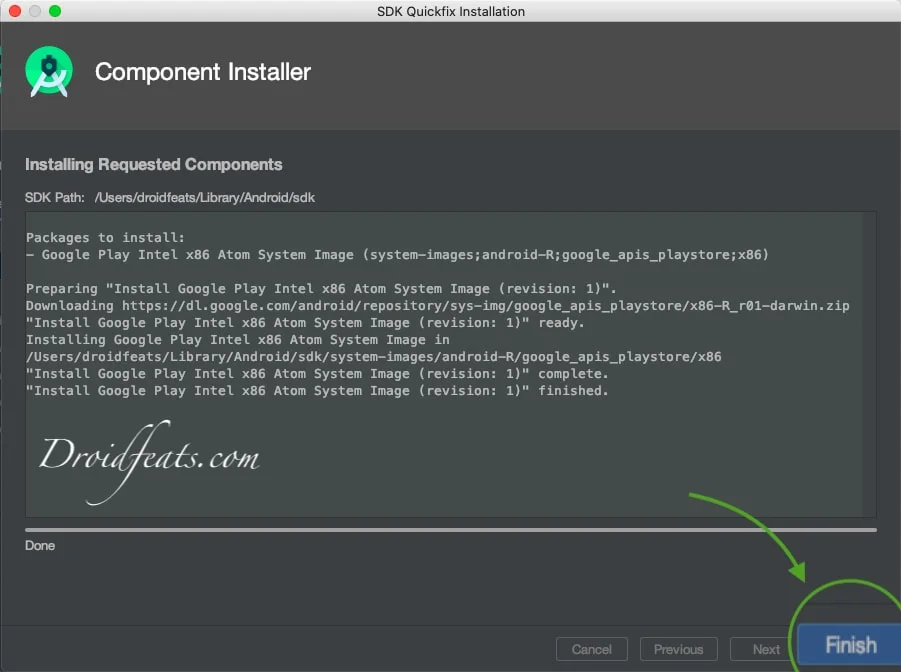
- Select “Accept” and then click “Next.” You will see the Component Installer window. Wait till the download and extraction process ends before proceeding to the next step. (Make sure to have good internet connectivity).
- Once the download and extraction process is over, click on “Finish” as shown below:
- The next step is to set up the Android emulator to run Android 11 / Android R. Read forward!
Next: Set up Android 11 on emulator
Once everything is downloaded and installed, you need to set up the Android emulator to use Android 11 on your computer and explore all the new features.
- So, coming from the previous steps, Android Studio will take you into another window where you can select the downloaded “Android R” image and click Next.
-
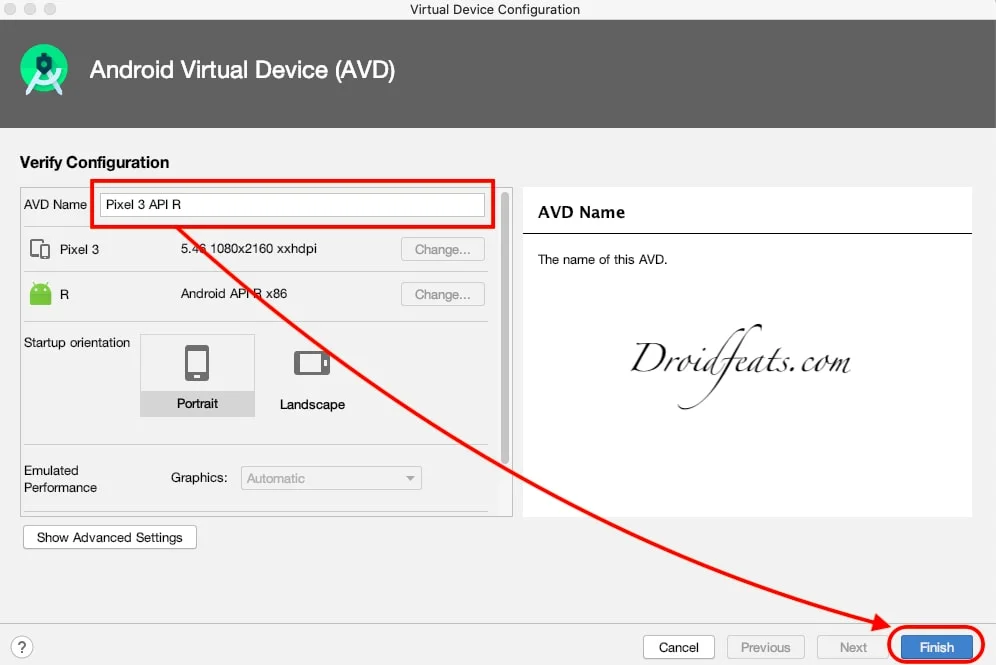
The next step is to give a name to your ADV (Android Virtual Device). Additionally, you can set the orientation to portrait or landscape as per your choice. The emulator is highly optimized; you don’t need to configure any other settings. Just click on the “Finish” button.
-
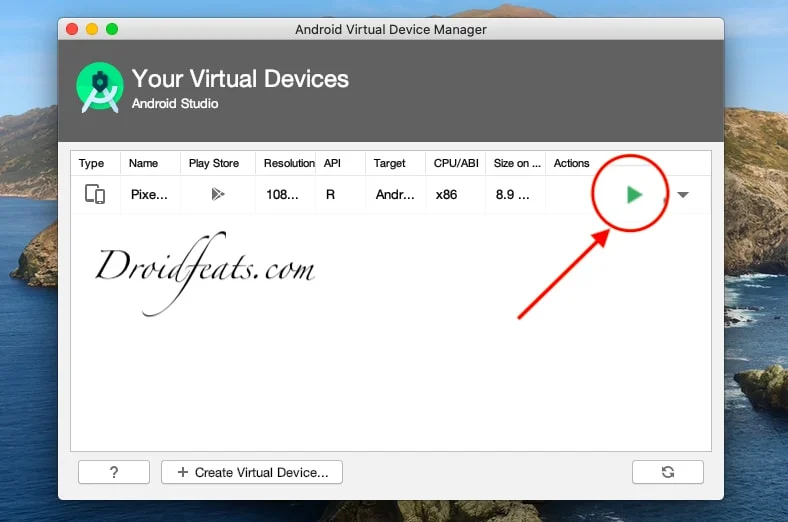
Once finished, you will see a new Virtual Android Device on your screen. Click on the “Play” button to start your virtual device running Android R.
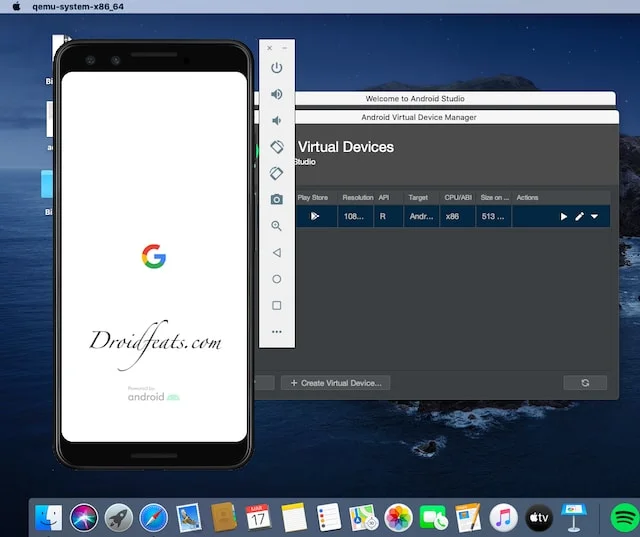
- The emulator will start within some seconds, and you will see the following screen with the Android boot-up animation.:
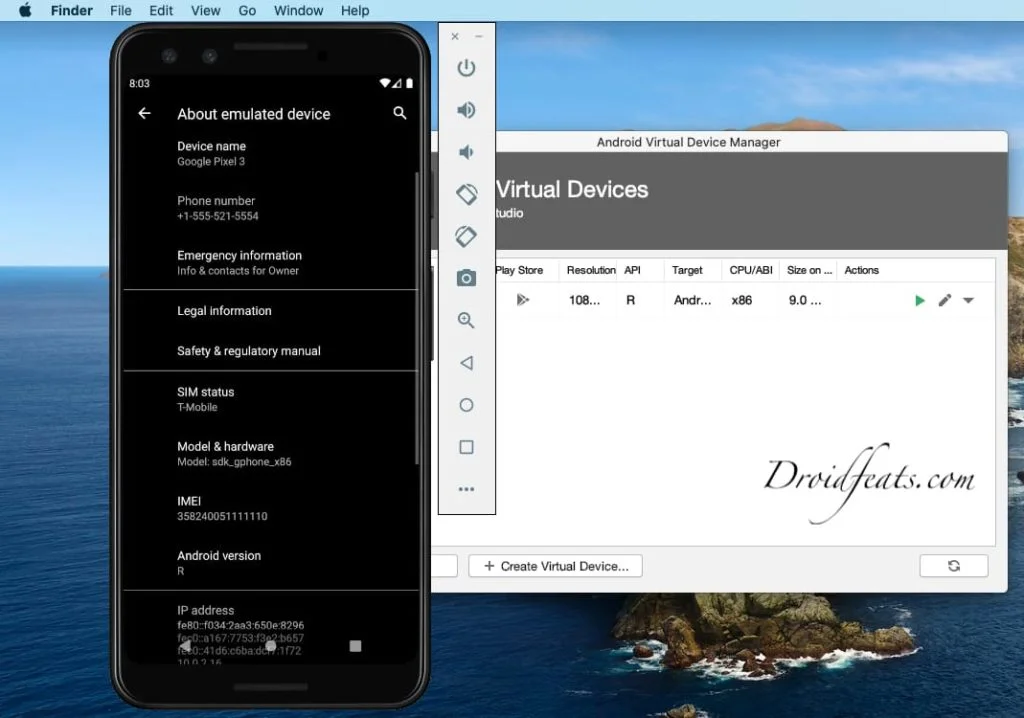
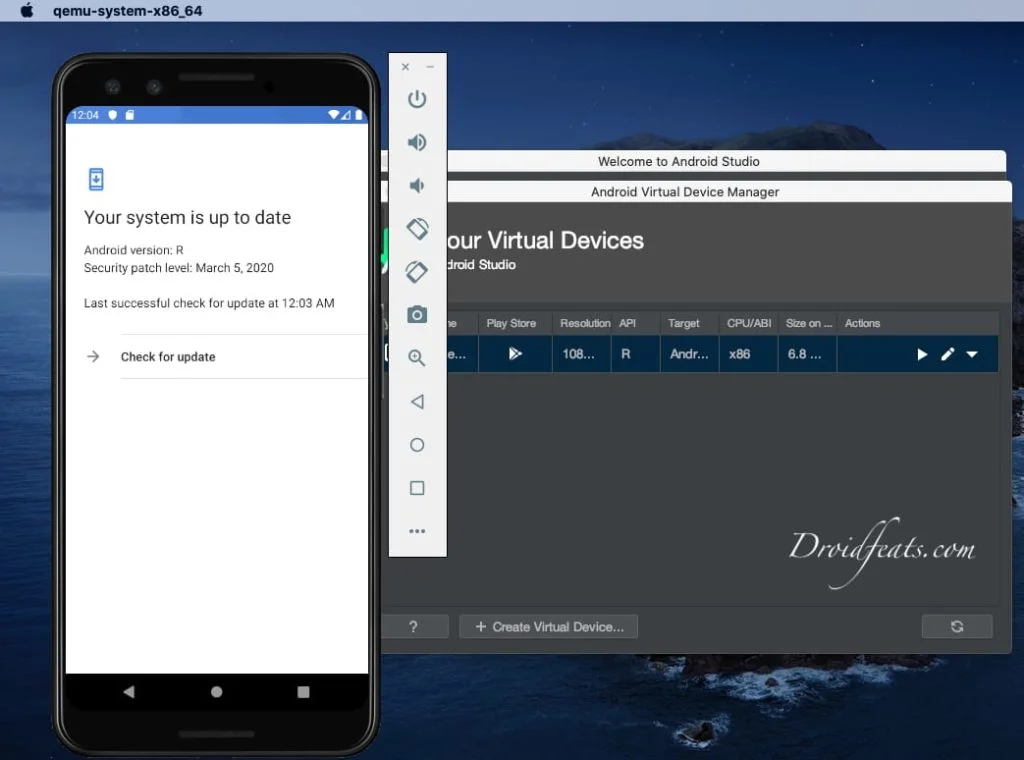
- Once your virtual device is on, you would probably be greeted by Android R on Pixel 3, which designates you have successfully completed the Emulator install.
- Now, simply browse around and check out all the new R-specific features.
Click to enlarge Click to enlarge - That’s pretty much to install Android 11 on your computer using the Android Studio emulator!
Verdict
Happy exploring! You can now enjoy the Android 11 operating system where you can install apps and games from the Play Store to test on the latest API.
So you are done with this tutorial! You had successfully installed Android 11 R on your PC using our guide. If you faced any problem with performing this tutorial, please let us know by dropping a comment below. Our team will reply you back as soon as possible.
![Download Vivo X200 FE GCam Port [Most Compatible Version] Download Vivo X200 FE GCam Port [Most Compatible Version]](https://static.droidfeats.com/wp-content/uploads/2025/07/vivo-x200-fe-in-four-aesthetic-color-options.png-300x179.webp)


