


In this post, I will guide you to properly install ADB binaries on your MacBook with a straightforward method. And then, you will learn to install TWRP Custom Recovery on your Android phone using a macOS Terminal. If you are a MacBook user and at the same time, using an Android phone, this guide is for you. You might have been sticking somewhere to connect your Android phone to macOS in the Fastboot Mode. I, too, tried to unlock the bootloader of my Android phone using my MacBook but failed several times. Finally, I got a simple solution for everyone who uses MacBook and Android. Read ahead; I will use the easiest way and will provide automatic updates using Homebrew.
You might have tried the manual installation of ADB binaries on your macOS. The manual installation is quite tricky and is not friendly for novice users. So, the first time users will find my guide easy as this is an excellent solid tutorial on how to setup ADB for Mac.
Why ADB and TWRP on macOS?
If you are an Android enthusiast and want to unlock the bootloader of your Android phone, install TWRP and root, this guide is for you. ADB means Android Debug Bridge, which is a link between your Android phone and PC. ADB files are required when your phone is in Fastboot Mode, and you want to flash something on your device using Fastboot command.
Using ADB binaries, you can put some command on your macOS terminal and install TWRP Custom Recovery using the tutorial below. After that, with TWRP, you can flash anything compatible with your phone.
In Windows operating system, it’s very easy to install ADB as it only requires to copy the files to C Drive. But in Mac, you might find it difficult. So, here, I am making the thing easy for you. Read ahead; there are some tools to download. I have provided the official download links for each tool. This post has a tutorial with all of the required installation steps to get ADB on macOS.
Step #1: Download Android File Transfer DMG for macOS

The first thing you need to install on your macOS is the Android File Transfer application. It is an official software by Google for the Apple users to browse and transfer files between your Mac computer and your Android device.
Unlike Windows, macOS doesn’t require a separate Android USB Driver for each device. For example, if you are using a Xiaomi phone and want to install a custom recovery on Fastboot, you need to have a Mi Flash tool or Mi PC Suite installed on your Windows PC. But in macOS, the Android File Transfer act as a USB Driver for any Android device. You can say it a universal USB Driver for Android in macOS.
Therefore, download the Android File Transfer DMG file from the link given below and install it on your MacBook or Mac PC.
How to install Android File Transfer on macOS?
- Download the Android File Transfer app.
- Open AndroidFileTransfer.dmg.
- Drag Android File Transfer to Applications.
- Use the USB cable that came with your smartphone box and connect it to your MacBook or Mac PC.
- Double click Android File Transfer.
- That’s it. You can now see all the files and folders of your Android device on your Mac.
Step #2: Install Homebrew on macOS
Homebrew for Mac is the missing package manager for macOS. It installs the stuff you need that Apple didn’t. Homebrew installs packages to their own directory and then symlinks their files into /usr/local.

In our case, Homebrew will install the Android platform-tools most easily on your Mac and will provide automatic updates. Follow the tutorial:
- Open the Terminal app on your Mac.
- Paste the following command in macOS Terminal prompt:
/usr/bin/ruby -e "$(curl -fsSL https://raw.githubusercontent.com/Homebrew/install/master/install)"
- Check the screenshot below!

- Hit Enter button, and your Homebrew installation should start now!
- You should see the following screen on your Mac:

-
You will see an Updates Available notification on the top right corner of your Mac. Click on Install, as shown in the screenshot above.

-
The system will automatically install Homebrew. Just wait for 2-4 minutes till you see installation is successful!

- Exit!
- Now, you are done with the Homebrew installation part. The next step is to install ADB using Homebrew!
Step #3: How to setup ADB using Homebrew on macOS
Once you are done with installing Homebrew, you can follow the step below to setup ADB binaries on your macOS using the same Terminal.
- Open the Terminal again.
- Enter the following command to install ADB on macOS:
brew cask install android-platform-tools
- Homebrew will download and install the Android platform-tools automatically from Google’s server.

-
Please wait for some time until you see the successfully installed message in the Terminal, as shown below:

- So, you are done with installing ADB on Mac using Homebrew.
- The next step is to verify your device and flash the TWRP image file. Read ahead!
Step #4: Install TWRP on Android using Mac
TWRP (TeamWin Recovery Project) is actually a third-party and the first touch-enabled custom recovery for the Android devices which allows the users to install the third-party software including the custom ROMs, kernels, and mods. Also, it enables a user to wipe/flash the device partitions as well as to backup/restore the software.
Dee’s Troy is now leading the project along with other developers responsible for maintaining the individual device support. Presently, TeamWin officially supports over 100 Android devices from various manufacturers. Individual developers are handling the unofficial ports/development for the specific Android devices.
Prerequisites #1
You must be having the following requirements to be fulfilled before you head down to install the TWRP recovery on Android using Mac.
- It’s highly recommended that you must have a full backup of your device before flashing TWRP. You can do the backup on Android phones following our guide.
- Be sure that your phone is charged at least 50-60% so that you can avoid sudden shutdowns during the process.
- You need to download and install Android File Transfer DMG on your Mac.
- Check out: Table of all ADB & Fastboot Commands for Android (Windows / Mac / Linux)
Prerequisites #2
- You need to enable USB Debugging mode to connect your Android phone to computer.
→ (Settings > About Phone > Build number > Tap it 7 times to become developer; Settings > Developer Options > USB Debugging).
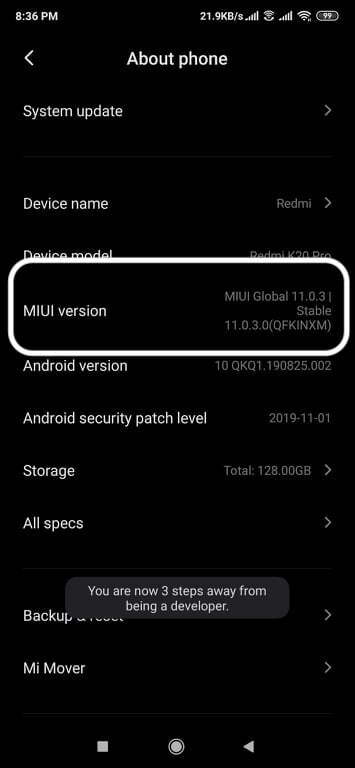
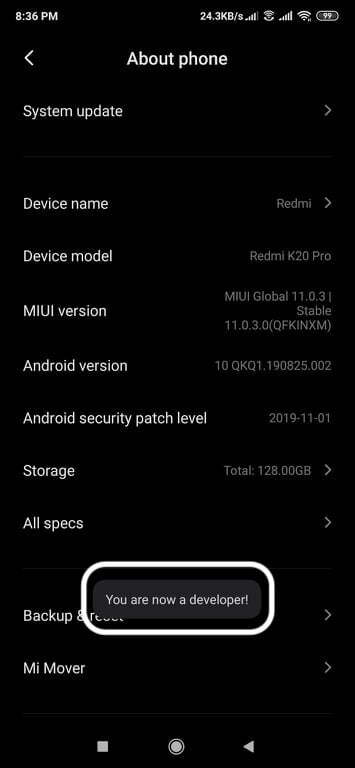
(Click to enlarge the images)
- Now, open the Terminal app on your Mac.
- Connect your device to PC using official USB cable (provided by device brand). You should change the USB mode to “file transfer (MTP)” mode. Some device may or may not required this, but for compatibility, it’s always good to select MTP mode.
- In Terminal, type “adb devices” and hit enter to launch the ADB daemon.
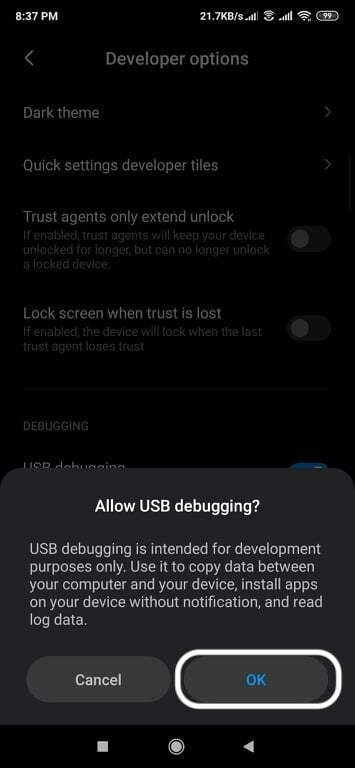
- On your device screen, you will see a prompt to allow or cancel USB Debugging access.
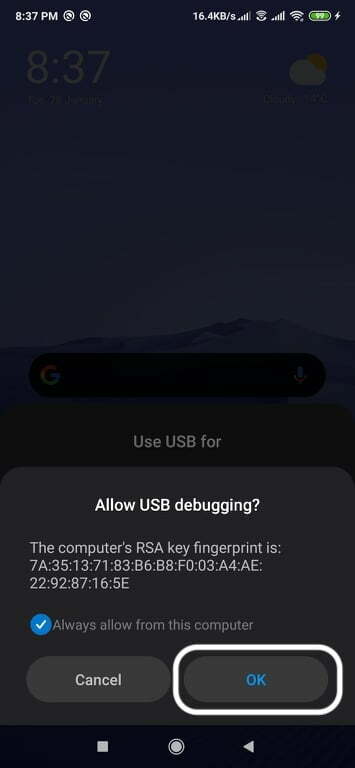 Tap on “OK” to allow USB debugging. You may check the “Always Allow for this computer” option if you never want to see this pop-up again.
 - Exit!
Note: Initially, you must enable OEM unlocking and then unblock the bootloader of your device. Please do research the community forum about how to unlock your phone, in case your smartphone comes with a factory locked bootloader. After that, get back to this TWRP tutorial.
Download TWRP Recovery Image
In order to make your effort easy, we have attached the links to all the supported Android manufacturers. You may just need to click on your device’s manufacturer name and then download the TWRP recovery for your device.
- Alcatel
- Allview
- Amazon
- Amlogic
- Archos
- Asus
- Barnes & Noble
- BQ
- Cat
- Dell
- Elephone
- Essential
- Fairphone
- HP
- HTC
- Huami
- Huawei
- Hyundai
- Infinix
- IUNI
- Kazam
- LeEco
- Lenovo
- Letv
- LG
- Lyf
- Marshall
- Mattel
- Meizu
- Micromax
- Minix
- Mobvoi
- Motorola
- Nextbit
- Nokia
- Nubia
- Nvidia
- Omate
- OnePlus
- Oppo
- Oukitel
- Pantech
- Planet
- Quanta
- Razer
- Realme
- Samsung
- Silentcircle
- Sony
- TWRP
- Ulefone
- Umidigi
- Unihertz
- Vanzo
- Vestel
- Wileyfox
- Wingtech
- Xiaomi
- Yu
- ZTE
- ZUK
Once you are done with the downloading of the TWRP recovery for your respective Android device, you need to follow the instructions to install the recovery using macOS.
How to install TWRP on Android using macOS (Tutorial)
- Download the TWRP recovery image (*.img) for your Android device on your Mac.
- Copy the image file to the Desktop of your macOS.
- Now Boot your Android phone into the bootloader/fastboot mode.
- Connect it to the PC with the help of the USB cable (preferably the one provided by the company).
- Open the Terminal application on your Mac.
- Make sure that your device is being detected properly using the following command:
fastboot devices - The command will return a unique device ID right with the ‘fastboot’ message, as shown below:

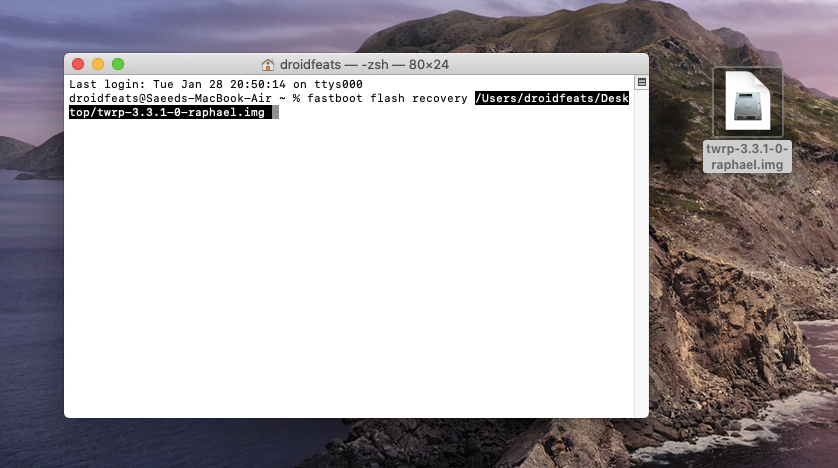
- Type the following command and do not HIT enter or return button.
-
fastboot flash recovery
- After writing “fastboot flash recovery,” drag the TWRP image file from the desktop and drop it to the Terminal. Check the screenshot below for better understanding:

- After dropping the IMG file, it should appear like the screenshot below:
-
Finally, hit the enter/return button to install TWRP on your Android device. You should see the following message on your Terminal:

-
Android Devices with A/B partition system, such as the Google Pixel/Pixel 2, Moto Z2 Force, Mi A1, and Mi 9T Pro, will not be supporting direct flashing. So you will need to boot TWRP for such devices using the following command:
fastboot boot <drop TWRP img file here> - Remember to drop the TWRP image in the same way you did in step 10 of this section.

- Finally, hit the enter/return button to boot your device into TWRP mode.
So this is how you can install TWRP recovery using Fastboot on Mac, which will be working for the majority of Android devices.
- See also: Top 50+ Android apps for rooted devices!
Conclusion
It’s done with the installing of the TWRP recovery on your Android devices on macOS, and now you can go ahead as well as flash the Custom ROM such as LineageOS and Pixel Experience. You are now able to use it to root your Android phone by flashing Magisk or SuperSU.
We hope you now have explicit knowledge about how to download and install TWRP recovery on Android devices using Mac. If you have any further queries, kindly leave them down in the comment box.

![Download GCam Nikita Port [Most Compatible Version for any Android smartphone]](https://droidfeats.com/wp-content/uploads/2025/09/GCam-Nikita-Port-450x253.webp "Download GCam Nikita Port [Most Compatible Version for any Android smartphone]")
35 Comments
It did not work on Mi Note 10…
fastboot: error: cannot determine image filename for 'recovery/Users/xxxxxxxxxxxxxxxxx/Desktop/twrp-3.3.1-0-tucana.img'Also, tried with fastboot boot command:
fastboot: usage: unknown command boot/Users/xxxxxxxxxxxxxx/Desktop/twrp-3.3.1-0-tucana.imgHi Drkarden,
Are you dragging the image file from the desktop?
Also, let me know if you had installed ADB using Homebrew properly?
got the same problem. there was a spacesign missing 🙂
I see.
Got the fix now?
yeah, everthing seems to work quiet fine, thanks for your walkthrough!
But I got a strange problem: My Device (Xiaomi Mi Pad 4 plus) only booted into twrp once after hitting power and Vol+. after restart it boots into “mi recovery 3.0”.
I thought I replaced “mi recovery” with twrp bootloader.
What went wrong? any idea?
ok, at least i got into twrp with the step 13. But now I cannot install any “rom.zip” file. It says my internal storage is 0 MB?
I`m sure, that i transferred the rom file correctly and saw it with android file transfer…
And additional to that, I cannot wipe my data, cache nor dalvik… error : failed to mount ‘/data’ (invalid argument)…
unable to mount storage
one step further:
needed to change filesystem first to ext 2 and than back to ext 4 (may i link a youtube video?! he knows how to do: https://youtu.be/Rs4zcryNt5Y)
and i used a sd card to install twrp and a custom rom.
know everything works perfect!
hope my solution may help anyone else….
thank you.
Thank you so much BenKn for the Video link.
Yes, sometime, you need to change the file system to ext 2, and then get back to ext 4 and reboot to troubleshoot such problems.
I faced that on my OnePlus 5 several times.
After installing Android ADB interface in windows 7, it’s showing error 10.
Give me the solution please.
Hello Shradhda,
This post is specific to macOS users, not Windows 7. You can refer to this guide instead: https://droidfeats.com/guide-how-to-install-adb-on-windows-macos-and-linux/
When I type “flashboot flash recovery” I get:
Stephens-iMac:~ stephenjarrett$ fastboot flash recovery /Users/stephenjarrett/Desktop/twrp-3.3.1-2-ocean.img(bootloader) is-logical:recovery: not found
Sending 'recovery' (26962 KB) OKAY [ 1.117s]
Writing 'recovery' (bootloader) Invalid partition name recovery
FAILED (remote: '')
fastboot: error: Command failed
Hi Stephen.
That’s quite strange 🙁
It seems like your bootloader is not unlocked. Check if your bootloader is unlocked properly, some times you have to do it twice.
Thanks for replying so quickly. I have now made many attempts to install TWRP. This is as far as I get. When I boot the phone I get the bootloader unlocked warning and on the Android (Moto G7 Power) in Recovery the last two lines are flashing_unlocked and Transfer Mode: USB Connected. Doesn’t that confirm an unlocked bootloader?
It might be an unsuccessful unlock attempt if it’s showing bootloader status: “flashing_unlocked.”
Generally, Moto phones give the following status:
Device is UNLOCK. Status Code:3Can you please check your detailed status on ADB using this command:
fastboot getvar allIf you get something like:
(bootloader) securestate: flashing_unlockedThen you got a mess in the process of unlocking the bootloader. What you need to do is flash the bootloader again from the stock firmware using the following code:
fastboot flash bootloader bootloader.imgYes I got (bootloader) securestate: flashing_unlocked
What’s my source for stock firmware image?
Can you please tell me the exact model number of your device so that I can provide you a direct download link to your stock firmware?
Or you can check out the thread for Moto G7 Power Stock Firmware collection from here:
https://droidfeats.com/forums/topic/zip-moto-g7-power-stock-firmware/
Based on model number, download your required firmware and extract the zip file.
After that, find out bootloader.img and flash using ADB.
And in my phone’s settings OEM Unlocking is greyed out
In some devices, if you recently unlocked/re-locked the bootloader, the Unlock OEM option from the Developer options could be greyed out. That’s quite common on many devices. But it is temporary. It takes take 7-10 days (depends on device-to-device) to get the greyed out disappeared.
Don’t know what happened, but I’m missing the last couple of comments. Anyway, My Moto G7 Power is an XT1955-5, and the security patch level is April 1, 2020. Build #PPOS29.114-134-13. I attempted to flash PPOS29.114-134-7-1, the latest I could find:
Stephens-iMac:~ stephenjarrett$ fastboot flash bootloader bootloader.imgfastboot: error: cannot load 'bootloader.img': No such file or directory
Stephens-iMac:~ stephenjarrett$ fastboot flash bootloader /Users/stephenjarrett/Downloads/OCEAN_RETAIL_9.0_PPOS29.114-134-7-1_cid50_subsidy-DEFAULT_regulatory-DEFAULT_CFC.xml\ \(1\)/bootloader.img
(bootloader) is-logical:bootloader: not found
Sending 'bootloader' (7419 KB) OKAY [ 0.432s]
Writing 'bootloader' (bootloader) Validating 'bootloader.default.xml'
(bootloader) Security version downgrade
(bootloader) Image aboot failed validation
(bootloader) Preflash validation failed
(bootloader) Cancelling 'bootloader.default.xml'
FAILED (remote: '')
fastboot: error: Command failed
This is totally the wrong way you are performing. You are executing the commands in the wrong way. At first, you need to extract the bootloader file from the firmware ZIP.
and then execute the code in the following way:
fastboot flash bootloader < bootloader image file name >.img
replace with the exact name of the bootloader that you will get after extracting the firmware ZIP file.
For example, if you extract the stock firmware ZIP of Google Nexus 6P, you will find the bootloader image as “bootloader-angler-angler-03.79.img”.
So, the code to execute in that case would be:
fastboot flash bootloader bootloader-angler-angler-03.79.img
Once you are done with that, you should reload the bootloaer using the following command:
fastboot reboot bootloader
Did you used the unlock code to unlock the bootloader on your Moto G7 Power XT1955-5?
This phone require unlock code from Motorola.
You should get the code from their official unlock page:
https://motorola-global-portal.custhelp.com/app/standalone/bootloader/unlock-your-device-a
after that, you need to execute the command in the following way:
fastboot oem unlock CODE FROM MOTOYou should take the number given to you by Motorola and replace CODE FROM MOTO with that.
Did you followed that?
Thank you so much. This is what I was looking for. I have Mi 9T Pro and a MacBook. I thought I need to manage a Windows laptop to install TWRP on my phone. But luckily I got this solid guide.
Thanks again, gonna perform the experiment soon.
You are most welcome. Do let me know if you face any problem while performing the tutorial.
Masterpiece bro!
You explained it like no one else ????????
Thank you bro for the appreciation 🙂
While installing homebrew, it’s showing a key sign written password.
This is a standard thing with UNIX-based systems. What’s going on here is that homebrew needs administrative access to your Mac to install correctly. So what happens is, it requests those permissions with sudo. Primarily, it wants your user account’s password to check if you have the authority to request those permissions in something called a sudoers file. When you see the pop-up when you want to make specific changes to your computer, the very thing happens.
PS: Homebrew needs administrative access, you need to put in your user’s password so the Mac can approve the request.
Master piece
Thank you 🙂
i can’t able to perform this cmd brew cask install android-platform-tools.
it keep showing me ‘Error: Unknown command: cask’
i won’t able to perform this cmd where we use brew cask install android-platform-tools in terminal. it keep showing me this thing.
Error: Unknown command: cask
Try This:
brew install –cask android-platform-tools
My Phone is stuck in bootloop after this.
The flashing was successful but my phone could not boot android or fastboot when i restarted.
Please help.