The Google Pixel 6 is a flagship Android smartphone that was released in October 2021. It is powered by Google’s custom-made Tensor processor, and features a 6.4-inch AMOLED display with a resolution of 1080×2400 pixels. The device comes with 8GB of RAM and is available in 128GB and 256GB storage variants. The Pixel 6 boasts a dual camera setup with a 50MP main sensor and a 12MP ultrawide lens. It also has an in-display fingerprint scanner and a large 4,600mAh battery.

On the other hand, the Google Pixel 6A is a mid-range variant of the Pixel 6, announced in May 2022. It shares many features with the Pixel 6, including the Google Tensor processor. The Pixel 6A also has a 6.1-inch display, 6GB of RAM, and 128GB of storage. It offers a similar camera setup with features like Face Unblur, Real Tone, and Magic Eraser. Despite its more affordable price point, the Pixel 6A still delivers a powerful performance and a range of features.
Both phones are developer-friendly and have received positive feedback from the developer community, including platforms like XDA. Therefore, if you are a power user interested in customizing your phone, you might be considering rooting the device.
In this post, I’m going to guide you on how to root the Pixel 6/6A Pro using the Magisk systemless tool. If you’ve already unlocked the bootloader, you can easily proceed with the tutorial below to root your Pixel 6/6A.

This guide will walk you through all the necessary steps to safely root your Pixel 6/6A. If you’re new to this, I strongly recommend reading the entire guide thoroughly before actually performing the steps on your device. This will ensure that you understand the process and can carry it out safely. Remember, rooting your device is a big step, so it’s important to be fully prepared. Let’s get started!
As always, my go-to choice for rooting is Magisk. The SuperSU tool has fallen out of favor and is no longer actively developed due to recent Android restrictions. At the time of writing this article, the latest version available is Magisk 27.x, which has been tested and found to be compatible with the Pixel 6/6A. Keep reading to find out how to download the necessary files!
Root Pixel 6/6A details
Pixel phones are renowned for their ease of rooting and unrooting. To restore functionality to Google Pay and banking apps, some workarounds may be necessary, but these are generally not problematic. It’s likely that you may encounter issues with over-the-air (OTA) updates, although the exact workings are unclear. Apart from this, you should not lose any functionality. So, rooting will just take a few steps, you’ll need a PC at your disposal and familiarity with some ADB commands. Don’t worry, I’ll guide you through the entire process. Just keep reading!
- See also: Gcam Port Hub (all device list)
Download Boot.img for Pixel 6/6A
To begin, download the factory image for your Pixel 6 or Pixel 6A. It’s crucial to ensure that the version you download matches the one currently installed on your smartphone. To verify this, navigate to Settings -> About Phone -> Build Number on your device.
| Device | File Name | SHA-256 Checksum |
|---|---|---|
| Pixel 6 | oriole_beta-ap31.240119.016-factory-1a1133a4.zip | 1a1133a4ac0df6326135ce4366cf1f6f0ea2af9a2ccbd48f2ce2aee848458b9f |
| Pixel 6A | bluejay_beta-ap31.240119.016-factory-76548be6.zip | 76548be62f414d73f1268d1d9e660509a15a03926bce4e91cecd8384cfb7be10 |
After the download is complete, extract the file to a convenient location on your PC. Proceed to the Images folder where you will find the init_boot.img file. Finally, copy this file and transfer it to your device.
Patch the Stock Boot Image
- Transfer the downloaded
init_boot.imgfile to your device’s internal storage. - Download and install the most recent version of Magisk Manager on your device.
- Launch Magisk Manager. From the main interface, navigate to
Install > Install > Select and patch a file. - Choose the boot image (
init_boot.img). The patching process of the stock boot image will commence in Magisk. - Upon completion, the patched file will be stored as
magisk_patched.imgin theDownloadfolder.
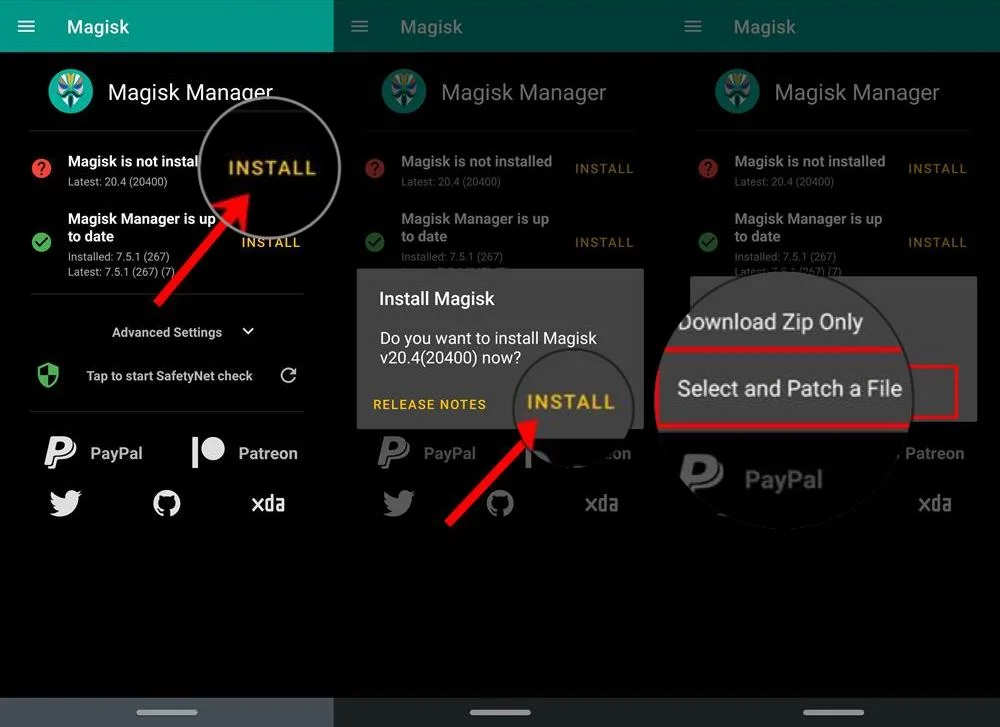
We have a detailed, dedicated guide on how to patch a boot image if you need more information. You can head over to this page and go through it.
Pre-requisites
- Unlock Bootloader:
- Ensure that your Pixel 6/6A has an unlocked bootloader.
- Download Magisk Manager:
- Download the latest version of Magisk Manager directly onto your phone.
- Update the OS:
- If you’re still on older builds, install the latest OS on your device.
- Set Up ADB Drivers:
- On your computer (whether it’s Windows or Mac), set up ADB drivers.
- Check Battery Level:
- Make sure your phone has a charge of at least 80 – 85% before proceeding.
- Enable USB Debugging:
- To connect your Android phone to the computer, enable USB debugging:
- Go to Settings > About Phone > Build number (tap it 7 times to become a developer).
- Then navigate to Settings > Developer Options > USB Debugging.
- To connect your Android phone to the computer, enable USB debugging:
Backup Pixel 6/6A
Before initiating the tutorial, we recommend that you create a backup of all crucial documents from your device and transfer a copy to your computer. During our experiment, there’s a possibility that your device may be wiped clean, resulting in the loss of all data stored on your phone. To prevent this, we have compiled a list of applications that can assist you in creating backups within your phone. Subsequently, you can transfer these files to your computer for added security.
Once you have successfully completed the backup process, you may proceed with the tutorial below on how to quickly root the Pixel 6/6A. Please ensure that you follow each step carefully to avoid any potential issues.
How to root Pixel 6/6A using patched BOOT Image
I’ve provided detailed, step-by-step instructions on how to flash the Magisk patched boot image on the Pixel 6 or 6A using fastboot. If you’re new to processes such as rooting, flashing a Custom ROM, or an Official Firmware, it’s strongly recommended that you read the entire tutorial before attempting these actions on your device. This will help ensure a smooth and successful operation.
Tutorial: How to Root Pixel 6/6A with Patched Boot Image
- Retrieve the
magisk_patched.imgfile from theDownloadfolder of your phone and place it on your computer. - Connect your phone to the computer using a USB cable that is compatible with your device. It is recommended to use the official cable provided by Google in the phone box.
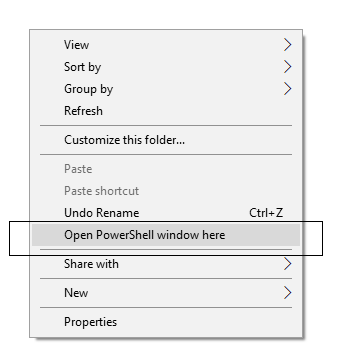
- Open the Command Prompt in the directory where the IMG file is located. To do this, press the
SHIFTkey and right-click in an empty space within the directory. From the pop-up menu, selectOpen PowerShell window hereorOpen command window here. - Open the PowerShell window and input the following command and press the Enter key to execute it.
adb reboot bootloader
This command will reboot your device into fastboot/bootloader mode.
└ If a permission pop-up appears on your device asking to “Allow USB debugging”, tap OK. - Once you are in the fastboot mode, type the following command and hit Enter:
fastboot getvar current-slot
- If the output is a, type the following and press Enter.
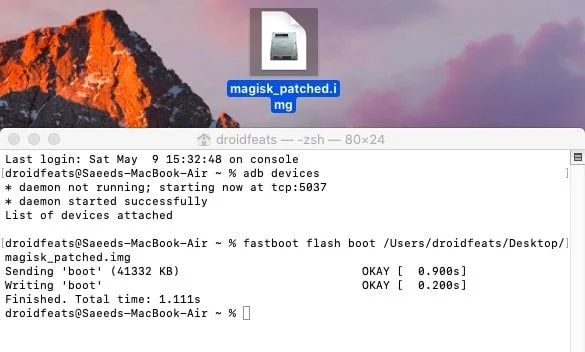
fastboot flash init_boot_a magisk_patched.img
- If the output is b, type the following and press Enter.
fastboot flash init_boot_b magisk_patched.img
-
The command concludes with the file name. If you possess a different file name, enter
fastboot flash init_boot_a <your-alternate-file-name.img>. Replace<your-alternate-file-name.img>with your specific file name.*While the command is executed on a Mac in this instance, it can be applied identically on a Windows system. The operating system does not affect the command’s functionality.
- If the output is a, type the following and press Enter.
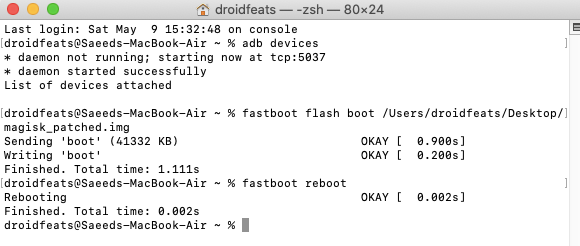
- After the file has been successfully flashed, you should reboot your device. To do this, type the following command and press enter to reboot into recovery mode:
fastboot reboot
*This action is performed on Mac, but it can be applied identically on a Windows system. The operating system does not affect the command’s functionality. - Your device should now reboot to its operating system. If everything was done correctly, you should see your device starting up as usual.
That’s it, you’ve completed the process! No additional actions are needed for the magisk_patched.img file.
Proceed by opening the Magisk Manager application. Upon successful installation, the application should display that Magisk is installed.
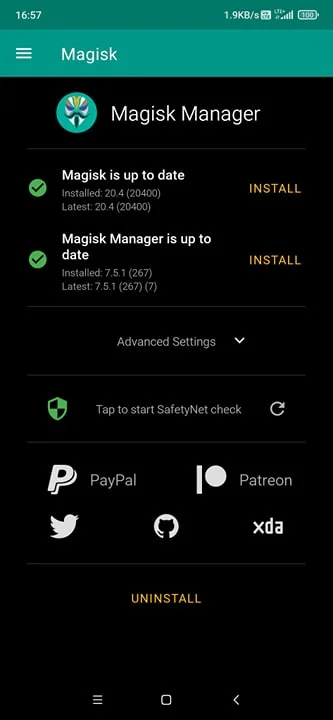
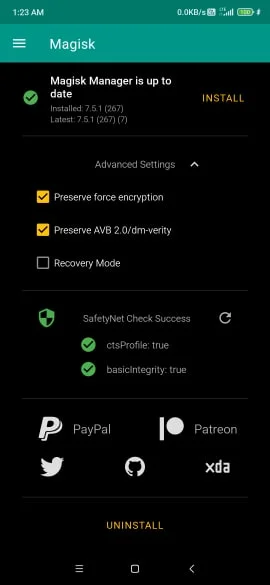
Congratulations! Your Pixel 6/6A is now rooted. You can explore a variety of top root-based applications on your device. Additionally, you have the freedom to customize your phone to your liking using Magisk Modules. Enjoy your personalized experience!
That concludes our tutorial! You have successfully rooted your Pixel 6/6A using the patched boot image, as per our guide. If you encounter any issues while following this tutorial, please don’t hesitate to leave a comment below. Our team will respond as promptly as possible. Thank you for your time and cooperation.
If you found this post helpful, show your appreciation by giving us a ‘Like’ on Facebook. Your support is greatly appreciated!



![Download Vivo X200 FE GCam Port [Most Compatible Version] Download Vivo X200 FE GCam Port [Most Compatible Version]](https://static.droidfeats.com/wp-content/uploads/2025/07/vivo-x200-fe-in-four-aesthetic-color-options.png-450x268.webp)