


MI A1 is a mid-range phone from Xiaomi that comes with Stock Android (Android One). The phone is backed up by Snapdragon 625 with 3080 mAh power backup.
The device runs on Vanilla Android 7.1.2 Nougat OS, and Google has already started rolling major system update, Oreo. Google Stock app suite handles Everything, (excluding the Camera and the IR Blaster). This may not be appealing to everyone.

The feature-rich Xiaomi’s MIUI is missing here. Since the firmware is pure Android, there are no Add-on or customizations, and Xiaomi only packs three of its app – Mi Remote, Feedback, and Mi Store. Also, the Camera App is built by Xiaomi because Google Stock Camera App does not support dual camera module.
Android Pie Update: Update Xiaomi Mi A1 to Android 9.0.0 Pie AOSP Custom Firmware
Moreover, you will get all the goodness of stock Android with the regular security patch. Google also offers unlimited video and photo storage on Google Photos on this device.
But those who are missing MIUI on this device can now install MIUI 9 (built by XDA Developers). MIUI 9 for MI A1 is ported from Mi5X and Redmi 5 Plus.
See also: Download Xiaomi Mi5X and MiUI 9 Stock Wallpapers [1080 x 1920 pixels]
The developer has ported Chinese Official MIUI 9 Dev 8.4.12 and MIUI Global Stable 9.5.4.0 from Mi5X and Redmi 5 Plus respectively. You can install any one of your choices.
However, the ROM is quite unstable for now and is not suitable for the daily use. The ROM is still in the cooking mode, and the stable version is yet to be released. If you are an Android enthusiast, and still you want to try out this port, we have a guide to install with download links. In that case, you need to have a TWRP recovery installed from before. If not, please do it from the guide below:
→ How to install TWRP Recovery [latest] on any Android device
[Since this is not an official firmware by Xiaomi, but a custom ROM, it requires a custom recovery. MI stock recovery can’t install this firmware because the flashable ZIP is unsigned.]So, before starting the tutorial, I recommend you to make a full backup of your existing ROM via TWRP for a safe side.
You can try out this MIUI 9 ported ROM on your MI A1 using the tutorial below! Let’s proceed with the guide! We have covered an entire steps-by-steps tutorial with all necessary tools (download links are given below, keep reading to grab and install).
[alert-warning]WARNING: All the custom ROMs, Official Firmware, How-to guides, tutorials, roots, hacks, and tricks mentioned on our site belong to the respective developers. We are not responsible if anything goes wrong with your device. Perform it at your own risk.[/alert-warning]MIUI 9 for MI A1 Firmware Details
As already stated, this ROM is in cooking mode. So, don’t expect much more stable here but still, you will be able to use some of the MIUI 9 features. A quick list is given below, and we hope you would love to use it on your device.
- Lightning fast system
- Changes in the notification shade
- Animated icons, UI changes and a fresh look
- App vault
- Revamped Gallery app
- Notification filter
- Mi Drop app
- Split screen
- Quick silent switch
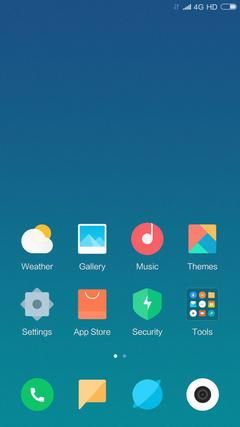
Screenshots
Check out the snaps of MIUI 9 on MI A1 below:
MI A1 USB Driver
Make sure you have correctly installed Xiaomi MI A1 USB Driver on your computer. If not, please download it from our USB Driver Section below and install it correctly. Otherwise, your computer will not be able to detect your device.
Backup your Android Device
We don’t want you to lose any data, or anything could go wrong unexpectedly. Before starting the tutorial, we strongly recommend you to make a full backup of your phone. If possible, take a full Nandroid Backup via TWRP or you can try out some of the Hand-Picked Android Backup Apps to secure your data quickly.
Pre-requisites
You must be having the following requirements to be fulfilled before you head down to the tutorial below.
- Initially, you must enable OEM unlocking and then unblock the bootloader of your device and only then you can flash the TWRP recovery.
- You need to install ADB/Fastboot tools on your PC.
- Make sure your phone has at least 80 – 85% charge. If not, please do charge it before starting the experiment.
- This tutorial will WIPE OUT all your DATA. Make sure to create a Backup of everything before starting the tutorial.
- Make sure your device has TWRP Custom Recovery installed from before. Otherwise, this tutorial will not work!
- You need to perform a Dalvik Cache wipe in recovery mode before installing the ROM.
- You need to enable USB Debugging mode to connect your Android phone to computer. (Settings > About Phone > Build number > Tap it 7 times to become developer; Settings > Developer Options > USB Debugging).
Download MIUI 9 for Mi A1
- Mi5x port: MIUI 9 for MI A1 ZIP
- Redmi 5 Plus port: MIUI 9 for MI A1 ZIP
- User data: Userdata IMG
How to install MIUI 9 ROM on Xiaomi MI A1
We have mentioned full step-by-step instructions on how to install MIUI 9 ported ROM on MI A1. If you are entirely new to rooting, flashing a Custom ROM or an Official Firmware, please read the entire tutorial once before actually performing it on your device.
TUTORIAL: (Step by Step Guide)
- Download the ported ROM from the above links for MI A1 (tissot) on your computer.
- Now, connect the device to your PC using the USB cable (preferably, the official one, provided by Xiaomi with the phone box).
- Copy and paste the downloaded zip file to the internal storage of your phone.
- Switch Off your phone and disconnect the cable.
- Press and hold [Volume Down] + [Power Button] together to enter into the recovery mode!
- Once you are in the TWRP recovery mode, perform a full data wipe by tapping on “WIPE” Button. Also, perform a factory reset by swiping on the “Swipe to Factory Reset” option at the bottom.
- Go back to main menu (TWRP Home) and tap on “Install” button. From the list, choose the zip file that you have copied in Step 3.
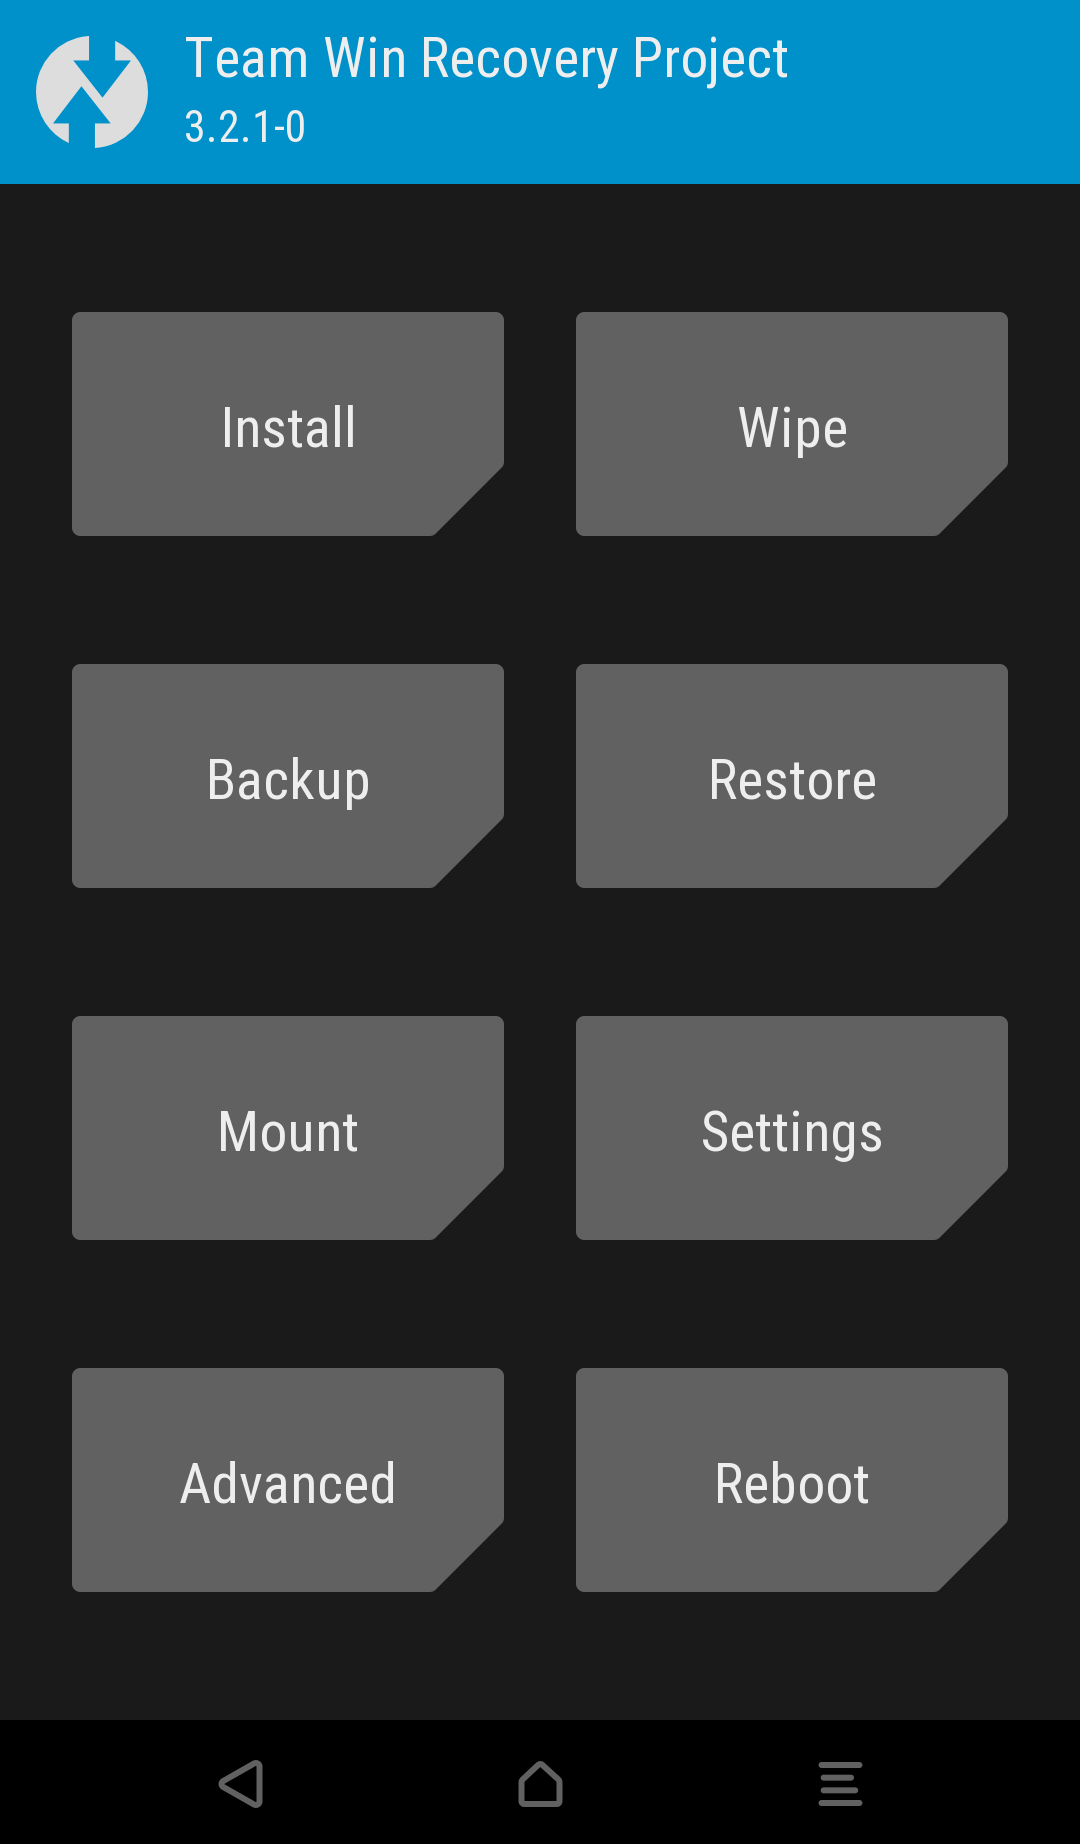
- Confirm the installation by swiping the “Swipe to Confirm Flash” option on the next screen.
- Now, tap on the “Wipe cache/dalvik” button to clean the ROM and stay away from any boot loop issues.
- Hit on “Reboot System” button!
Wait a while, and your phone may take up to 10 minutes to boot for the first time.
Install Magisk ZIP on MI A1
This is a mandatory step to perform while installing ported MIUI ROM on MI A1. Installing Magisk will give you root access to this ROM. You need to delete some system/app files to make this ROM a bit stable after you root your device using Magisk. Follow our guides below in order to root your MI A1 on MIUI 9:
→ Download: Magisk 16.4: the systemless root with Magisk Manager 5.7.0
→ Guide: How to install Magisk to root Android devices – Universal Systemless Interface
Once you root your MI A1, you need to perform some fastboot command for User data. Follow the instruction below!
Flash User data using Fastboot
- Download User data image (*.img) for your MI A1 from the above download section.
- Now copy this image file to C:\adb folder where the ADB/Fastboot binaries will be present.
- Press and hold the SHIFT key and do a right-click on an empty space inside the folder.
- You should Select ‘Open PowerShell window here’.

- Now Boot your MI A1 into the Bootloader/Fastboot mode.
- Connect it to the PC with the help of the USB cable.
- Make sure that your device is being detected properly using the following command:
fastboot devices
- The command will return a unique device ID right with the ‘fastboot’ message.
- Lastly, install User data on the device using the following command:
fastboot flash userdata userdata.img
- Now reboot your device using the following command:
fastboot reboot
So this is how you can install MIUI 9 on MI A1. You can now enjoy the test of MIUI 9 on your device with all new features. Check your OS version by navigating to Settings > About phone.
How to make the ROM a bit stable on MI A1 [fix for Mi5X version]
You can make the ROM a bit stable by removing the following folders:
- Autoregistration
- CloudService
- Mi Drive
- SampleAuthenticatorService
- SampleExtAuthService
- SecureExtAuthService
- SecureSampleAuthService
- XiaomiAccount
- XiaomiSimActivateService
You can find these folders in system/app. Use ES File Manager or Solid Explorer and allow root access to it.
Now, Reboot your device and get a blazing fast MIUI 9 ROM on your MI A1.
Any problem during installation? Feel free to drop a comment below, and we will reply you back as soon as possible. Also, don’t forget to share this post if you found it helpful.
![Download Redmi 15 GCam Port [Most Compatible Version]](https://droidfeats.com/wp-content/uploads/2025/08/Redmi-15-450x213.webp "Download Redmi 15 GCam Port [Most Compatible Version]")
![Download Redmi 9a GCam Port [Most Compatible Version]](https://droidfeats.com/wp-content/uploads/2025/03/Redmi-9a-GCam-Port-sample-450x245.webp "Download Redmi 9a GCam Port [Most Compatible Version]")
![Download Redmi 9 GCam Port [Most Compatible Version]](https://droidfeats.com/wp-content/uploads/2025/02/Redmi-9-GCam-Port-450x245.webp "Download Redmi 9 GCam Port [Most Compatible Version]")
5 Comments
XDA Source link?
Hi Falan,
XDA Source: (link)
Is there any post on the simplest way to root android phone or tablet running on MediaTek and SnapDragon Chip?
Hi Endy,
This guide may help you: https://droidfeats.com/how-to-install-magisk/
Does VoLte works? And can I change language?