Sony Xperia XZ Dual F8332 was launched back in 2016, which came with Android 6.0.1 Marshmallow and Xperia UI on the top. Sony has scaled it in order to keep the experience fairly light.
Now the device got Android 8.0.0 Oreo love from the OEM, and if you own this smartphone, then you should be looking for the new software update with firmware version 41.3.A.2.58_R3E weighing around 2.74 GB. You still have Sony’s own Launcher, app icons, Settings menu, and a built-in theme engine. But the majority of the UI looks closer to Stock Android.
The device has started receiving Android 8.0 Oreo-based firmware from January 2018. The build number changed 41.3.A.2.58_R3E with all new features like Autofill, background app limiting, Smart Text Selection, picture-in-picture mode, Notification Dots, and new emoji.
TRENDING Now: Official Galaxy S9 wallpapers, themes and apps [port] — download ’em here
Please read the tutorial below if you’ve got a Sony Xperia XZ Dual F8332 lying around and you’re looking to try out the Oreo update. This post consists the step-by-step instruction to install Android 8.0 Oreo Official Firmware on Xperia XZ Dual F8332. We have carefully composed it for your sake.
We have mentioned the important tools and Software download links below. Keep going through the text to grab and install it manually!
If you did not receive the update via OTA (Over-the-air) or you are in a Custom ROM, having a variant with an unlocked bootloader, you can update your Xperia XZ Dual F8332 to Android 8.0 Oreo Official Firmware using the tutorial below. You’ll need to use Flashtool to install the over-the-air update files. (file links are given below).
This guide wouldn’t be much difficult for you, considering that Flashing via Flashtool has been performed by you earlier. Here, we have covered the complete step-by-step tutorial in order to ensure our new users to perform the flash at ease without any trouble.
WARNING: All the custom ROMs, Official Firmware, How-to guides, tutorials, roots, hacks, and tricks mentioned on our site belong to the respective developers. We are not responsible if anything goes wrong with your device. Perform it at your own risk.
Xperia XZ Dual F8332 Firmware Details
Xperia XZ Dual_F8332_41.3.A.2.58_India_Generic 8.0.0
This is official stock Sony Xperia firmware.
Model: Sony Xperia XZ Dual (F8332)
Firmware version: 41.3.A.2.58_R3E
Region: India (Generic) [1305-0131]
Android version: Android 8.0.0 Oreo
We hope you love Android 8.0 Oreo Official Firmware for Sony Xperia XZ Dual. Certainly, we love it too, but before you look forward to install it on your phone, kindly go through the important information mentioned below before jumping on to start the tutorial.
Preparation – Sony PC Companion [USB tool]
One main reason, people, encounter problems while flashing firmware on their device is due to not installing correct USB drivers on their PC.
Make sure you have correctly installed Sony PC Companion tool on your computer. If not, please download it from our USB Driver Section below and install it correctly. Otherwise, your computer will not be able to detect your device.
[mks_button size=”large” title=”Download Sony PC Companion tool” style=”squared” url=”https://droidfeats.com/android-usb-drivers-windows-mac/” target=”_blank” bg_color=”#1e73be” txt_color=”#FFFFFF” icon=”fa-download” icon_type=”fa” nofollow=”0″]
*[Instructions are given below]
Backup your Xperia XZ Dual
We don’t want you to lose any data, or anything could go wrong unexpectedly. Before starting the tutorial, we strongly recommend you to make a full backup of your existing regional/carrier firmware. If possible, take a Backup via Sony Xperia Companion on your computer, or you can try out some of the hand-picked Android Backup Apps to secure your data quickly.
Points to keep in mind
- Make sure your phone has at least 80 – 85% charge. If not, please do charge it before starting the experiment.
- This tutorial will WIPE OUT all your DATA. Make sure to create a Backup of everything before starting the tutorial.
- You need to perform a Dalvik Cache wipe in recovery mode before installing the ROM.
- You need to enable USB Debugging mode to connect your Android phone to computer. (Settings > About Phone > Build number > Tap it 7 times to become developer; Settings > Developer Options > USB Debugging).
Xperia XZ Dual FTF Firmware file Download
Download Official Android 8.0 Oreo for Xperia XZ Dual F8332 (FTF firmware file). Use the below decryption key to start downloading.
Decryption Key: !20opD2u_OtC9k6deYd9rB8u-C5_lNkXXQXc7yVrkzig
[mks_button size=”large” title=”Download Firmware” style=”squared” url=”https://mega.nz/#!88wV0IgZ” target=”_blank” bg_color=”#1e73be” txt_color=”#FFFFFF” icon=”fa-download” icon_type=”fa” nofollow=”1″]
Flashtool Download
This guide is based on the Flashtool to install Android 8.0 Oreo on Xperia XZ Dual. So, before attempting the tutorial, make sure you have downloaded and installed the latest Flashtool [version 0.9.22.3 or above] software on your computer.
[mks_button size=”large” title=”Download Flashtool” style=”squared” url=”http://www.flashtool.net/downloads.php” target=”_blank” bg_color=”#1e73be” txt_color=”#FFFFFF” icon=”fa-download” icon_type=”fa” nofollow=”1″]
How to install Android 8.0 Oreo on Xperia XZ Dual F8332 via Flashtool
We have mentioned full step-by-step instructions on How to Install Android 8.0 Oreo Official Firmware on Xperia XZ Dual F8332. If you are entirely new to rooting, flashing a Custom ROM or an Official Firmware, please read the entire tutorial once before actually performing it on your device.
TUTORIAL: (Step by Step Guide)
Step 1: You need to ensure that you have correctly installed all the driver on your computer for your Xperia XZ Dual. Make sure to download Sony PC Companion from the above-given link.
[Ensure that you have connected your device to your computer before starting the downloading process of USB and ADB drivers.]Step 2: Install Flashtool driver from the following location:
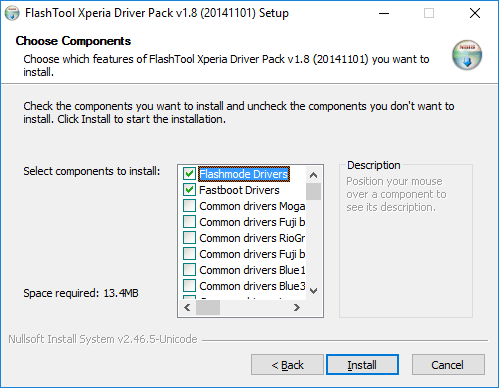
“C:\Flashtool\drivers”
Check the “Flashmode Drivers” and “Fastboot Drivers” to install.
NOTE: If you are on Windows 8/8.1/10, please follow the steps below:
Press Windows key + R together and in the “Run” box, type “shutdown.exe /r /o /f /t 00“.
Now, make the following selection to boot into Startup setting screen: Troubleshoot > Advanced options > Start Up Settings > Restart.
After that, when the computer reboots, choose number 7 (i.e. “Disable driver signature enforcement”). Your computer will start with Driver signing enforcement disabled until the next restart.
Now, you can install the Flashtool drivers on your computer.
Windows may show a warning message that “Driver is not signed”. Ignore that message and confirm the installation. Once the installation is complete, reboot your PC.
Step 3: On your phone, enable “Unknown Source” in the setting.
- Navigate to Setting > Security.
- Check the option “Unknown sources”.
- Tap OK on the prompt message.
- Select “Trust”.
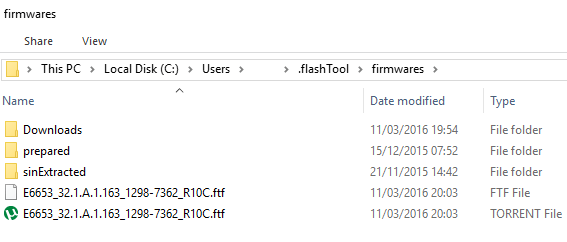
Step 4: You need to copy the FTF Firmware file to the following location on your computer:
“C:\Users\[Your PC Name]\.flashTool\firmwares”
It should be like this:
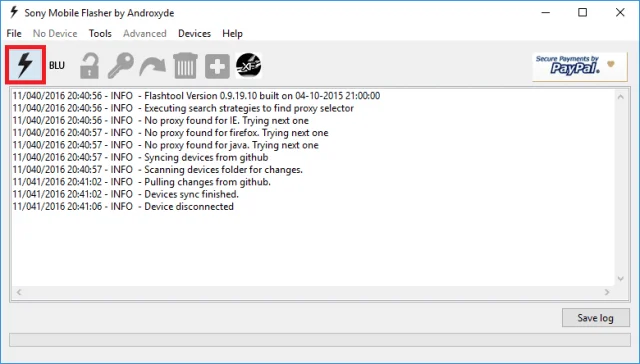
Step 5: Open Flashtool software on your computer, and Click on the lightning bolt on the top left of the Flashtool as highlighted in the image below:
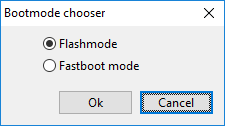
Select “Flashboot” and click “OK”.
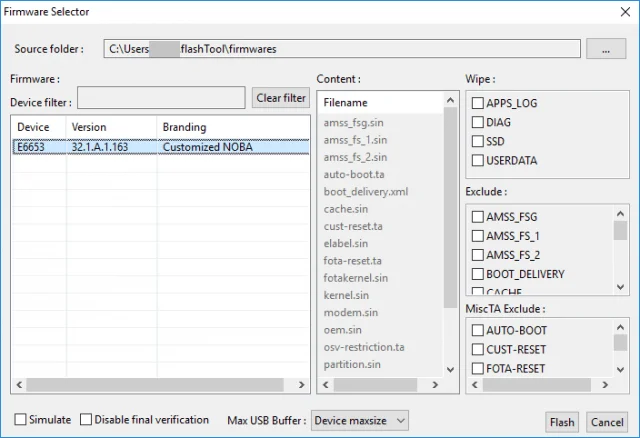
You should be already in the folder where the source file is located. If not, please navigate to the following location:
“C:\Users\[Your PC Name]\.flashTool\firmwares”
Step 6: From the firmware panel, select the firmware build version that you want to flash on your Xperia XZ Dual.
Make sure Device variant is same as the model number of your phone.
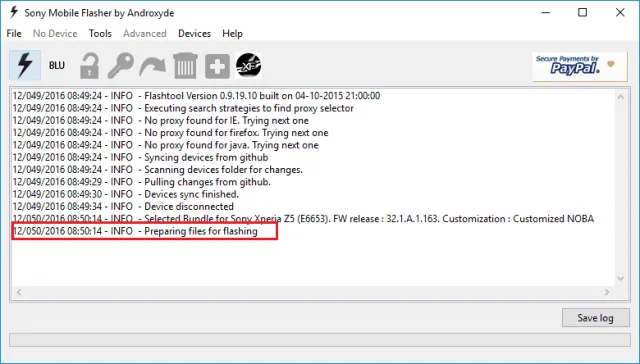
Step 7: Click on “Flash” button. Flashtool will show an INFO: “preparing files for flashing”, on the log panel.
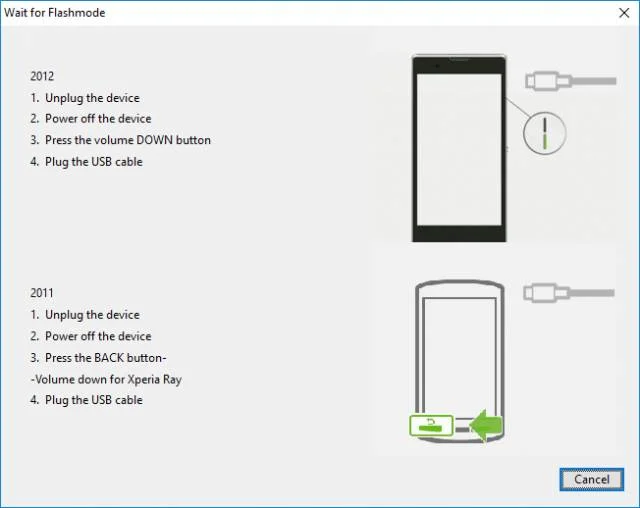
You need to wait for 60 seconds for the “Wait for Flashmode” pop-up to appear. Once it does, connect your Xperia XZ Dual to the computer via USB cable.
Press and hold “Volume down” button while connecting the USB cable.
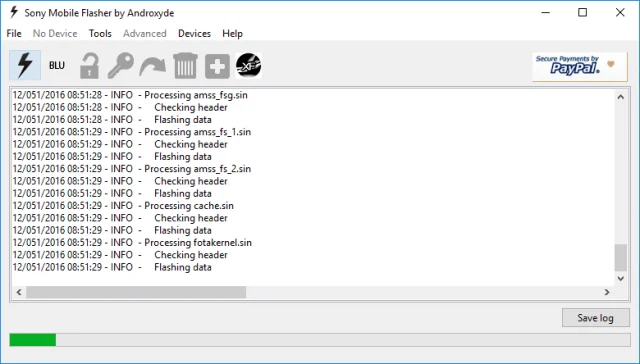
The pop-up will get disappeared, flashtool will then start installing Android 8.0 Oreo on your device. You can let go of the ‘volume down’ button.
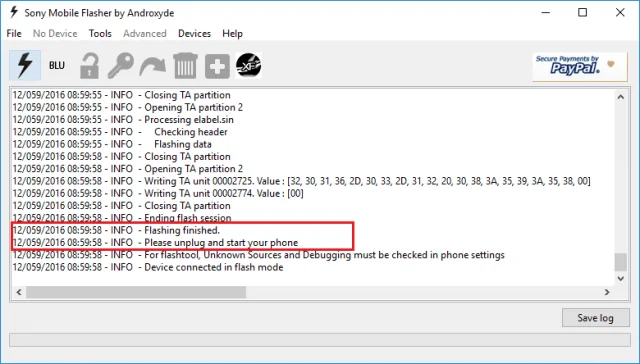
Once you see “flashing finished” in the INFO message as shown in the image below, your Sony Xperia XZ Dual F8332 has been successfully updated to the latest Android 8.0 Oreo Official Firmware.
Step 8: Now, unplug your device and reboot.
Wait a while, and your phone will not take more than 10 minutes to boot for the first time.
Hurray! Your Sony Xperia XZ Dual F8332 should have got Official Android 8.0 Oreo installed by now. Go to Settings > About phone to verify.
If you encounter any problem, please comment below, and we will get back to you as soon as possible.
Please don’t forget to share if you have found this post helpful!
![Download Vivo X200 FE GCam Port [Most Compatible Version] Download Vivo X200 FE GCam Port [Most Compatible Version]](https://static.droidfeats.com/wp-content/uploads/2025/07/vivo-x200-fe-in-four-aesthetic-color-options.png-300x179.webp)


1 Comment
BIUS€€