Xiaomi recently released Poco F1, the best gaming phone that comes with flagship level Qualcomm Snapdragon 845 processor (which powers Samsung’s Galaxy S9 and Note 9). No wonder, this phone already gained everyone’s attention, and if you have brought it, you might be looking for TWRP and root. This guide will definitely help you. We will be describing a tutorial on how to root Xiaomi Poco F1. We will be using TWRP recovery to flash Magisk root tool in order to gain root access. Also. we have a tutorial on how to install TWRP recovery on Poco F1 below before the root tutorial.
Thanks to the developer for making TWRP custom recovery available to this newly released device. This is so fast. Isn’t it?

Using TWRP, you can unlock the full potential of your device. You can try out any custom ROM on your device. We are sure that this device will get official LineageOS support soon. Do you think we should explain why to root? Well, if you are the regular reader of Droidfeats, we don’t think we need to tell it again.
If you are looking for stuff like Xposed module, custom Mods, substratum, etc. to customize you Poco F1, you must have root access. Even some Apps from Play store like Titanium Backup need root access to backup your Apps and remove system bloatware.
But the most important part before starting this tutorial is unlocking the bootloader. Xiaomi Poco F1 comes with a locked bootloader. Therefore, you must unlock it before starting the tutorial. After that, you can install TWRP with which you need to flash Magisk 17.1 package to gain root access. Our choice of root tool will always be Magisk due to its systemless approach, reliability and extended support.
WARNING: All the custom ROMs, Official Firmware, How-to guides, tutorials, roots, hacks, and tricks mentioned on our site belong to the respective developers. We are not responsible if anything goes wrong with your device. Perform it at your own risk.
Compatibility
This guide is specific to Xiaomi Poco F1. Please do not experiment this with any other Xiaomi’s device. Otherwise, your device may get bricked permanently. No one wants that, right?
Downloads: TWRP, Magisk, and Force encryption disabler
- TWRP Recovery: twrp-3.2.3.0-beryllium-20180831.img
- Force encryption disabler: DisableForceEncryption_Treble.zip
- Magisk root file: Magisk 17.1 Stable ZIP
Pre-requisite
- Make sure your phone has at least 80 – 85% charge. If not, please do charge it before starting the experiment.
- You need to enable USB Debugging mode to connect your Android phone to computer. (Settings > About Phone > Build number > Tap it 7 times to become developer; Settings > Developer Options > USB Debugging).
- Your bootloader must be unlocked from before to root Poco F1. If not, please do that first, then get back to our tutorial.
- You must install Android SDK tool on your computer.
- Also, enable OEM Unlocking in Developer Options which may need while flashing an image file.
- Install Xiaomi Poco F1 driver on your computer.
How to Install TWRP and root Xiaomi Poco F1
We have mentioned the full step-by-step instructions on How to root Xiaomi Poco F1 using Magisk tool and install TWRP Custom recovery. If you are entirely new to rooting, flashing a Custom ROM or an Official Firmware, please read the entire tutorial once before actually performing it on your device.
Tutorial: How to install TWRP on Xiaomi Poco F1
- Download all the required files from the above-given links to your device. Also, keep a copy of the TWRP image file on your computer.
- Connect your phone to the computer using compatible USB cable (preferably, the official one, provided by Xiaomi with the phone box).
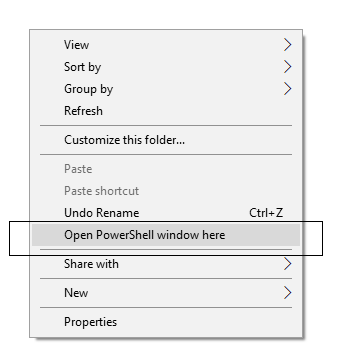
- Open Command Prompt on the same directory as TWRP file. Press the SHIFT key and right-click on an empty space. Select “Open PowerShell window here” or “Open command window here” from the pop-up menu.
- On the PowerShell Window, type the following command and HIT enter:
adb reboot bootloader
(This will reboot the device into fastboot/bootloader mode.)
└ If you get a permission pop-up on your device to Ällow USB debugging”, tap OK.
- Once you are in the fastboot mode, type the following command and HIT enter:
fastboot flash twrp-3.2.3.0-beryllium-20180831.img
(The command ends with the file name. If the file name changes in a newer version, type “fastboot flash <your-changed-name-here.img”)
- Once the file is flashed, reboot your device! Carefully hold the Volume Up button now. While holding, type the following command and HIT enter to reboot into TWRP recovery.
fastboot reboot
- TWRP Recovery: In order to reboot into recovery mode, use Volume rockers to select “Recovery mode” option and press Power button to select. You will get access to TWRP.
- You will be asked to enter your device Password/PIN/Pattern. Enter it to let system decrypt in recovery mode. If you don’t have any password, it won’t ask.
- Now, go back to main menu (TWRP Home) and tap on “Install” button. From the list, choose the Force encryption disabler ZIP file that you have copied in Step 1. This step will prevent your device from boot-looping.
So, you are done here! No further steps are required for TWRP image file.
Tutorial: How to root Xiaomi Poco F1
There are two methods to root Xiaomi Poco F1 using Magisk:
- Flash the Magisk ZIP using TWRP recovery.
- Patch the stock boot image of your current firmware and flash it using fastboot.
However, the second method is not recommended for novice users since it is quite tricky. You need to familiarize with the steps before you proceed with it. Both methods are described in our detailed tutorial below:
→ How to install Magisk to root Android devices – Universal Systemless Interface
Once you are done with everything, reboot your phone to the system, and verify root status using this Root Checker App.
So you are done with this tutorial! You had successfully installed TWRP and rooted Xiaomi Poco F1 using our guide. If you faced any problem with performing this tutorial, please let us know by dropping a comment below. Our team will reply you back as soon as possible.
Is this post helpful? Please do share it on Social Media to THANK US.


![Download Redmi 9a GCam Port [Most Compatible Version] Download Redmi 9a GCam Port [Most Compatible Version]](https://static.droidfeats.com/wp-content/uploads/2025/03/Redmi-9a-GCam-Port-sample-450x245.webp)
![Download Redmi 9 GCam Port [Most Compatible Version] Download Redmi 9 GCam Port [Most Compatible Version]](https://static.droidfeats.com/wp-content/uploads/2025/02/Redmi-9-GCam-Port-450x245.webp)