From this post, you will be able to update your Nokia 8.1 to Android 10.0 official firmware with build number V4.15B. The Nokia 8.1 was released back in December 2018 with Android 9.0 Pie. But now, the company has rolled out Android Q for this device via OTA, thanks to the HMD Global. However, this update might not reach your region. In that case, you can manually install the OTA ZIP of V4.15B Android 10 on Nokia 8.1. We have the download link of the update file as well as an easy tutorial below to flash it quickly. Read ahead!
What’s new in Android 10 Q?
Nokia 8.1 was the part of Android Q Beta Program, and now, its the first device from the HMD Global to get stable Android 10.
So, before starting the tutorial, let us check some of the key features of Android Q. Since this is a major upgrade from Nokia, you can expect a lot of new features, changes, and other improvements. Moreover, Nokia comes under the Android One. So, you can expect a quick update as well as security patches via OTA.
The main features of Android Q are as follows:
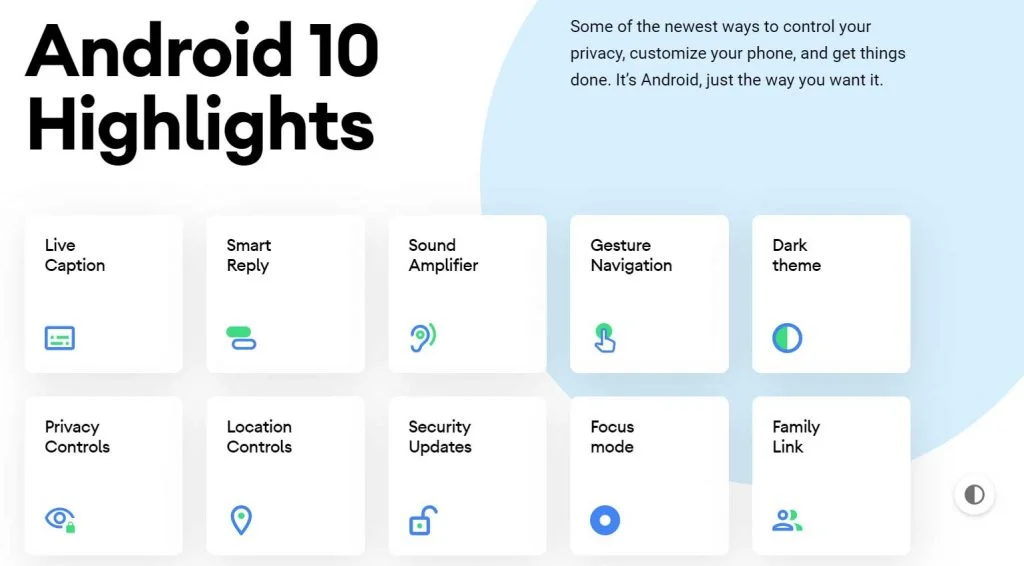
- Live Caption: Automatically caption media playing on your phone
- A dark mode
- Smart Reply for all messaging apps
- A better sharing menu
- Focus Mode
- Quicker access to settings
- A standard depth format
- An improved Files app
- Overhauled permissions
- Wi-Fi sharing via QR codes
- Gestures, app drawers play nicely
- Google Assistant ‘handles’
- Sound Amplifier
- Hearing aids get streaming support
- Security updates via Play Store
- Wet, overheating USB warnings
- Digital Wellbeing
- Family Link
To know more about Android 10, you can check out on the official site as well!
There’s a video by NokiaPowerUser.com on the first impression of the Nokia 8.1 running Android 10. Kudos to them!
As mentioned earlier, the Android 10 for Nokia 8.1 comes as a V4.15B build number, which weighs about 1.4 GB or 1448.7 MB to be precise. As per the Nokia subreddit, this update is already available for Indian and European users via OTA (Over-the-air).
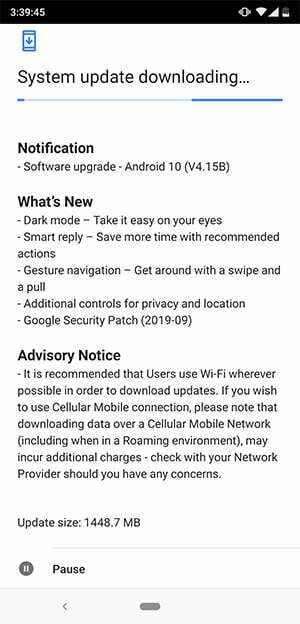
However, it could take some time to reach the entire part of the world. So, if you are eagerly waiting for Android Q on Nokia 8.1, you can manually sideload the OTA zip file using stock recovery or by using a simple dialer code within the OS.
Love the Android Q features? We love it too, and we know you are looking forward to installing Android 10.0 on Nokia 8.1. But before heading to the installation tutorial, we recommend you to check out the Pre-requisites section below.
Pre-requisites
- Make sure your phone has at least 80 – 85% charge. If not, please do charge it before starting the experiment.
- You need to enable USB Debugging mode to connect your Android phone to computer. (Settings > About Phone > Build number > Tap it 7 times to become developer; Settings > Developer Options > USB Debugging).
- You must install Android SDK tool on your computer.
- Install Nokia 8.1 USB driver on your computer.
Backup your Android Device
We don’t want you to lose any data, or anything could go wrong unexpectedly. Before starting the tutorial, we strongly recommend you to make a full backup of your phone.
Once you are sure that you have completely backed up your data, proceed to the tutorial below to and update Nokia 8.1 to Android Q using fastboot.
Download Nokia 8.1 Android Q Update
- OTA → Nokia 8.1 Android 10 (V4.15B) OTA Package (official link)
- Factory Image → [not available now]
Note: This OTA package is only compatible with the ‘PNX_Sprout’ version of the Nokia 8.1. If you have a ‘gsi_sdm660_64’ version, this file may not work for you. Make sure to check your version before attempting the sideload.
After downloading the ZIP file, make sure to rename it to “PNX-415B-0-00WW-B03-update.zip“.
[alert-note]WARNING: All the custom ROMs, Official Firmware, How-to guides, tutorials, roots, hacks, and tricks mentioned on our site belong to the respective developers. We are not responsible if anything goes wrong with your device. Perform it at your own risk.[/alert-note]How to Install Nokia 8.1 Android Q Update
There are two different methods to update the Nokia 8.1 to Android 10. Either you can sideload the Android Q OTA using Stock Recovery, or you can flash the factory image. Since we don’t have a factory image, for now, we will opt to sideload method.
Sideload OTA using Stock Recovery
- Download Android 10 Q for Nokia 8.1 from the OTA link above.
- Install ADB and Fastboot driver (Ignore if already done).
- Switch OFF your device.
- Press and hold [Volume Down] + [Power] buttons till you see the bootloader/fastboot mode.
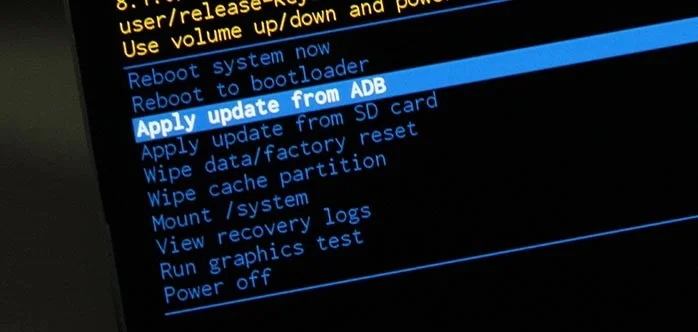
- Use Volume Keys to select “Recovery Mode” and press [Power] button to enter to the stock recovery.
- On the Android bot screen, hold the [Volume Up] button and tap the [Power] key once.
- Connect your phone to the computer using compatible USB cable (preferably, the official one, provided by Nokia with the phone box).
- Select ‘Apply update from ADB.’
- Copy/Paste the downloaded file to your ADB directory [C:\adb].
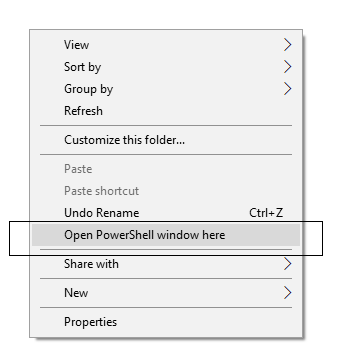
- Open Command Prompt on the same directory as the folder with Android 10.0 ZIP file. (Press the SHIFT key and right-click on an empty space. Select “Open PowerShell window here” or “Open command window here” from the pop-up menu.)
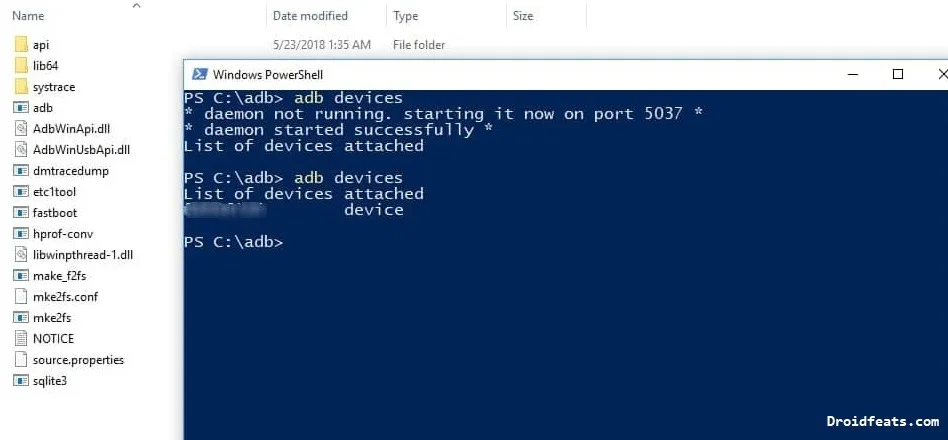
- Make sure that your device is being detected properly using the following command:
adb device
- The command will return a unique device ID right with the ‘fastboot’ message.
- Type the following code on your Command Window and HIT enter:
adb sideload PNX-415B-0-00WW-B03-update.zip
- Your OTA installation should start now!
- Once the installation is completed, select “reboot system now” option from the recovery menu.
Wait a while, and your phone may take up to 10 minutes to boot for the first time.
While the device boots, it shall run the latest Android 10.0 Q firmware. Now, simply browse around and check out all the new Q-specific features.
So you are done with this tutorial! You had successfully installed Android 10 Q on your Nokia 8.1 using our guide. If you faced any problem with performing this tutorial, please let us know by dropping a comment below. Our team will reply you back as soon as possible.
Is this post helpful? Please do share it on Social Media to THANK US.
![Download Vivo X200 FE GCam Port [Most Compatible Version] Download Vivo X200 FE GCam Port [Most Compatible Version]](https://static.droidfeats.com/wp-content/uploads/2025/07/vivo-x200-fe-in-four-aesthetic-color-options.png-300x179.webp)



2 Comments
I have an error
(~47%) adb: failed to read command: No error
Please help me
Thank you
I have an error
(~47%) adb: failed to read command: No error
Please help me