In this tutorial, we will guide you to install Android 11 developer preview on Google Pixel devices. Android 11 is still not released and is on developer preview. So, being a developer preview, Android 11 is only available for manual flashing. This means you need to download the system factory images from Google’s official source and flash it using Android Debug Bridge (ADB). This method seems a bit technical for the novice users. But using our detailed tutorial below, you can easily install Android 11 developer preview on your Google Pixel phone. Read ahead!

Usually, Google launches a new Android version in March and then uses Google I/O conference to present the latest features. But this time, it arrived a bit earlier. The Android 11 developer preview is now available to download and install on the Pixel devices. You can flash the OS right away and check out what’s new on this Android version. As of now, we will be listing a few key features below. The rest, you can experience by yourself using the developer preview of Android 11.
But remember, this is an early baseline build for developers only and not intended for daily or consumers. So, you might not get the full stability on this OS. Even the complete features aren’t included in the Developer Previews. If you need a stable build, you need to wait in the following manner:

Android 11 Timeline (from the official source)
| Timeline | Build | Type | Developer actions |
|---|---|---|---|
| February | Developer Preview 1 | Early baseline build focused on developer feedback, with new features, APIs, and behavior changes. | Priority window for feedback on APIs. Explore new APIs and behavior changes and report any critical issues or requests to us during this time. |
| March | Developer Preview 2 | Incremental update with additional features, APIs, and behavior changes. | Give us feedback as you work with APIs and behavior changes. Begin early app compatibility testing. |
| April | Developer Preview 3 | Incremental update for stability and performance. | Get apps ready for consumers Beta. Continue compatibility testing, publish updates without changing targeting. Notify SDK and library developers of any issues. |
| May | Beta 1 | Initial beta-quality release, over-the-air update to early adopters who enroll in Android Beta. | Continue compatibility testing, watch for feedback from Android Beta users. Start early testing with targeting Android 11. |
| June | Beta 2 | Platform Stability milestone. Final APIs and behaviors. Play publishing opens. | Start final compatibility testing for apps, SDKs, and libraries. Release compatible versions. Continue work to target Android 11. |
| Q3 | Beta 3 | Release candidate build. | Release compatible updates for apps, SDKs, and libraries. Continue work to target Android 11. Build with new features and APIs. |
| Q3 | Final release | Android 11 release to AOSP and ecosystem. | Release compatible updates for apps, SDKs, and libraries. Continue work to target Android 11. Build with new features and APIs. |
What’s new in the Android 11 for Google Pixel devices?
Google has improved on varieties of features with the Android 11 update. It supports new technologies, increased functionalities, and accessibilities that developers and users want.
Another important feature that Android 11 bought is how apps can now find out if you are on 5G, continuing a feature that lets apps distinguish whether you are on 4G or a Wi-Fi connection. This feature optimizes the content and performance based on your connection. It also stops the usages if your phone is draining loads of data unnecessarily.
Additionally, the notification bar of Android 11 has its own messaging tab. So notifications from ongoing conversations, or other apps, will be divided to let you ignore some if you want.
Here is a brief look at what is new:
- 5G experiences
- One-time permission
- Bubbles (People and Conversations)
- Insert images into notification replies
- Biometrics supports
- Secure storage and sharing of data
- A new NFC file-sharing alternative
- Improved dark mode
To know more about Android 11 features, check out the official Android site!
Download Android 11 Developer Preview 1 System Images
As of now, the Android 11 is only for developers. That’s why you need to download the system image and install it manually. Below are the download links of the official factory image for the compatible Pixel smartphones:
| Device name | Codename | Download system factory image |
| Pixel 4 XL | coral | Download Android 11 Beta |
| Pixel 4 | flame | Download Android 11 Beta |
| Pixel 3a XL | bonito | Download Android 11 Beta |
| Pixel 3a | sargo | Download Android 11 Beta |
| Pixel 3 XL | crosshatch | Download Android 11 Beta |
| Pixel 3 | blueline | Download Android 11 Beta |
| Pixel 2 XL | taimen | Download Android 11 Beta |
| Pixel 2 | walleye | Download Android 11 Beta |
You can quickly install Android 11 developer preview 1 on Google Pixel devices using the tutorial below!
[alert-note]WARNING: All the custom ROMs, Official Firmware, How-to guides, tutorials, roots, hacks, and tricks mentioned on our site belong to the respective developers. We are not responsible if anything goes wrong with your device. Perform it at your own risk.[/alert-note]Please read the entire tutorial once before actually performing it on your device!
Google Pixel USB Driver
Make sure you have correctly installed Google Pixel USB driver on your computer. If not, please download it from our USB Driver Section below and install it correctly. Otherwise, your computer will not detect your device.
→Download the latest Google Pixel USB Driver
You may also like:
- Trending: Download YouTube Vanced APK LATEST (for any Android) – get premium YouTube features for free
- Rooting guide: How to Root Google Pixel 3 and Pixel 3 XL using Magisk tool
- Unlock: How to Unlock Bootloader on Google Pixel 3 and Pixel 3 XL
Backup Google Pixel (Warning)
But before starting the tutorial, we suggest you to backup your important documents from the device and make a copy of it to your computer. On performing our experiment, your device will get wiped, and you will lose everything from the phone. We don’t want that. in that case, we have a list of Application that may help you on creating backup within the phone. Later on, you can copy the files to computer for a safe side.
→ Top 10 Best Android Backup Apps – Secure your Data
Once you are sure that you are done with the backup stuff, please proceed to the tutorial below on How to install Android 11 on Google Pixel devices.
Pre-requisites
- Make sure your phone has at least 80 – 85% charge. If not, please do charge it before starting the experiment.
- You need to enable USB Debugging mode to connect your Android phone to computer. (Settings > About Phone > Build number > Tap it 7 times to become developer; Settings > Developer Options > USB Debugging).
- You must install Android SDK tool on your computer.
- This tutorial may WIPE OUT all your DATA. Make sure to create a Backup of everything before starting the tutorial.
- Install USB driver on your computer.
HOW TO: Install Android 11 on Google Pixel phones
We have mentioned full step-by-step instructions on How to Install Android 11 on Google Pixel phones. If you are entirely new to rooting, flashing a Custom ROM or an Official Firmware, please read the entire tutorial once before actually performing it on your device.
TUTORIAL: (Step by Step Guide)
- Download the Android 11 system factory image from the above download section for your specific Pixel phone on your PC.
- Connect your phone to the computer using the compatible USB cable (preferably, the official one, provided by Google with the phone box).
- Make sure that you had correctly configured the ADB binaries on your computer. Please check: How to Set Up ADB and Fastboot with Android SDK.
- If you are a macOS user, you can find a detailed tutorial here: How to correctly setup ADB on macOS using Homebrew!
- Once done with the ADB setting, do switch OFF your device.
- Next, enter into the Fastboot / Bootloader Mode on your phone. Press and hold [Volume Up] + [Volume Down] + [Power] buttons till you see the bootloader/fastboot mode.
- Extract the downloaded files on your PC.
- Copy/Paste the extracted files to your ADB directory [for example, C:\adb on Windows].
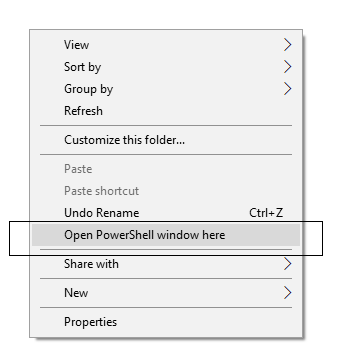
- Open Command Prompt on the same directory as the folder with the Android 11 file. (Press the SHIFT key and right-click on an empty space. Select “Open PowerShell window here” or “Open command window here” from the pop-up menu.)
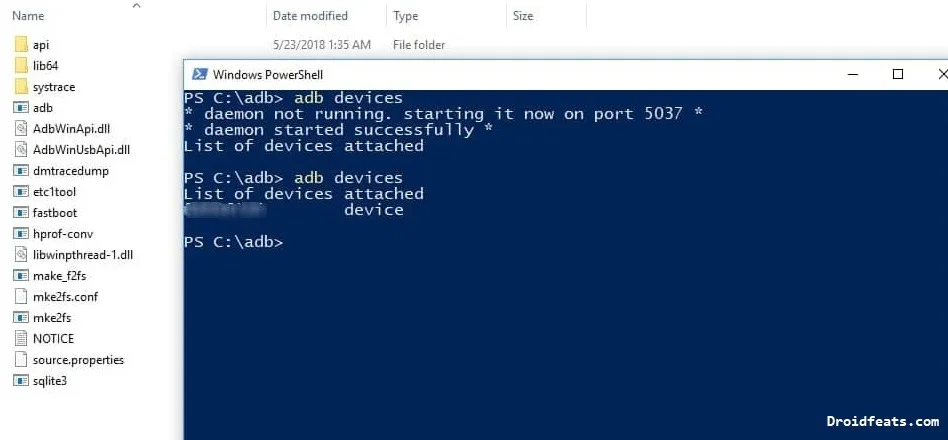
- Make sure that your device is being detected properly using the following command:
adb device - The command will return a unique device ID right with the ‘fastboot’ message.
- Run the following file from the factory image files in your fastboot directory (depending which OS you are on):
→ Windows: Run the file “flash-all.bat”.
→ Mac: Run the file “flash-all.sh” using Terminal.
→ Linux: Run the file “flash-all.sh”. - That’s pretty much you had to do for flashing Android 11 on your Google Pixel phone. Now, wait and see the process. Once the process is complete, follow the on-screen instructions on your phone (in case you have to unlock the bootloader).
Wait a while, and your phone will not take more than 10 minutes to boot for the first time.
Hurray! Your Google Pixel phone should have got Android 11 Developer Preview 1 installed by now. Go to Settings > About phone to verify.
Conclusion
So, you are done with the complete tutorial. We hope you now have a piece of explicit knowledge about how to install Android 11 factory image on Google Pixel phone. If you have any further queries, kindly leave them down in the comment box. Also, if you found this post helpful, do not forget to share it on Social Media to thank us.



![Download Vivo X200 FE GCam Port [Most Compatible Version] Download Vivo X200 FE GCam Port [Most Compatible Version]](https://static.droidfeats.com/wp-content/uploads/2025/07/vivo-x200-fe-in-four-aesthetic-color-options.png-450x268.webp)
![Google Camera vs Stock Camera [The Secret Behind Pixel Perfection] Google Camera vs Stock Camera [The Secret Behind Pixel Perfection]](https://static.droidfeats.com/wp-content/uploads/2025/02/Google-Camera-vs-Stock-Camera-450x245.webp)