From this post, you will be able to root OnePlus Nord using Magisk systemless tool. If you had unlocked its bootloader and installed the TWRP, you can proceed to the tutorial given below and root OnePlus Nord with ease. The device is getting pretty much hype, so does its development in the third-party community like XDA. If you want to take the full benefits of this device and unlock its potentiality, you must first root the phone.
This guide will let you do all the necessary steps to root OnePlus Nord with basic safety. Suppose you are a novice user doing these things. In that case, I request you to read the entire guide thoroughly once before actually performing it on your device.

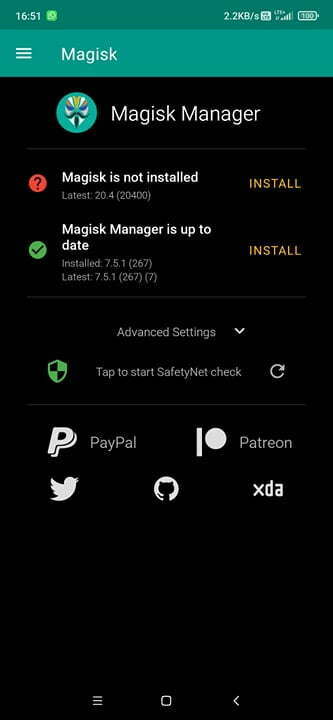
As always, our rooting choice is Magisk. The SuperSU tool is no longer active in any community; neither has further development due to Android restrictions in the recent updates. As of now, we have the Magisk 20.4, the latest one while writing this article, which is tested and compatible with the OnePlus Nord. Continue reading below to download the required files!
Root OnePlus Nord details
OnePlus Nord is just beginning to arrive, and there’s already a way to root the device. Thanks to the XDA Senior Member Some_Random_Username. Obviously, there is no TWRP at the moment, but he has managed to take out the patched boot image using topjohnwu’s Magisk to root OnePlus Nord. So, rooting will just take a few steps, you will need to have a PC handy and know your way around some ADB commands. I will explain everything; just continue reading!
Download Boot.img for OnePlus Nord
Download the boot.img file for OnePlus Nord on your computer from the links below. But keep in mind, this patch is created from the latest OxygenOS build (currently 10.5.2). If you still have the older version, please do update it first, and then proceed ahead! We are not sure about the earlier builds, so be careful.
- EU Edition: 10.5.2.AC01BA.boot.img
- Indian Edition: 10.5.2.AC01DA.boot.img
After downloading, check out the pre-requisites and then the tutorial carefully to root your OnePlus Nord using fastboot commands.
Patch the Stock Boot Image
- Move the download boot.img file to your device’s internal storage.
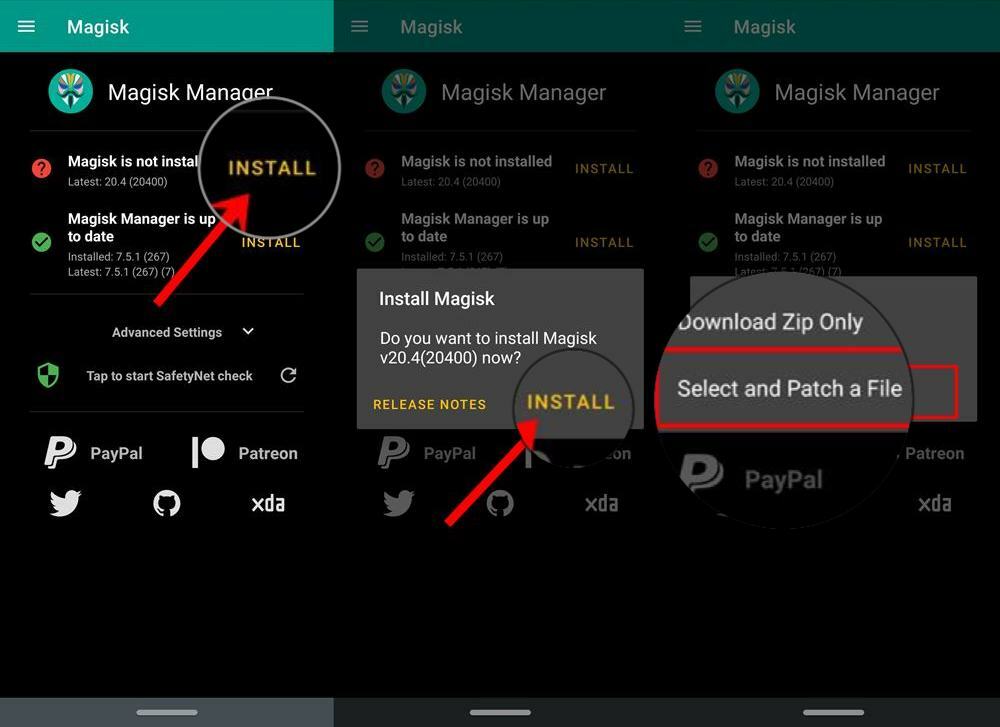
- Download and install the latest Magisk Manager on your device.
- Open Magisk Manager. From the main screen, select Install > Install > Select and patch a file.
- Now select the boot image (boot.img). Magisk will start patching the stock boot image.
- Once completed, the file will be saved as ” magisk_patched.img ” in the Download folder.
Pre-requisites
- Your OnePlus Nord must have an Unlocked Bootloader!
- Download the latest version of the Magisk Manager on your phone!
- Install Oxygen 10.5.2 or above if you are still on the older builds.
- Set up ADB Drivers on your computer. (Windows / Mac)
- Make sure your phone has at least 80 – 85% charge. If not, please do charge it before starting the experiment.
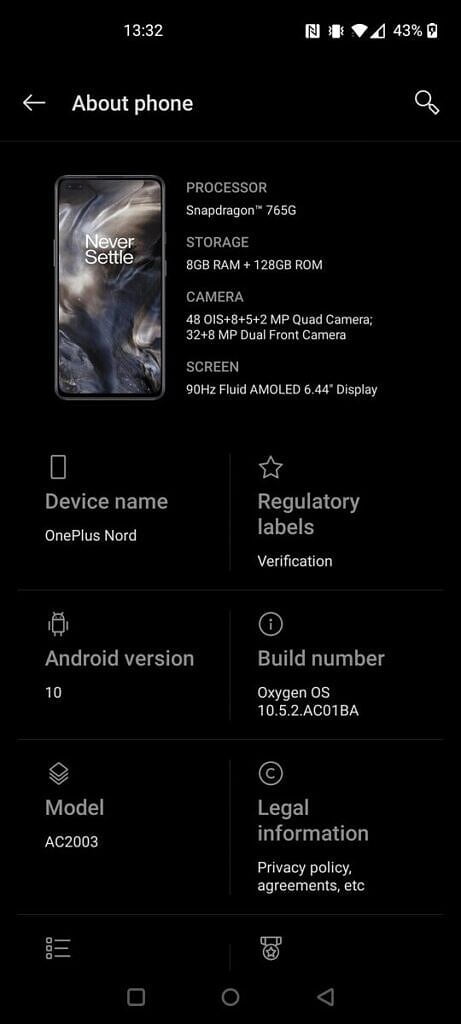
- You need to enable the USB Debugging mode to connect your Android phone to the computer. (Settings > About Phone > Build number > Tap it 7 times to become developer; Settings > Developer Options > USB Debugging).
Backup OnePlus Nord
Before starting the tutorial, we suggest you to backup your essential documents from the device and make a copy of it to your computer. On performing our experiment, your device may get wiped, and you may lose everything from the phone. We don’t want that. In that case, we have a list of applications that may help you in creating backups within the phone. Later on, you can copy the files to the computer for a safer side.
- Top 10 Best Android backup apps – Secure your Data!
Once you are sure that you are done with the backup stuff, please proceed to the tutorial below on How to Root OnePlus Nord quickly.
How to root OnePlus Nord using patched BOOT Image
We have mentioned the full step-by-step instructions on how to flash the Magisk patched boot image on OnePlus Nord using fastboot. If you are entirely new to rooting, flashing a Custom ROM or an Official Firmware, please read the entire tutorial once before actually performing it on your device.
Tutorial: How to Root OnePlus Nord with Patched Boot Image
- Install Magisk Manager on your phone using the downloaded APK file in the pre-requisite section.

- Get the magisk_patched.img file on your computer (from the download folder of your phone).
- Connect your phone to the computer using a compatible USB cable (preferably, the official one, provided by OnePlus with the phone box).
- Open Command Prompt on the same directory the IMG file is located. Press the SHIFT key and right-click on an empty space. Select “Open PowerShell window here” or “Open command window here” from the pop-up menu.

- On the PowerShell Window, type the following command and HIT enter:
adb reboot bootloader
(This will reboot the device into fastboot/bootloader mode.)
└ If you get a permission pop-up on your device to “Allow USB debugging”, tap OK. - Once you are in the fastboot mode, type the following command and HIT enter:
fastboot getvar current-slot
- If the output is a, type the following and press Enter.
fastboot flash boot_a magisk_patched.img
- If the output is b, type the following and press Enter.
fastboot flash boot_b magisk_patched.img
- (The command ends with the file name. If you have a different file name, type “fastboot flash boot_a <your-changed-name here.img”)
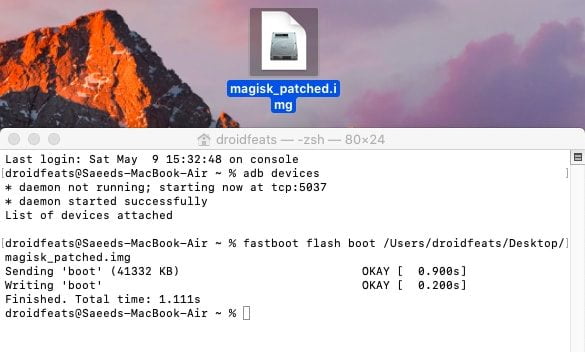
*This action is performed on Mac, but it is the same on Windows!
- If the output is a, type the following and press Enter.
- Once the file is flashed, reboot your device! While holding, type the following command and HIT enter to reboot into TWRP recovery.
fastboot reboot
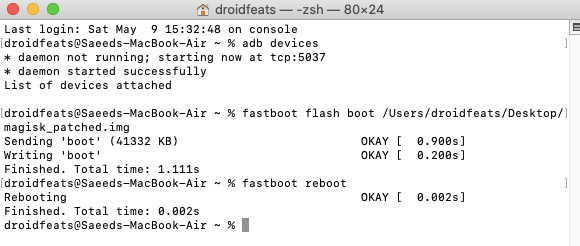
*This action is performed on Mac, but it is the same on Windows! - Your device should reboot to OS now!
So, you are done here! No further steps are required for magisk_patched.img file.
Now, open the Magisk Manager app. It should show Magisk is installed!
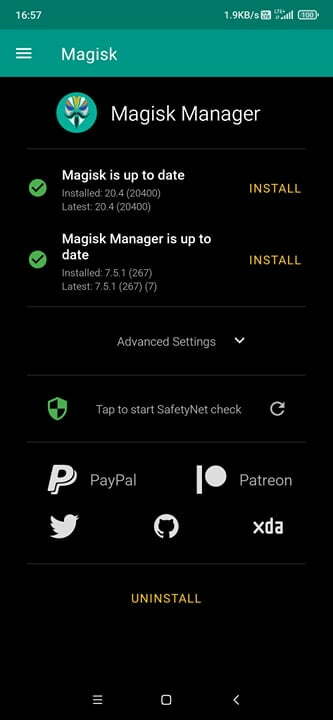
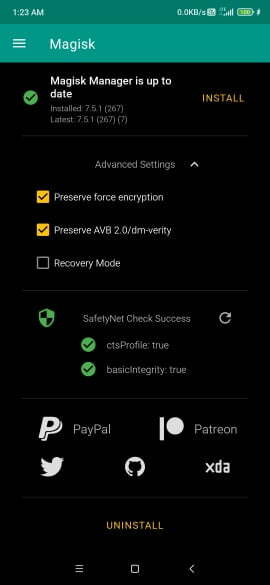
Hurrah! You have got rooted OnePlus Nord 🙂 You can now try out some top root based app on your phone. Moreover, you can use Magisk Modules to modify the phone in the way you love. Check out: How to install Magisk Module!
Download GCam PORT for OnePlus Nord
So you are done with this tutorial! You had successfully rooted your OnePlus Nord with the patched boot image using our guide. If you faced any problem with performing this tutorial, please let us know by dropping a comment below. Our team will reply you back as soon as possible.
Is this post helpful? Please do share it on Social Media to THANK US.