The G series of Motorola has been one of the most successful smartphone lineups of the company. Unfortunately, most of the phones are lagging of getting the major system update from the company. The Moto G4 and G4 Plus were released back in 2016 with Android 6.0 Marshmallow. But later, both the device received Nougat update from the OEM. Despite promising an update for Android Oreo, they exclude the G4 in their Oreo update timeline. However, the company backtracked their decision now, because of the strong negative reaction of their users.

We are finally getting much closer to receive a major system update for both the device. The Moto G4 Android Oreo update is being soak tested by users, and one of the beta build has been leaked online.
Thanks to the senior XDA member rajatgupta1998 for sharing Android 8.1 Oreo build with November security patch. The build number is OPJ28.128, but keep in mind, you can’t downgrade after installing if your device bootloader is locked.
With this guide, you will be able to update your Moto G4 / G4+ to Android 8.1 Oreo firmware using sideload method. Read ahead; we have download links for all necessary files along with the OTA link. Tutorials are given below with detailed steps. If you are the first time playing with sideloading, please do read the entire article once before performing this experiment.
Moto G4 and G4 Plus Android 8.1 Oreo Soak Test
The OTA has been captured by XDA user rajatgupta1998. He also created a TWRP backup, in case you have a custom recovery installed, you can easily restore it to get the fresh Android 8.1 Oreo on your Moto G4 / G4 Plus.
But keep in mind that this is a major system update. The newer software comes with an updated bootloader and modem version. Once you install this update, you can’t get back to Nougat. So, you need to wait for the stable release from Motorola. However, if you restore the TWRP backup, it will not update your bootloader and modem. So you can easily downgrade if you want.
Features
This Android 8.1 Oreo update for Moto G4 / G4+ have all the goodies that are present in stock Oreo firmware. Some of them are as follows:
- Pixel Visual Core
- Automatic dark and light theme
- New cheeseburger emoji
- Ambient display
- Redesigned power menu
- Android Go
- Notification dots
- Choose which apps display notification dots
- Enable or disable Picture-in-Picture for individual apps
- Show battery percentage in the status bar
- Choose your autofill provider
- Adjust Night Light
- Limit background activities on older apps
- Reveal the Android Octopus
- and many more.
Love the features? We love it too, and we know you are looking forward to installing Android 8.1 Oreo on Moto G4 / G4 Plus. But before heading to the installation tutorial, we recommend you to check out the Pre-requisites section below.
Spotted bugs
Now, before heading to the tutorial below, check out some of the bug discovered on this build:
- The camera seems very slow on the first boot. It also lags sometimes.
- Switching between the primary camera and the secondary camera needs time.
- Since this is not the final build, SafetyNet is not passed yet. Therefore, Play Store shows device as “Uncertified”.
We hope these bugs will get fixed as soon as the OEM release a stable update via OTA. Now you are aware of these bugs. If you are okay with them, just follow the instruction below in order to update your device.
Download Moto G4 / G4 Plus Android 8.1 Oreo leaked OS
OTA package: block_delta-Blur_Version.25.236.3-28.1.43.athene.retail.en.US.zip (Discontinued)
TWRP Backup: twrp-backup-block_delta-Blur_Version.25.236.3-28.1.43.athene.retail.en.US.zip (Discontinued)
Thanks to the XDA Senior members, srajatgupta1998 for this work. All credit goes to them.
Credit
Backup your Android Device
Before proceeding to the tutorial to install, we strongly recommend you to backup your important data and files from your phone. Because flashing an official firmware will erase everything from your device. We don’t want you to lose anything by following our tutorial. In that case, you can check out our list of backup app that may help you:
→ Top 10 Best Android Backup Apps – Secure your Data
Once you are sure that you made a complete backup of your necessary documents, you can move ahead to the tutorial below and update Moto G4 / G4 Plus to Android 8.1 Oreo firmware with the latest security patch.
Pre-requisites
- Make sure your phone has at least 80 – 85% charge. If not, please do charge it before starting the experiment.
- This tutorial will WIPE OUT all your DATA. Make sure to create a backup of everything before starting the tutorial.
- You need to perform a Dalvik Cache wipe in recovery mode before and after installing the ROM.
- You need to enable USB Debugging mode to connect your Android phone to computer. (Settings > About Phone > Build number > Tap it 7 times to become developer; Settings > Developer Options > USB Debugging).
- Install Motorola USB driver on your computer.
- Install TWRP custom recovery, in case you want to restore the backup.
- Sideloading OTAs won’t trip the KNOX counter. So, you are safe.
How to install Android 8.1 Oreo on Moto G4 / G4+
We have mentioned full step-by-step instructions on how to install Android Oreo on Moto G4 / G4 Plus. If you are entirely new to rooting, flashing a Custom ROM or an Official Firmware, please read the entire tutorial once before actually performing it on your device.
There are two method to install Android 8.1 Oreo on Moto G4 / G4 Plus:
- Sideload method
- TWRP method
Method #1: Update Moto G4 / G4+ to Oreo using ADB
- Download the Android 8.1 Oreo Soak Test OTA package from the above-given link to your computer.
- Now, connect your phone to the computer using the USB cable (preferably with the one which is provided by the OEM).
- Copy and paste the downloaded zip file to the internal storage of your phone.
- Now, restart your device into the bootloader mode using the following button combination:
Volume Down + Power buttons together.
- You should be in the bootloader screen. Use volume rockers to navigate Recovery mode and hit the Power button to select it.
- You will see an Android robot on the screen.
- Now, hold the Power button and press the Volume Up button to enter into the stock recovery mode.
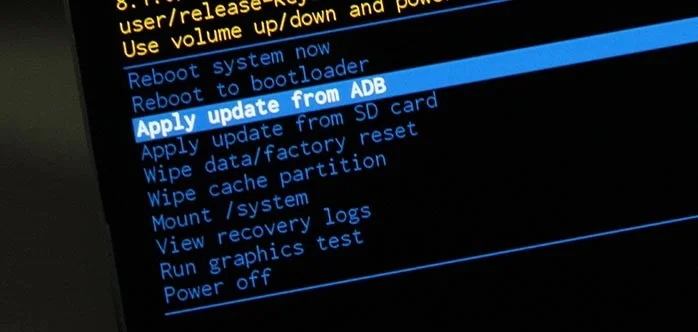
- Once you entered the recovery mode, select ‘Apply update from ADB.’
- Choose the OTA package (filename: block_delta-Blur_Version.25.236.3-28.1.43.athene.retail.en.US.zip) that you had downloaded earlier in the step #1.
- Finally, hit the power button to confirm and install Android 8.1 on Moto G4 / G4 Plus.
- Your Android Oreo installation should start now!
- Once the installation is completed, select “reboot system now” option from the recovery menu.
Method #2: Restore TWRP Backup
[alert-note]Note: Perform this method only if you have TWRP custom recovery installed on your Moto G4 / Moto G4 Plus.[/alert-note]- Download the Android 8.1 Oreo TWRP Backup ZIP package from the above-given link to your computer.
- Switch Off your phone.
- Go to the recovery mode using the following button combinations:
Volume Down and Power button together.
- In TWRP home, navigate to Wipe > Format Data.
- Type “yes” and confirm format. This step will clean everything on your phone, including internal storage.
- Once formatted, navigate to “Mount” menu and tap on “Enable MTP.”
- Now, connect your phone to the computer using the USB cable (preferably with the one which is provided by the OEM).
- Extract the downloaded ZIP file on your computer to get the required folder, i.e., the TWRP Backup folder (2018-11-23–13-24-15).
- Copy and paste that folder to the internal storage of your phone in the following manner:
sdcard (internal storage)/TWRP/BACKUPS/(2018-11-23–13-24-15)
- Disconnect the device from your computer.
- Go back to main menu (TWRP Home) and tap on “Restore.”
- Select the backup package, and make sure to check both System and Boot options in the next screen.
- Finally, swipe the button and you are done!
- Once the restoration is completed, select “reboot system now” option from the recovery menu.
Wait a while, and your phone may take up to 10 minutes to boot for the first time.
While the device boots, it shall run the latest Android 8.1 Oreo firmware. Now, simply browse around and check out all the new Oreo-specific features.
So you are done with this tutorial! You had successfully installed Android 8.1 Oreo on your Moto G4 / G4+ using our guide. If you faced any problem with performing this tutorial, please let us know by dropping a comment below. Our team will reply you back as soon as possible.
Is this post helpful? Please do share it on Social Media to THANK US.

![Download Vivo X200 FE GCam Port [Most Compatible Version] Download Vivo X200 FE GCam Port [Most Compatible Version]](https://static.droidfeats.com/wp-content/uploads/2025/07/vivo-x200-fe-in-four-aesthetic-color-options.png-300x179.webp)


