Samsung already started rolling the Pie update to some of their new line smartphones. The One UI beta program is now available for the users of India, China, France, Germany, South Korea, Spain, UK, and the USA. However, some regions are yet to get it, maybe in the very first quarter of 2019. But, if you aren’t lucky enough to get the update directly from Samsung, you can use this guide to update manually. We have a complete tutorial on how to manually update Samsung Galaxy S9 and S9 Plus to One UI Android 9.0 Pie firmware. We will be using sideload method to install the OTA package using ADB or stock recovery.

Android 9.0 has been around the side for a couple of months now. Many devices including OnePlus 6, Essential Phone (PH1), Nokia 7 Plus, Nokia 6.1 and 6.1 Plus already got the update. On the other hand, Samsung is lagging, and they have just started to roll out for their latest flagship via the beta program only. The delay is maybe because of their redefined One UI skin.
The One UI is a redefined version of Samsung’s Experience 10, which primarily focus on the thing that matter the users. One UI is based on Android 9.0 Pie update, which features a vast UI overhaul with an emphasis on ease-of-use, especially in system-wide dark theme and single hand mode. The One UI beta program allows the user to try out the software before official roll out from Samsung.
The design looks clean, with a lot of curves in the interface. We will talk a lot about this skin in the upcoming month of 2019 as the final version will be released officially.
UPDATE (Wed, 19 Dec 2018): Samsung Galaxy S9’s stable One UI (Android Pie) update is rolling out! Check out this guide on How to manually update Galaxy S9 / S9+ to Android 9.0 Pie (Stable) Official firmware!
How to Opt for One UI Beta Program?
Opting One UI beta program is way easy, just a matter of downloading an app from the Play Store and apply. We have described the process below. However, if you are still not able to get the update due to your geographical location, or intentionally you want manual update, just head over to our tutorial below. We have explained everything with the download links for all version of Galaxy S9/S9+.
- Install Samsung Members app from the Google Play Store on your Galaxy S9 / S9 Plus.
- Open the application and log in using your registered ID.
- Once you logged in, go to the “Notices” section of the app.
- Tap on One UI Beta Program Registration.
- Once you are done with the registration, navigate to Settings > Software updates to download and install One UI beta on your Galaxy S9 / S9 Plus.
That’s it! For manual installation, read below!
Pre-requisites
- Make sure your phone has at least 80 – 85% charge. If not, please do charge it before starting the experiment.
- You need to enable USB Debugging mode to connect your Android phone to computer. (Settings > About Phone > Build number > Tap it 7 times to become developer; Settings > Developer Options > USB Debugging).
- Enable OEM Unlock: Settings > Developer options > Enable OEM unlock.
- You must install Android SDK tool on your computer.
- Install Samsung USB driver on your computer.
- Sideloading OTAs won’t trip the KNOX counter. So, you are safe.
- Important: The One UI Android 9 Pie beta update for Galaxy S9/S9+ will work only if the device is having build number BRJ6 or ARJ2.
- The update manner will be as follows:
→ Exynox edition – (G960F/G965F): BRJ6 > ZRKA build number
→ Unlocked Snapdragon edition – (G960U1/G965U1): ARJ2 > ZRK9 build number - If you don’t have the required build number from before, please download the firmware from Sammobile and install it using this guide.
Download One UI Beta OTA for Samsung Galaxy S9/S9+
We have been able to collect the OTA packages of One UI Pie update for Samsung Galaxy S9 and S9 Plus for the following model number. Please make sure to download the correct one based on your device variant.
| Galaxy S9 (Exynos) | Link |
| BRJ6 > ZRKA (Beta 1) | Download now! |
| ZRKA > ZRKL (Beta 2) | Download now! |
| ZRKL > ZRKN (Beta 2 Hotfix) | Download now! |
| Galaxy S9 (Snapdragon) | Link |
| ARJ2 > ZRK9 (Beta 1) | Download now! |
| ZRK9 > ZRKJ (Beta 2) | Download now! |
| ZRKJ > ZRKP (Beta 2 Hotfix) | Download now! |
| Galaxy S9+ (Exynos) | Link |
| BRJ6 > ZRKA (Beta 1) | Download now! |
| ZRKA > ZRKL (Beta 2) | Download now! |
| ZRKL > ZRKN (Beta 2 Hotfix) | Download now! |
| Galaxy S9+ (Snapdragon) | Link |
| ARJ2 > ZRK9 (Beta 1) | Download now! |
| ZRK9 > ZRKJ (Beta 2) | Download now! |
| ZRKJ > ZRKP (Beta 2 Hotfix) | Download now! |
Thanks to the XDA Senior members, suyash1629, geri005 and forum moderator murtaza02 for this work. All credit goes to them.
Credits
Backup your Android Device
Before proceeding to the tutorial to install, we strongly recommend you to backup your important data and files from your phone. Because flashing an official firmware will erase everything from your device. We don’t want you to lose anything by following our tutorial. In that case, you can check out our list of backup app that may help you:
→ Top 10 Best Android Backup Apps – Secure your Data
Samsung users can use Samsung Smart Switch to backup data on the computer. Samsung Smart Switch even allows the users to move data from one device to another of different variant (like moving data of Galaxy S8 to Galaxy S9).
Once you are sure that you made a complete backup of your necessary documents, you can move ahead to the tutorial below and update Galaxy S9 / S9 Plus to One UI Android 9.0 Pie beta Firmware with the latest security patch.
Tools that required for firmware installation
- Odin flash tool: Download Samsung’s Odin flash tool here.
- Samsung USB driver: Download Samsung USB Driver.
- USB Cable: You must have the official USB cable of your device – the one that provided by Samsung.
- You must install Android SDK tool on your computer.
How to install Android 9 Pie beta with One UI on Galaxy S9 and S9 Plus
There are two method to install Android 9.0 Pie on Galaxy S9 / S9 Plus:
- ADB method
- SDcard method
The first one uses ADB binaries along with some command using a computer. It may be quite tricky for the newbie. But the second one is so easy, just a matter of pressing some button combination.
You may also like: How to Root Samsung Galaxy S9 and S9 Plus [all variant] Exynox
Method #1: Update Galaxy S9/S9+ to Pie using ADB
- Make sure you have the required firmware version installed on your phone.
- Once you are done, do check the version (build number) to verify: Settings > About phone.
- Now, download the One UI Android 9.0 Pie for Galaxy S9/S9+ from the above-given link to your computer.
- Rename the file name to an easily rememberable name. Let us consider it as S9-pie-beta.zip here.
- Make sure you have installed ADB and fastboot drivers on your computer.
- Enable USB debugging: You need to enable USB Debugging mode to connect your Android phone to computer. (Settings > About Phone > Build number > Tap it 7 times to become developer; Settings > Developer Options > USB Debugging). Ignore if you had done this before.
- Enable OEM Unlock: Settings > Developer options > Enable OEM unlock. Ignore if you had done this before.
- Now, connect your phone to the computer using the USB cable (preferably with the one which is provided by the OEM).
- Check your phone’s screen. If it asks you to allow USB debugging, just accept it by selecting the OK/Yes option.
- Now, boot your device into the recovery mode using the following command:
adb reboot recovery
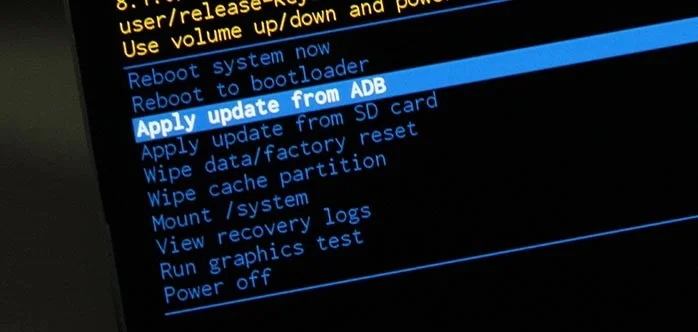
- Once you entered the recovery mode, select ‘Apply update from ADB.’
- Copy/Paste the downloaded file (S9-pie-beta.zip) to your ADB directory [C:\adb].
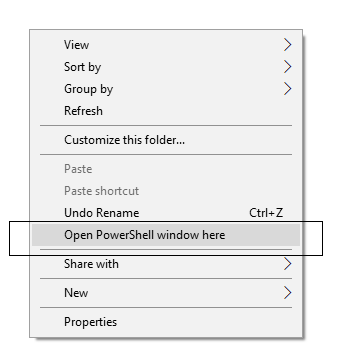
- Open Command Prompt on the same directory as the folder with S9-pie-beta.zip file. (Press the SHIFT key and right-click on an empty space. Select “Open PowerShell window here” or “Open command window here” from the pop-up menu.)
- Type the following code on your Command Window and HIT enter:
adb sideload S9-pie-beta.zip
- Your One UI Android Pie installation should start now!
- Once the installation is completed, select “reboot system now” option from the recovery menu.
Method #2: Update Galaxy S9/S9+ to Pie using SDcard
- Follow step #1 to step #4 from the method one.
- After that, transfer the S9-pie-beta.zip file to SDcard on your Galaxy S9 / S9 Plus.
- Switch OFF the phone.
- Now, boot your device into recovery mode: Once the device is switched off, press and hold Bixby, Volume Up and Power buttons simultaneously until you see the screen boot up.
- Navigate to “Install update from SDcard” option and select it using power button.
- Select the Android 9 Pie update file (S9-pie-beta.zip) that you had transferred in step #2.
- On the next screen, select YES and confirm the installation.
- Your One UI Android Pie installation should start now!
- Once the installation is completed, select “reboot system now” option from the recovery menu.
Wait a while, and your phone may take up to 10 minutes to boot for the first time.
While the device boots, it shall run the latest One UI Android 9.0 Pie firmware. Now, simply browse around and check out all the new Pie-specific features.
So you are done with this tutorial! You had successfully installed One UI Android 9.0 Pie on your Galaxy S9 / S9+ using our guide. If you faced any problem with performing this tutorial, please let us know by dropping a comment below. Our team will reply you back as soon as possible.
Is this post helpful? Please do share it on Social Media to THANK US.


4 Comments
How to roll back to Oreo?
Hi Sharjeel,
You can easily do that using this guide: Galaxy S9/S9 Plus Update – Android 8.0 Oreo (Official) timeline
Works on Galaxy S9 G9600?
Yes, it will work on G9600 as well.