In this guide, you will be able to root your Moto G6 Plus running on Android 8.0 Oreo using Magisk root utility. Moto G6 Plus is a 2018 Motorola G series that were announced a couple of months back, and they are making way for the Android community. Fortunately, the device can be rooted using Magisk root tool. We will be using the latest version of Magisk to gain root access on Moto G6 Plus.
Steps are ahead in the tutorial below, with which you can easily root this smartphone. After rooting, you can use all the root Apps from the Google Play store and some custom mods that can give flagship functionality on your smartphone.

Being a 2018 device, Moto G6 Plus comes with Android 8.0 Oreo, and we expect Android P as a next major upgrade of this device.
Check out the Roadmap here: Android P update for all supported devices [list and release date]
Root is the only way to open the window to enhance the feature of an Android device. You can install Custom ROM, Recoveries, and also install modules that can improve the performance of your phone. The process of rooting Moto G6 Plus is quite easy as it is based on patching boot image. Read ahead; we have some download links that required while rooting. Make sure to grab them all and proceed to the tutorial below.
Why Magisk on Moto G6?
Magisk is the most reliable root utility since 2016 because of its systemless approach. It doesn’t mess with system partition. So, the installation is cleaner and can be uninstalled easily. Also, you will get some additional features like inbuilt Magisk Modules that can be browsed from Magisk Manager. You won’t get these modules on other root utility.
Also see: Download SuperSU ZIP [latest]: Root your Android phone using TWRP
[alert-warning]WARNING: All the custom ROMs, Official Firmware, How-to guides, tutorials, roots, hacks, and tricks mentioned on our site belong to the respective developers. We are not responsible if anything goes wrong with your device. Perform it at your own risk.[/alert-warning]Pre-requisite
- Make sure your phone has at least 80 – 85% charge. If not, please do charge it before starting the experiment.
- You need to enable USB Debugging mode to connect your Android phone to computer. (Settings > About Phone > Build number > Tap it 7 times to become developer; Settings > Developer Options > USB Debugging).
- Your bootloader must be unlocked from before to root Moto G6 Plus. If not, please do that first, then get back to our tutorial.
- You must install Android SDK tool on your computer.
- Also, enable OEM Unlocking in Developer Options which may need while flashing an image file.
- Install Moto G6 Plus USB driver on your computer.
How to root Moto G6 Plus
We have mentioned the full step-by-step instructions on How to root Moto G6 Plus using Magisk tool. If you are entirely new to rooting, flashing a Custom ROM or an Official Firmware, please read the entire tutorial once before actually performing it on your device.
Tutorial: Using patched boot image and Magisk
- Download the root image file to your computer (based on the firmware you are currently running).
→ patched_bootOPW27.113-45-4.img – June 2018 Firmware
→ patched_bootOPW27.113-45.img – April 2018 Firmware - Now copy this image file to C:\adb folder where the ADB/Fastboot binaries will be present.
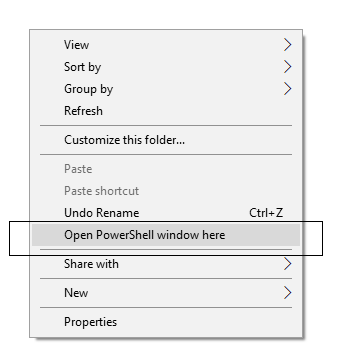
- Press and hold the SHIFT key and do a right-click on an empty space inside the folder.
- You should Select ‘Open PowerShell window here’.
- Connect your phone to the PC with the help of the USB cable.
- Now Boot your device into the Bootloader/Fastboot mode using the following command:
adb reboot bootloader
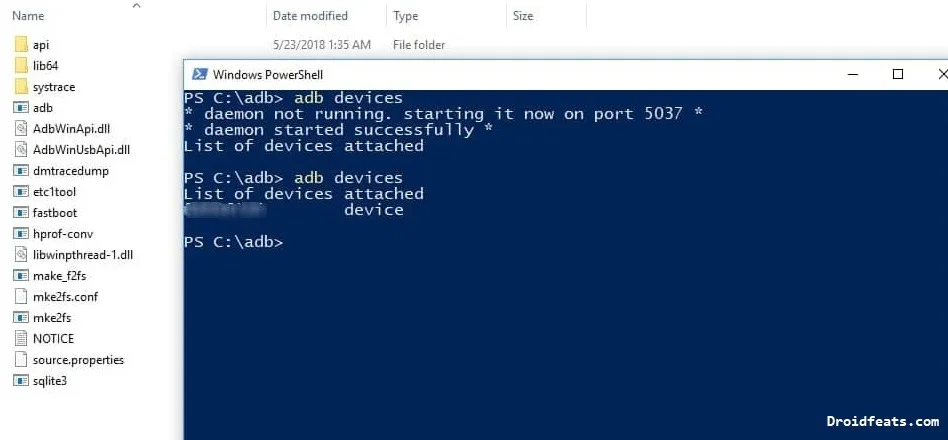
- Make sure that your device is being detected properly using the following command:
adb devices
- The command will return a unique device ID right with the ‘fastboot’ message.
- Install Boot image on the device using the following command:
June 2018 Firmware:fastboot flash patched_bootOPW27.113-45-4.img
April 2018 Firmware:
fastboot flash boot patched_bootOPW27.113-45.img
- Now reboot your device using the following command:
fastboot reboot
- Once the device has restarted, you can verify root status using a root checker app from the Play Store.
That’t it!
Your Moto G6 Plus has been successfully rooted now! You can now install a Custom recovery like TWRP any try some cool Mods like the Viper4Android sound Mod and Xposed Framework.
See also: Top 50+ Android Apps for Rooted Devices in 2019
So you are done with this tutorial! You had successfully rooted your Moto G6 Plus using our guide. If you faced any problem with performing this tutorial, please let us know by dropping a comment below. Our team will reply you back as soon as possible.
Is this post helpful? Please do share it on Social Media to THANK US.


