Are you a music lover? Boost your Android Sound system by modifying with ViPER4Android Oreo — the most famous sound mod for Android devices. This guide will help you in installing ViPER4Android on smartphones running Android 8.0/8.1 Oreo.
ViPER4Android is one of the oldest mods and has been in Android Customization community since long, thanks to zhuhang, a Recognized XDA Developer for developing this sound mod. With this Custom Mod, a user can take the full inbuilt advantage of Audio System on Android phones. It increases the inner potential of the sound system at maximum level by offering some cool equalizer options.
See also: How to install Systemless Xposed (Framework) on Android 8.0/8.1 Oreo
ViPER4Android Audio Effects are beast, and the community is supporting from Gingerbread to Oreo and will get continuous support from the developer for the future version of Android OS. Using this guide, you will be able to install Official ViPER4Android on Android Oreo.
See wallpaper collection:
- Download the HTC U11 Plus Wallpapers — (2880×2880 pixels)
- Huawei P20 [full resolution] Stock Wallpapers — Download here!
- Download the Official Google Pixel 2 [full resolution] Wallpapers
- OnePlus 5T Official Wallpapers — Sandstone White, Lava Red edition
- Download the Redmi Note 5 (Pro) [full resolution] Stock Wallpapers
ViPER4Android Features
The UI of V4A App got quite a lot changes after the Nougat release, and the Menu is now redefined for new users. If you are entirely new to ViPER4Android Audio Effect Mod, and you want to know what audio modification does ViPER4Android offer, check out the quick list below:
- Playback Control: Amplify the output volume of Android devices.
- FET Compressor: Limit the FET circuits to keep your device safe from getting any damage to any sound hardware system.
- Viper-DDC: Enjoy near HIFI sound on your headphones.
- Spectrum Extension: Make your music sound lossless with enhanced high frequencies.
- USB/Dock effect Support: ViPER4Android supports USB/Dock audio output.
- Speaker Optimization: Highly Optimized Speaker for a stunning output of quality audio.
- ViPER Bass: With different bass modes, you can have more excellent bass experience than before!
- ViPER Clarity: With the latest Clarity mode selection, you can balance up heavy bass with high clarity audio that you can never imagine before!
- Headphone Surround+ (VHS+): With this VHS+, V4A made its way to achieve great surround technologies for Android.
- FIREqualizer: 10-band Finite Impulse Response (filter equalizer) for redefining at the top of every audio output.
Like these features? We love it too, and we know you are looking forward using on your Android phone. Read the tutorial below to install ViPER4Android on Oreo. But make sure you don’t have any Custom Mod for sound from before. If it does, please uninstall or remove it before proceeding to the tutorial below!
[alert-warning]WARNING: All the custom ROMs, Official Firmware, How-to guides, tutorials, roots, hacks, and tricks mentioned on our site belong to the respective developers. We are not responsible if anything goes wrong with your device. Perform it at your own risk.[/alert-warning]Popular on Apps:
- Download ViPER4Android FX APK [Guide included] to improve the sound on your Android
- Official Galaxy S9 wallpapers, themes, sounds and apps [port] — download ’em here
- 15 best Android Launcher Apps of 2018 — hand-picked!
- 7 Best Sources for Quad HD Android Wallpapers – (2560×1440 pixels)
- Download Magisk 16.4: the systemless root with Magisk Manager 5.7.0
- Top 40 Android Apps for Rooted Devices in 2018
- Top 10 Best Android Backup Apps – Secure your Data
Software Descriptions
- Version: FX version 2.5.0.5 (active) / XHiFi version 2.1.0.2-1 (discontinued)
- Codename: (FX version) Beautiful / (XHiFi version) X-Factor
- Compiled date: September 1, 2016 / September 4, 2013 – Official Release
- Operating environment: Android 2.3 / 4.0 / 4.1 / 4.2 / 4.3 / 4.4 / 5.0 / 6.0 / 7.0/ 8.0
- CPU platforms: ARM (ARM CortexA8 or higher), x86 (Atom/i3/i5/i7)
- Language: English (US) / Simplified Chinese / Traditional Chinese / more
Things to Remember
- Make sure your phone has at least 80 – 85% charge. If not, please do charge it before starting the experiment.
- Your device must be rooted! If not, find your rooting guide here!
Backup your Android Device
We don’t want you to lose any data, or anything could go wrong unexpectedly. Before starting the tutorial, we strongly recommend you to make a full backup of your phone. If possible, take a full Nandroid Backup via TWRP, or you can try out some of the Hand-Picked Android Backup Apps to secure your data quickly.
Samsung users can use Samsung Smart Switch to backup data on the computer. Smart Switch even allows the users to move data from one device to another of different variant (like moving data of Galaxy S7 to Galaxy S9).
How to Install ViPER4Android on Android 8.1 Oreo
We have mentioned full step-by-step instructions on How to Install ViPER4Android on Android 8.0/8.1 Oreo. If you are entirely new to Custom Mod, please read the entire tutorial once before actually performing it on your device.
The tutorial has been divided into 2 part:
- Pre-setup: setting up the device with BusyBox.
- Mod Setup: ViPER4Android Installation
Pre-setup: Tutorial (Step-by-step)
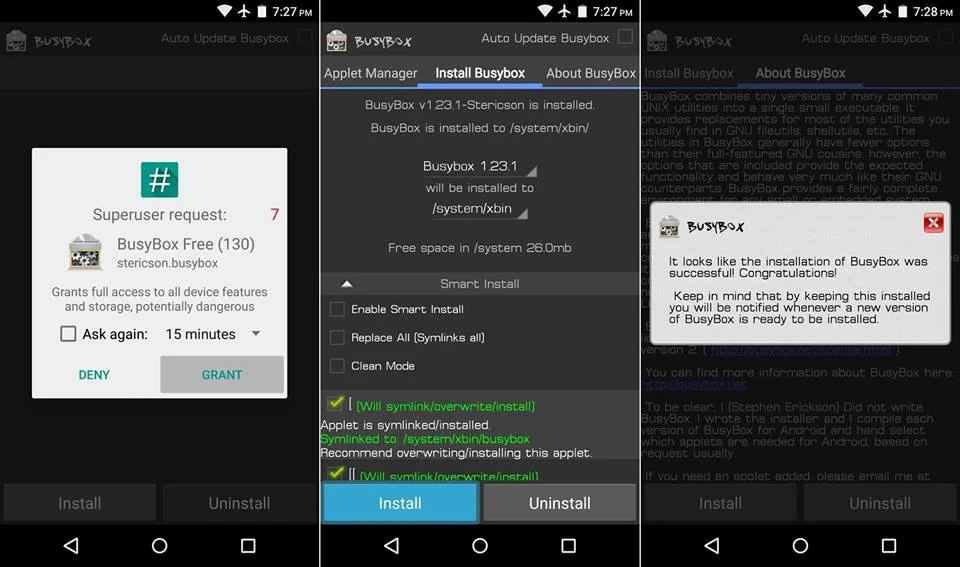
Step 1: Download and Install BusyBox and Install it on your rooted Android Device:
Open the App and grant root permission.

Make sure you install BusyBox properly. Do not modify any option. Leave them as they are!
You will see a success message when the installation is complete (Check Screenshots above).
Step 2: Download and Install Solid Explorer file manager on your device:
Step 3: Swipe out from the left corner of the App screen and “tap” on Root option under the storage section.
The App will ask for Root permission. Just grant them!
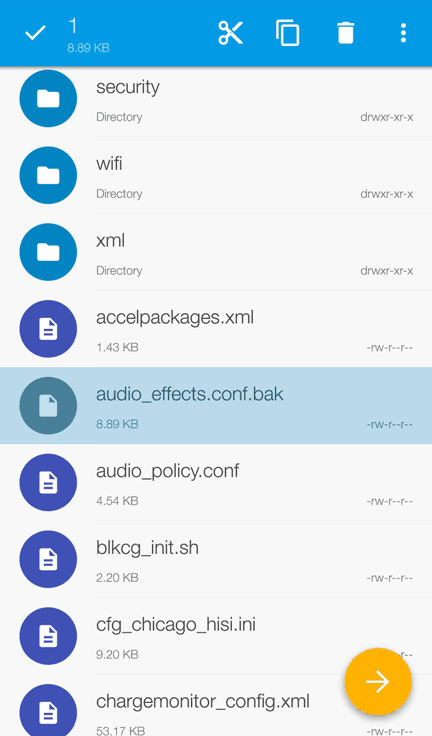
Step 4: Now, navigate to /Vendor/etc. and find the file “audio_effects.conf” inside it.
Step 5: Rename the file to “audio_effects.conf.bak“.
How?
Long press on the file and “tap” on the 3-dot overflow on the top of the right side and select Rename.
Tap “OK” and exit the Solid Explorer application!
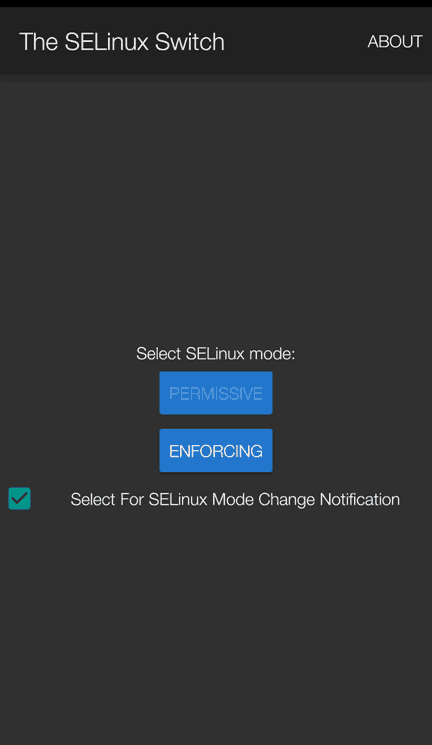
Step 6: Set the SELinux status as Permissive. To do that, Download the SELinux Switch App from below and install it on your device.
[mks_button size=”medium” title=”Download The SELinux Switch App” style=”squared” url=”https://forum.xda-developers.com/devdb/project/?id=22073#downloads” target=”_blank” bg_color=”#1e73be” txt_color=”#FFFFFF” icon=”fa-android” icon_type=”fa” nofollow=”1″]
Now, Open the App and grant the Root permission. Then, press “Permissive” Button to set the SELinux status as required.
Step 7: Reboot your device after performing the Step 6.
That’s it! Your device is now set to Install ViPER4Android Oreo. Continue reading below to finalize the Mod.
Mod Setup: Install ViPER4Android Oreo
Step 1: Download ViPER4Android Oreo Zip Package from the link below and extract it on your computer:
[mks_button size=”medium” title=”Download ViPER4Android FX 2.5.0.5″ style=”squared” url=”http://www.mediafire.com/file/xonl4jha2e4vez1/ViPER4Android_FX_v2505.zip” target=”_blank” bg_color=”#1e73be” txt_color=”#FFFFFF” icon=”fa-download” icon_type=”fa” nofollow=”1″]
You will get the following 2 files:
- ViPER4Android_FX_v2505_A4.x-A7.x.apk
- ViPER4Android_FX_v2505_A7.x_Nougat_IO_test_fix.apk
We only need the second one — (ViPER4Android_FX_v2505_A7.x_Nougat_IO_test_fix.apk)
Step 2: Connect your device to your computer using USB Cable and and transfer the second file to phone internal storage. Make sure your PC has Android USB Driver installed. Otherwise, your device will not recognized by the system.
Step 3: Now, install the APK file from your phone internal storage and open it.
Step 4: Once you open the App (ViPER4Android), it will ask for updating the V4A driver. Confirm by tapping on “Yes” and grant root permission to it.
The driver installation should start, and it will take 30-60 seconds to complete. Your phone screen may get a freeze. Don’t worry about that.
Once the driver installation is completed, tap on “OK” and reboot your device.
Step 5: Once the device is ON, open ViPER4Android again and swipe out from the left to open the menu.
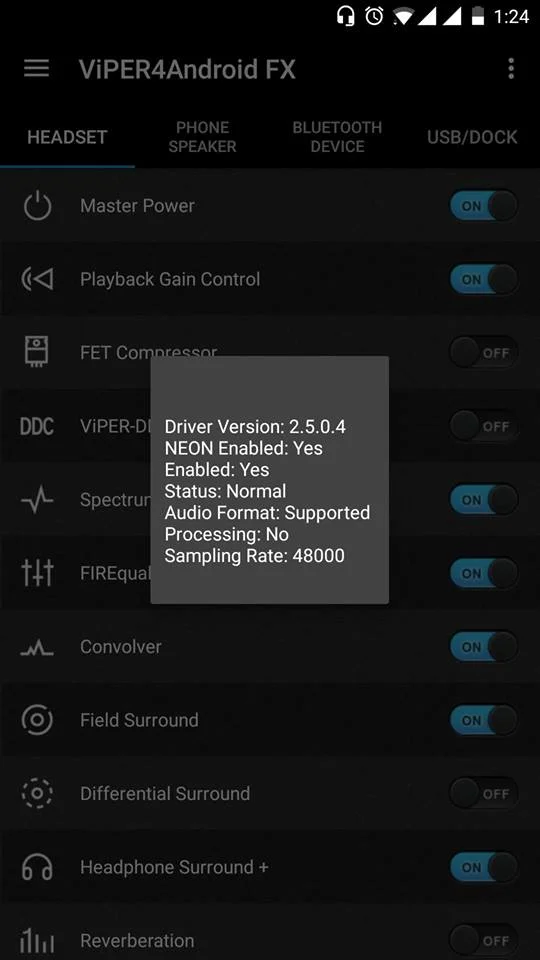
Step 6: Confirm the driver status — Tap on “Driver Status”, and it should show the status value as normal.
Hurray! You are done with setting ViPER4Android Oreo on your device.
You can now enjoy the soothing and enhanced audio experience on your device running Android 8.0/8.1 Oreo. Now you can Modify the sound setting of your phone in the way you like.
Sponsored: If you want to try the alternate of Viper4Android then you can make use of Dolby Atmos APK for increasing the audio on your phone.
If you encounter any problem, please comment below, and we will get back to you as soon as possible.
Please don’t forget to share if you have found this post helpful!


![Download Nothing Phone 3a GCam Port [Most Compatible Version] Download Nothing Phone 3a GCam Port [Most Compatible Version]](https://static.droidfeats.com/wp-content/uploads/2025/04/Nothing-Phone-3a-450x254.webp)
![Download Redmi 9a GCam Port [Most Compatible Version] Download Redmi 9a GCam Port [Most Compatible Version]](https://static.droidfeats.com/wp-content/uploads/2025/03/Redmi-9a-GCam-Port-sample-450x245.webp)
8 Comments
Hi, I have an issue, when I install the driver and reboot the phone when I open the app it shows the same message (install the driver) again and I have tried many times and always the same message and the driver does not install.
Hi
I followed your instructions and everything worked until I tried to install drivers. It came up with an error message – “Driver install failed: I/O error, please reboot and try again.”
Ive tried rebooting and nothing has worked. Please advise. Thanks
I have no audio_effect.conf file only audio_effect.xml file. renaming it (or not) will give an I/O error while installing drivers… Do you have a solution for this?
“driver installed, please reboot your device”. Rebooting, and then the same message appear. I need to install/update the driver. Repeat 24/7. :/
“setting up the device with Gravity Box”
maybe BusyBox?
Hi, thank you so much for correcting me.
Yeah, it is BusyBox.
I use first and second manual on the my Huawei Mate 10 with EMUI 10 software 8.0.0.141 and Viper is NOT working 🙁
Can you elaborate on your problem? What’s the error?