A complete guide on How to Install TWRP Custom Recovery on Samsung Galaxy S9 is here. This is an exclusive tutorial for the Samsung’s 2018 flagship.
After the launch of Galaxy S9 and S9 Plus, Samsung released the Kernel source officially for both the device. This boost the Developer community to start working on this device. TWRP has been released for both the devices by a recognized XDA Developer jesec, a key element in getting Custom ROM development, modders and tinkerers.

A Custom Recovery like TWRP is significant for the entire number of reasons when it comes to the development of Custom ROMs and Mods. Without a Custom Recovery, it’s completely impossible to flash a Custom ROM as the OEM restrict installing non-official software via stock recovery.
Now, Android enthusiasts can extend the control over this phone.
See also: Download the Huawei P20 [full resolution] Stock Wallpapers here!
As you continue reading below, we will guide you on How to Install Official TWRP Custom Recovery on Samsung Galaxy S9 and S9 Plus.
We have made sure that we will give enough details of each step so that a first time user won’t get confused. Read further to find out How to TWRP Custom Recovery on Galaxy S9/S9 Plus.
See also: 15 best Android Launcher Apps!
This tutorial is for Exynox Edition ONLY. The only restriction currently is that TWRP is not available for Snapdragon Edition, thus leaving some American users in the dark. This is because of the Snapdragon backed Galaxy S9/S9+ is carrier-locked, and it’s quite difficult to unlock the bootloader of American Edition.
See also:
- Install One UI Android Pie on Galaxy S9/S9+ [all variant] 9.0 beta
- Download Galaxy S9/S9 Plus Update: Android 8.0 Oreo (Official) timeline
- Update Galaxy S9 to Project Treble ROM [Android 8.1] — Oreo Firmware
- Official Galaxy S9 wallpapers, themes, sounds and apps [port] — download ’em here
If this is the first time you are installing a Custom ROM or an Official Firmware, we understand that you would want to make sure everything goes smooth. So before actually performing anything on your device, make sure that you have backup all your Data, to be on a safe side. No one knows, when anything goes wrong!
WARNING: All the custom ROMs, Official Firmware, How-to guides, tutorials, roots, hacks, and tricks mentioned on our site belong to the respective developers. We are not responsible if anything goes wrong with your device. Perform it at your own risk.
Let’s proceed with the tutorial below! We have covered an entire steps-by-steps tutorial with all necessary tools (download links are given below, keep reading to grab and install).
We have written the guide very carefully so that you don’t get stuck during the installation process.
You can quickly install TWRP Custom Recovery on Galaxy S9/S9+ using the tutorial below!
See also: How to Root Samsung Galaxy S9 and S9 Plus [all variant]
TWRP for Galaxy S9/S9+ Details
Team Win Recovery Project (TWRP in short) is the most famous recovery for android which opens the door to modify our phone in the way we like. This recovery provides the advanced options like system partition, making Nandroid backups, wipe cache/dalvik etc.
TWRP recovery built with ease of use and customization in mind. The graphical user interface is also XML driven which is completely customizable – where you can change the theme or colour of recovery screen.
Samsung Galaxy S9 and S9 Plus got a lot of developments due to its popularity. The phone will be getting a huge number of custom ROMs based on Android Oreo and Android P. You will be able to install most of the ROM via this TWRP recovery.
So, you can enjoy the added benefits of this latest TWRP custom recovery on your phone.
Supported models
As mentioned above, TWRP Custom Recovery is currently available only for Exynox Edition. To make sure you own the correct Samsung Galaxy S9 and S9 Plus model with Exynos chipset, please confirm your variant from the list below:
Samsung Galaxy S9
- G960F (Exynos 9810)
- G960N (Exynos 9810)
- G9608 (Exynos 9810)
- G960FD (Exynos 9810)
Samsung Galaxy S9 Plus
- G965F (Exynos 9810)
- G965N (Exynos 9810)
- G9658 (Exynos 9810)
- G965FD (Exynos 9810)
Proceed to the tutorial below, ONLY if you own any of the above-mentioned Galaxy S9 or S9 Plus models.
If you are not sure with your model number, go to Settings > System > About phone on your device to confirm the variant model.
Galaxy S9/S9+ USB Driver
Make sure you have correctly installed Samsung USB Driver on your computer. If not, please download it from our USB Driver Section below and install it correctly. Otherwise, your computer will not detect your device.
Backup your Android Device
We don’t want you to lose any data, or anything could go wrong unexpectedly. Before starting the tutorial, we strongly recommend you to make a full backup of your phone. You can try out some of the Hand-Picked Android Backup Apps to secure your data quickly.
Samsung users can use Samsung Smart Switch to backup data on the computer. Smart Switch even allows the users to move data from one device to another of different variant (like moving data of Galaxy S7 to Galaxy S8).
Points to Remember
-
- Make sure your phone has at least 80 – 85% charge. If not, please do charge it before starting the experiment.
- This tutorial will WIPE OUT all your DATA. Make sure to create a Backup of everything before starting the tutorial.
- This tutorial is only for Galaxy S9 and S9 Plus. Please don’t try in other Samsung Models.
- You need to enable USB Debugging mode to connect your Android phone to computer. (Settings > About Phone > Build number > Tap it 7 times to become developer; Settings > Developer Options > USB Debugging).
- This tutorial works on Galaxy S9/S9+ running Android 8.0 Oreo and all future updates.
HOW TO: Install TWRP Custom Recovery on Galaxy S9/S9+
We have written full step-by-step instructions on How to install TWRP recovery on Samsung Galaxy S9 and S9 Plus. If you are entirely new to rooting, flashing a Custom ROM or an Official Firmware, please read the entire tutorial once before actually performing it on your device.
TUTORIAL: (Step by Step Guide)
Step 1: Download the following files and save these anywhere on your computer:
Official TWRP from the Links below:
(Choose the latest .tar image from the list)
No DM-Verity from the links below:
- dm-verity and force encryption disabler zip: link!
Odin (Samsung Flashtool) from the link below:
- Odin Software for PC: link!
Step 2: Go to the Download/Odin mode on your phone.
How?
Press and HOLD [Volume Down] + [Bixby] +[Power] buttons together, and wait for 15 seconds (approx.)
read the warning carefully…!
Press [Volume Up] button to enter to the download mode.
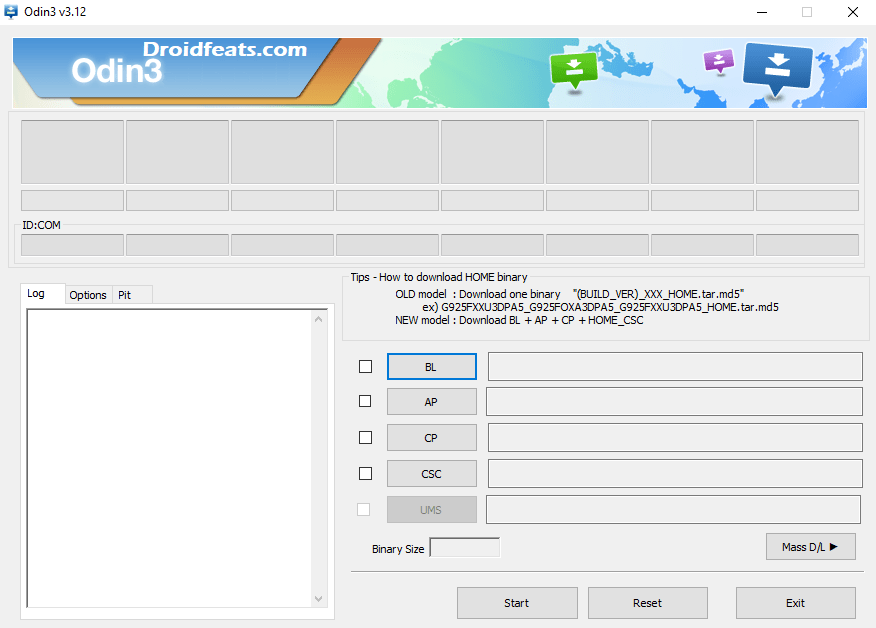
Step 3: Open Odin on your computer. Connect your device to your computer using USB cable while in Download mode.
Step 4: Odin must recognize your phone. If your computer detects the phone correctly, one of the ID:COM boxes will turn yellow with the COM port number.
You will see “Added!!” message is appearing in the Log box. This might take some minutes.
Step 5: Load the TWRP .tar file into the Odin. You need to select the file that you had downloaded in step 1.
- Click on ‘AP’ and select file with ‘.tar’ in its name.
Step 6: In Odin, uncheck Auto Reboot and check F. Reset Time options (if not already).
Step 7: Hit the Start button in the Odin. Installation process would start now, and it will take a couple of minutes to finish.
Step 8: Once the installation is completed, press and hold [Power], [Volume Down] and [Bixby] Button until the screen turns black.
Step 9: Once it does, release [Volume Down] button and hold the [Volume Up] button while still pressing the [Bixby] button.
This will boot your Galaxy S9/S9+ into recovery mode. You could now see the interface of TWRP Custom Recovery on your device.
On the first boot, TWRP will ask you to modify the system. Just decline it!
Step 10: You should connect your phone to PC and copy the No DM-Verity zip file to your internal storage!
Step 11: Go to TWRP home screen > Install > Install Image.
(Check Kernel and Boot partition).
From there, choose the boot image file that you had copied, and confirm installation.
Step 12: Reboot your device and you are done!
Hurray! Your Galaxy S9 or S9 Plus should have got TWRP Custom recovery installed by now. You can try out some of the best Custom ROM from our list on your phone.
How to make TWRP recovery permanent on Galaxy S9 and S9 Plus
There is an auto recovery restore system in Samsung Galaxy S9/S9+ Official Firmware. Whenever you restart your device, stock recovery keeps showing up. To get rid of this, do the following steps below:
NOTE: Your Galaxy S9/S9+ must be rooted to perform this.
Simply rename or remove the following files from /system directory.
/system/recovery-from-boot.p
/system/etc/install-recovery.sh
This will override the stock recovery with TWRP. You can delete this file using ES File Manager (by enabling root access on it). That’s it!
Any Problem?
If you encounter any problem, please comment below, and we will get back to you as soon as possible.
Please don’t forget to share if you have found this post helpful!

![Download Vivo X200 FE GCam Port [Most Compatible Version] Download Vivo X200 FE GCam Port [Most Compatible Version]](https://static.droidfeats.com/wp-content/uploads/2025/07/vivo-x200-fe-in-four-aesthetic-color-options.png-300x179.webp)


